Your WordPress site can look professional and unique without hiring a developer. The built-in customization tools let you adjust colors, fonts, layouts, and nearly every visual element. Whether you’re using the Full Site Editor, a page builder like Elementor, or editing theme files directly, understanding your options helps you create a site that matches your brand and works for your audience.
This guide covers five methods for customizing WordPress themes, from beginner-friendly visual editors to advanced code modifications. You’ll learn when to use each approach, what tools you need, and how to avoid common mistakes that break sites or slow them down.
Table of Contents
- Understanding When (and Why) to Customize Your Theme
- Method 1 – Using the Full Site Editor (FSE)
- Method 2 – Customizing with the Theme Customizer (Classic Themes)
- Method 3 – Design Flexibility with Page Builders
- Method 4 – Editing Theme Files (Advanced Users)
- Method 5 – Creating and Using a Child Theme
- Best Practices for Safe Customization
Understanding When (and Why) to Customize Your Theme
Before you start changing things, understand the difference between themes and plugins. Themes control how your site looks—colors, fonts, layouts, and overall design. Plugins add functionality—contact forms, galleries, eCommerce features, and other tools that make your site do more.
Customizing your theme matters for two big reasons:
- Brand differentiation – Your colors, fonts, and layout choices help visitors recognize your business and remember it later. When your site looks different from the thousands using the same default theme settings, you stand out.
- User engagement – A well-customized theme makes content easier to read, navigation clearer, and calls-to-action more noticeable. Better design keeps visitors on your site longer.
Start with a flexible base theme. Look for themes labeled “customizable” or those that specifically support the Full Site Editor, popular page builders, or WooCommerce if you run an online store. WPZOOM’s Inspiro Premium, for example, works with both block-based editing and Elementor, giving you multiple ways to customize without touching code.
The right foundation theme saves hours of frustration later. Trying to heavily modify a rigid, code-heavy theme often creates more problems than starting with a flexible option designed for customization.
Method 1 – Using the Full Site Editor (FSE)
The Full Site Editor arrived in WordPress 5.9 and changed how we customize themes. Instead of separate tools for headers, footers, and page content, FSE lets you edit everything visually using blocks. If your theme supports block-based editing, this becomes your primary customization tool.
Accessing and Working with FSE
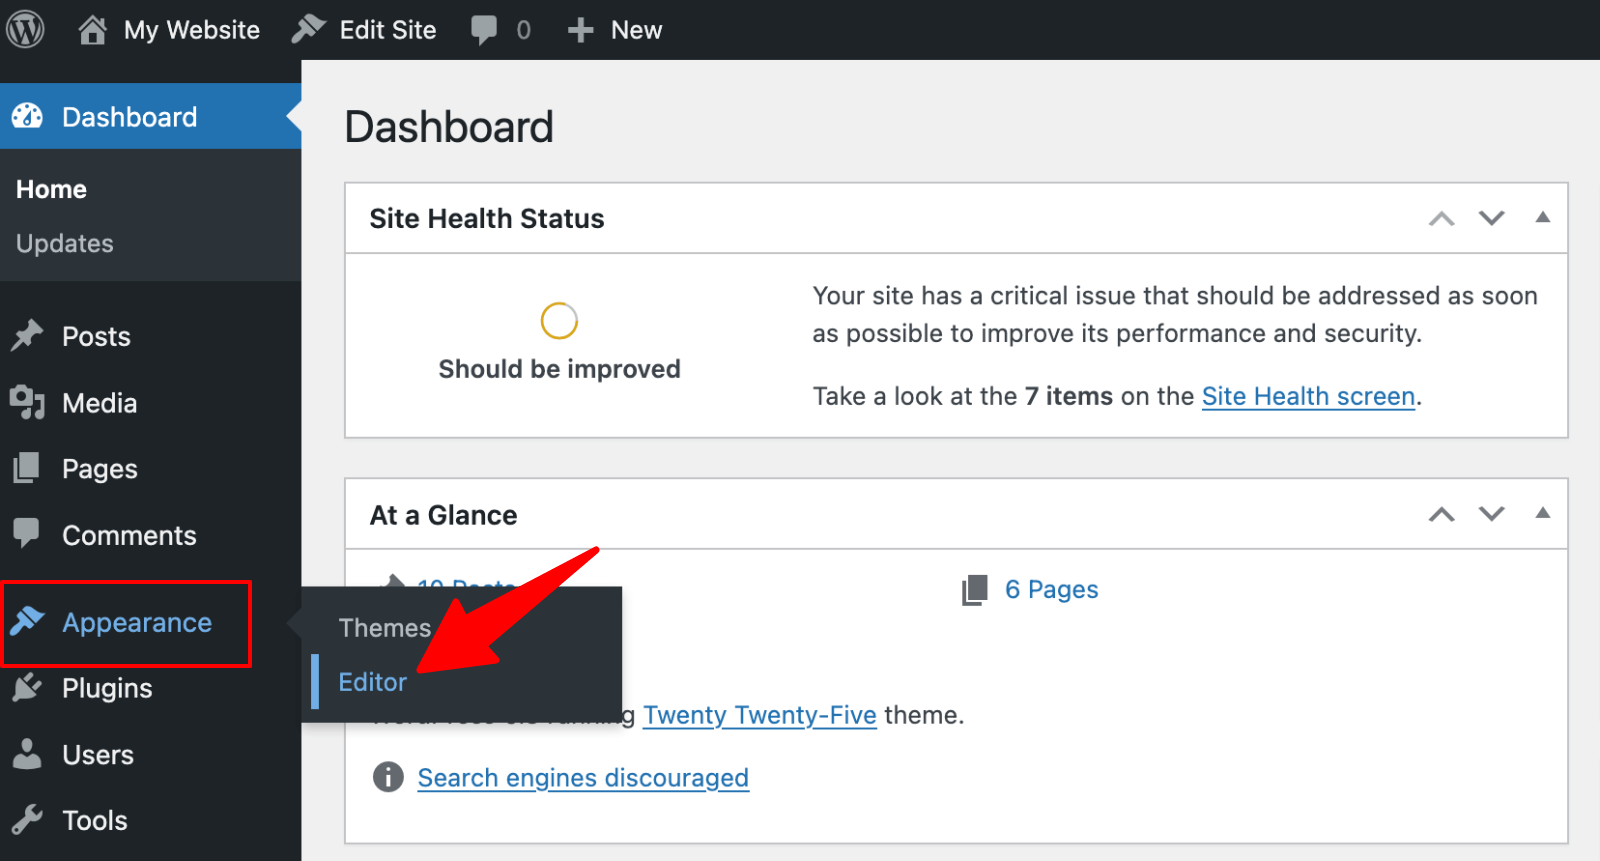
1. Go to Appearance → Editor in your WordPress dashboard
2. You’ll see your homepage with editing controls along the top
3. Click areas to edit them directly—header, footer, sidebar, or main content
4. Add new blocks using the + button, just like editing a regular page
5. Rearrange blocks by dragging them where you want them
6. Change colors, fonts, and spacing using the block settings panel on the right

The Template and Patterns libraries deserve special attention:
- Templates control the structure of different page types—your blog posts, archive pages, and 404 pages all use separate templates. Click “Templates” in the editor to customize these individually.
- Patterns are pre-designed block combinations you can insert and modify—think of them as starter layouts for headers, feature sections, or call-to-action areas.
Why FSE Works (and When It Doesn’t)
FSE benefits are clear. You see exactly what visitors will see while you work, no preview mode needed. Changes happen instantly. You can customize parts of your site that older themes kept locked away in code. And you’re working with Gutenberg blocks, the same system you already know from creating pages and posts.
But FSE only works with block themes. If your theme was built before the block system became standard, you won’t see the Editor option under Appearance. Check your theme documentation to confirm compatibility before planning major customizations around FSE.
📖 Learn more! For more details on this modern approach, read our guide on what are block themes in WordPress.
Tips for better results:
- Save blocks you use repeatedly as reusable patterns—customize once, insert anywhere
- Use the List View (click the icon with three lines) to see your entire page structure at once
- Test your design on different screen sizes using the preview buttons
- Export your templates as backups before making major changes
Method 2 – Customizing with the Theme Customizer (Classic Themes)
If you’re working with a classic theme or prefer the traditional WordPress customization experience, the Theme Customizer remains your go-to tool. You’ll find it under Appearance → Customize in your dashboard. This opens a live preview of your site with a settings panel on the left.

What You Can Control in the Customizer
The exact options depend on your theme, but most customizers include these sections:
- Site Identity – Upload your logo, set site title and tagline, add a site icon (favicon)
- Colors – Choose color schemes for backgrounds, text, links, and buttons
- Typography – Select fonts and adjust sizes for headings and body text
- Menus – Create and assign navigation menus to different locations
- Widgets – Add content blocks to sidebars and footer areas
- Homepage Settings – Choose whether your homepage displays recent posts or a static page
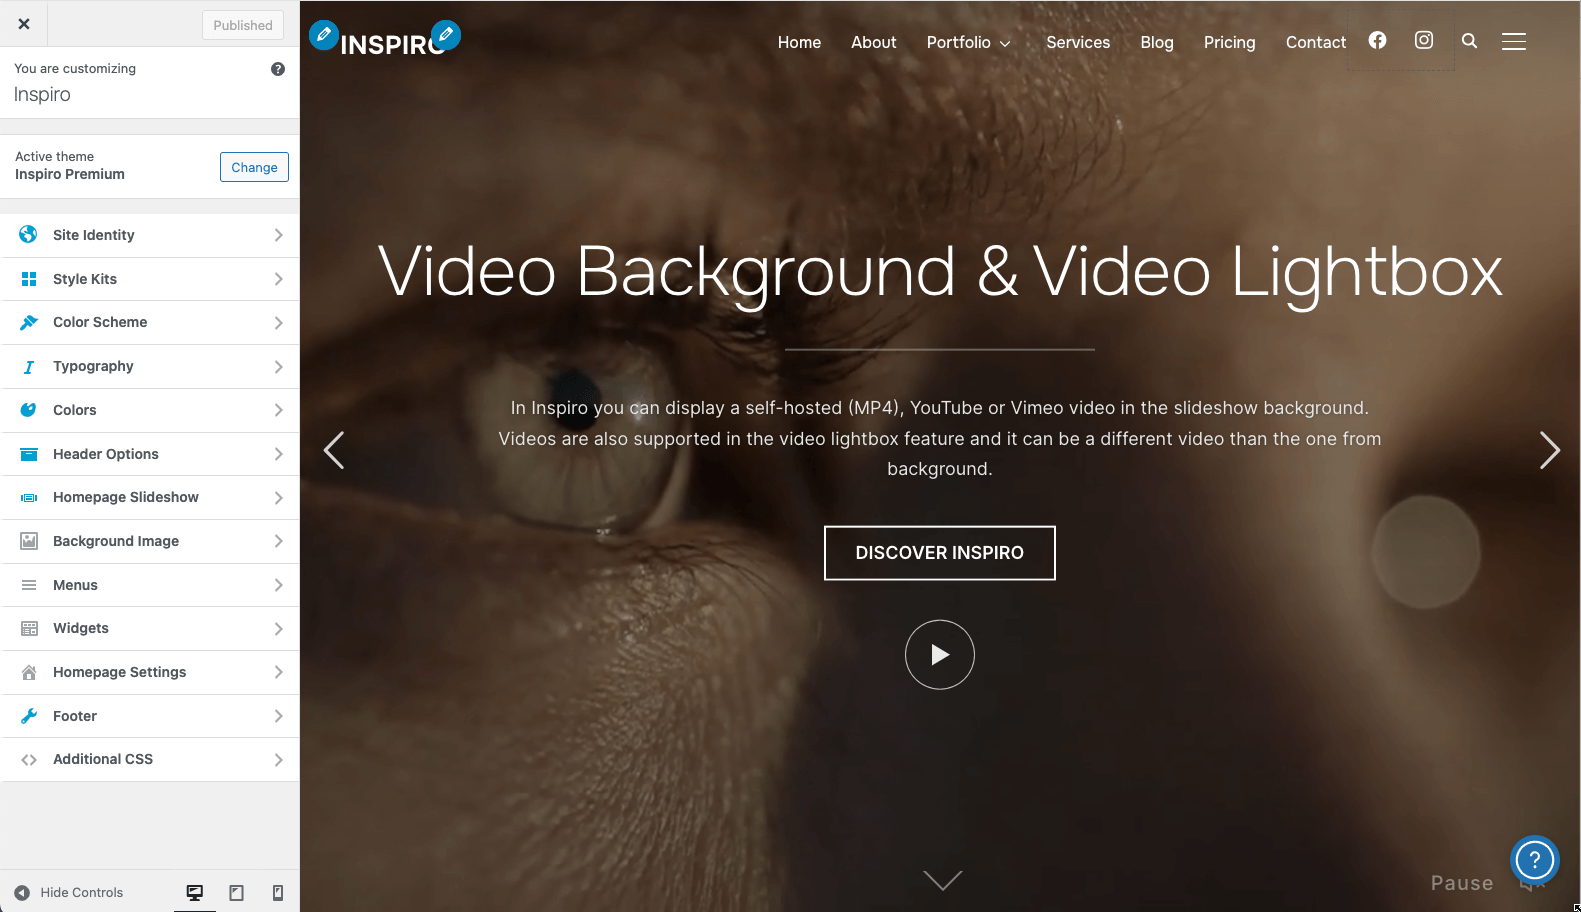
Themes like Inspiro Premium extend the customizer with advanced header and footer builders. These let you add elements like social media icons, custom buttons, or additional menu locations without editing code. You’re still working visually—drag elements into position, click to configure them, and see changes immediately in the preview.
📖 Learn more! If you need to customize these specific areas, check out our tutorials on how to edit the header in WordPress and how to edit the footer in WordPress.
The Additional CSS box gives you quick styling power. Click “Additional CSS” at the bottom of the customizer panel to add custom styles that override your theme’s defaults.
Your changes apply immediately in the preview. When you’re satisfied, click “Publish” to make them live. The customizer saves everything in your database, not your theme files, so updates won’t erase your work.
⚡ One warning: don’t confuse Additional CSS with full theme editing. Complex layout changes still require page builders or template modifications. Use Additional CSS for quick tweaks like adjusting spacing, changing colors, or hiding specific elements.
Upgrade Your Website with a Premium WordPress Theme
Find a theme that you love and get a 10% discount at checkout with the FLASH10 code
Choose your theme
Method 3 – Design Flexibility with Page Builders
Page builders transform WordPress into a drag-and-drop design tool. You build layouts by dragging elements (text boxes, images, buttons, forms) onto your page and positioning them exactly where you want. No code required, and you get precise control over every detail.
Popular Page Builder Options
Popular options include:
- Elementor – The most widely used page builder, with a free version covering basic needs and a Pro version adding templates and advanced widgets.
- Divi – A complete theme and builder system from Elegant Themes, known for its visual builder that works on the front end
- SeedProd – Focuses on landing pages and complete theme building, popular for creating custom WordPress themes without coding
- Beaver Builder – Developer-friendly option with clean code output and solid reliability
Building Your First Page with Elementor
Building a page with Elementor (step-by-step):
1. Install and activate the Elementor plugin from your WordPress dashboard
2. Edit any page and click the “Edit with Elementor” button

3. You’ll see your page with a widgets panel on the left and your content in the center
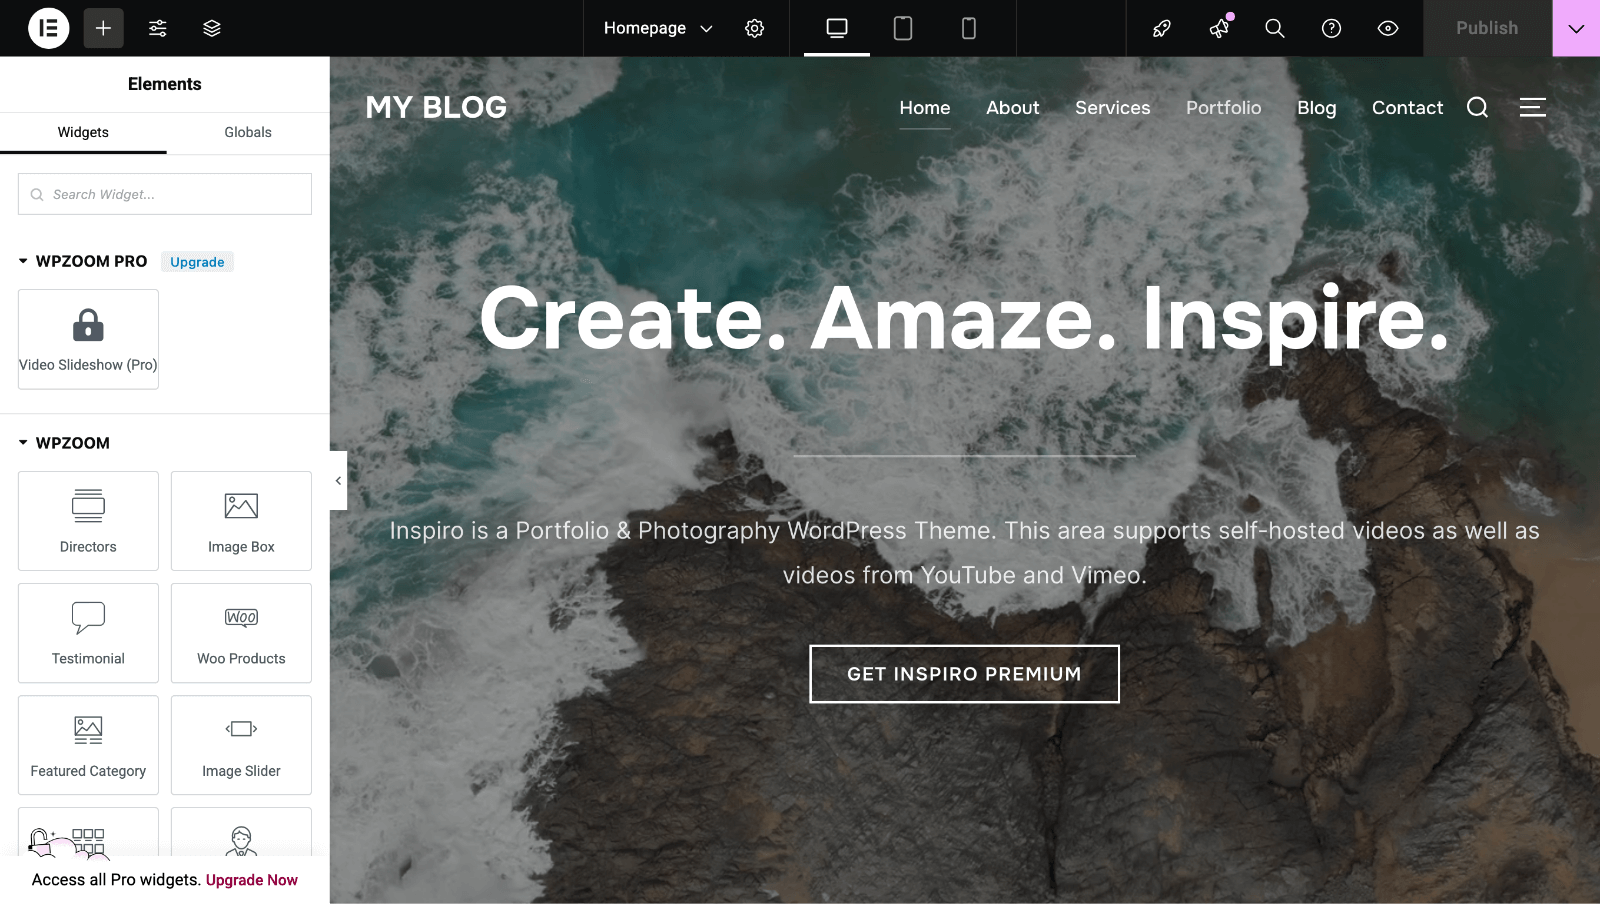
4. Drag widgets from the left panel onto your page—headings, text blocks, images, buttons, whatever you need
5. Click any element to open its settings panel and adjust colors, sizes, spacing, and other properties
6. Change layouts by dragging elements to different positions or switching to different column structures
7. Preview your page on desktop, tablet, and mobile using the bottom toolbar
8. Click “Publish” when finished
Elementor works with most themes, though some integrate better than others. The free version handles basic page building. Elementor Pro adds theme-building capabilities—you can design custom headers, footers, and post templates that apply across your entire site.
The Tradeoffs of Using Page Builders
Page builders let you achieve professional designs without hiring developers. You get precise control over layouts that the standard WordPress editor can’t match. Many include template libraries so you start with professional designs rather than blank pages.
But there’s a tradeoff. Switching page builders later means rebuilding your layouts. Each builder uses its own shortcodes and custom markup. If you build fifty pages with Elementor, then switch to Divi, you’ll need to recreate those pages. Choose your builder carefully and stick with it.
Page builders also add code to your site. A well-optimized builder like Elementor minimizes this impact, but pages built with builders typically load more scripts than basic WordPress pages. Use caching and optimization to keep your site fast.
📖 Learn more! For more tips, read our guide on WordPress speed optimization.
Method 4 – Editing Theme Files (Advanced Users)
Direct file editing gives you ultimate control over your theme’s appearance and behavior. But it requires technical knowledge, carries real risks, and usually isn’t necessary.
⚡ Important! Only consider this method if you’re comfortable with CSS and PHP, understand WordPress template hierarchy, and have specific customizations that other methods can’t achieve.
The Theme File Editor (Appearance → Theme File Editor) lets you edit files directly in WordPress.

Most developers recommend against using it. One syntax error in functions.php can crash your entire site, and the editor provides no safety net. Use a proper code editor like VS Code on your computer, test changes locally, then upload via FTP.
Safety Checklist Before Editing Code
Before you edit theme files:
- Know CSS and PHP syntax—mistakes can break your site entirely
- Set up a local or staging environment for testing (never edit live sites directly)
- Back up your entire site, especially your database and theme files
- Understand that theme updates will overwrite your changes unless you use a child theme
- Consider whether page builders or plugins could achieve the same result more safely
Here’s why this matters: when you edit a theme file and the theme updates, your changes disappear. The update replaces every file with the new version. That’s why child themes exist—they prevent this exact problem.
Version control helps track what you’ve changed. Tools like Git let you save snapshots of your code, compare versions, and roll back mistakes. If you’re editing theme files regularly, version control stops “I broke something but don’t know what” problems.
For most people, page builders and customizer options handle everything they need. Save direct file editing for specialized situations that truly require it.
Understanding Theme File Structure
The key files:
- style.css – Contains all your theme’s CSS rules that control colors, fonts, spacing, and layout
- functions.php – Adds functionality to your theme through PHP functions and hooks.
- Template files (header.php, footer.php, single.php, etc.) – Control the structure and HTML output of different page types
Method 5 – Creating and Using a Child Theme
A child theme inherits everything from its parent theme while letting you modify specific parts without risking your changes during updates. When the parent theme updates, your child theme customizations remain untouched. This makes child themes essential for anyone editing theme files directly.
Your child theme sits in its own folder alongside the parent theme. It contains only the files you want to modify—typically style.css and functions.php at a minimum. WordPress loads the parent theme first, then applies your child theme files on top, overriding any matching elements.
When you modify files—adding CSS to style.css or copying and editing template files from the parent theme—your changes stay safe during parent theme updates.
Copy only the template files you actually need to modify. If you want to change your header, copy header.php from the parent theme to your child theme folder, then edit that copy. Leave everything else in the parent theme. This keeps your child theme lean and reduces conflicts.
When you customize using the Full Site Editor, Theme Customizer, or page builders, you typically don’t need a child theme—those tools store customizations in your database, not theme files. Child themes matter when you’re editing CSS, PHP, or template files directly.
📖 Learn more! For a complete walkthrough, see our detailed guide on how to create a WordPress child theme.
Best Practices for Safe Customization
Smart customization habits prevent headaches. Follow these practices whether you’re using FSE, page builders, or editing code.
- Back up your site before making changes. Use a plugin like UpdraftPlus or your host’s backup tool. Get a complete backup—files and database. If something breaks, you can restore everything in minutes rather than spending hours troubleshooting. Schedule automatic backups to run daily or weekly, depending on how often you update your site.
- Test changes on a staging site rather than your live site. Many hosts offer one-click staging environments that clone your site. Make your customizations there, check everything works, then push changes to production. This prevents visitors from seeing broken layouts or error messages while you experiment.
- Avoid editing code when you have alternatives. Page builders, customizer options, and plugins handle most customization needs more safely than direct code editing. Only touch theme files when no other method works for your specific requirement. And when you do edit code, use a child theme.
- Use version control if you’re modifying theme files regularly. Git tracks every change you make, lets you compare versions, and makes rolling back mistakes simple. GitHub Desktop provides an easy interface if command-line Git feels intimidating. Commit changes with descriptive messages so you know exactly what each modification did.
- Test responsive design on actual devices. Desktop preview modes help, but nothing beats checking your site on a real phone and tablet. Text that looks perfect on your monitor might be too small on mobile. Buttons might be too close together for finger taps. Load your site on your phone throughout the customization process. For detailed guidance on image optimization, check our article on WordPress image sizes best practices.
- Prioritize accessibility. Use high-contrast color combinations so text stays readable. Choose fonts at least 16px for body text. Add alt text to every image. Ensure your site works with keyboard navigation, not just mouse clicks. Screen readers need semantic HTML—use proper heading hierarchy (H1, H2, H3) and descriptive link text instead of “click here.”
- Follow WordPress coding standards when writing custom CSS or PHP. Proper indentation, consistent naming conventions, and clear comments make your code maintainable. You’ll thank yourself six months later when you need to modify something and can’t remember why you wrote it that way.
These practices become habits quickly. They take slightly more time upfront but prevent disasters that waste far more time fixing.
Ready to Customize With Confidence?
Try Inspiro Premium, a WordPress theme designed for complete customization flexibility. Inspiro Premium works seamlessly with the Full Site Editor and Elementor and includes powerful built-in header and footer builders. You get professional design options, video background support, WooCommerce integration, and responsive layouts that look stunning on every device.
Inspiro Premium gives you the customization tools you need without forcing you into one editing method. Choose your preferred approach—blocks, page builder, or code—and create a site that truly represents your brand. No bloat, no complexity, just smart customization that works the way you do.
Explore Inspiro Premium features and see how easy WordPress customization can be.