WordPress plugins are powerful tools that let you add new features and improve your site without writing a single line of code. Whether you want to boost SEO, add contact forms, improve site speed, or start an online store, there’s a plugin for it.
If you’re new to WordPress, learning how to install a WordPress plugin will unlock the platform’s true potential.
In this guide, we’ll walk you through WordPress plugin installation using four different methods — from the simplest dashboard method to advanced options like FTP/SFTP and WP-CLI. We’ll also cover common plugin installation issues and how to fix them, so you can get your plugins up and running quickly.
Table of Contents
- Before You Start: WordPress.com vs WordPress.org
- Method 1: Install a WordPress Plugin via the Dashboard
- Method 2: Install a WordPress Plugin from a ZIP File
- Method 3: Manually Install a WordPress Plugin via FTP/SFTP
- Method 4: Install a WordPress Plugin via WP-CLI
- Troubleshooting Common Plugin Installation Issues
Before You Start: WordPress.com vs WordPress.org
Before you begin installing plugins, it’s important to understand the difference between WordPress.com and WordPress.org, as it directly affects what you can do.
If your website runs on WordPress.com, plugin installation is restricted unless you’re on the Business plan or higher. Free and lower-tier plans don’t allow adding custom plugins, so you’ll be limited to the built-in features and the approved marketplace.
On the other hand, a self-hosted WordPress.org site offers complete flexibility. As soon as you install WordPress on your own hosting account, you can add any free or premium plugin without limitations. This is the preferred option for businesses, bloggers, and developers who want full control over their websites.
If you’re unsure which version you’re using, check your hosting provider or WordPress dashboard. Knowing this before you start will save time and prevent frustration when following the installation steps in this guide.
Method 1: Install a WordPress Plugin via the Dashboard
The easiest way to install a plugin is directly from the WordPress dashboard using the built-in search feature. This method works for any plugin available in the WordPress plugin directory and is ideal for beginners.
Step-by-step instructions:
1. In your WordPress admin area, go to Plugins → Add New.
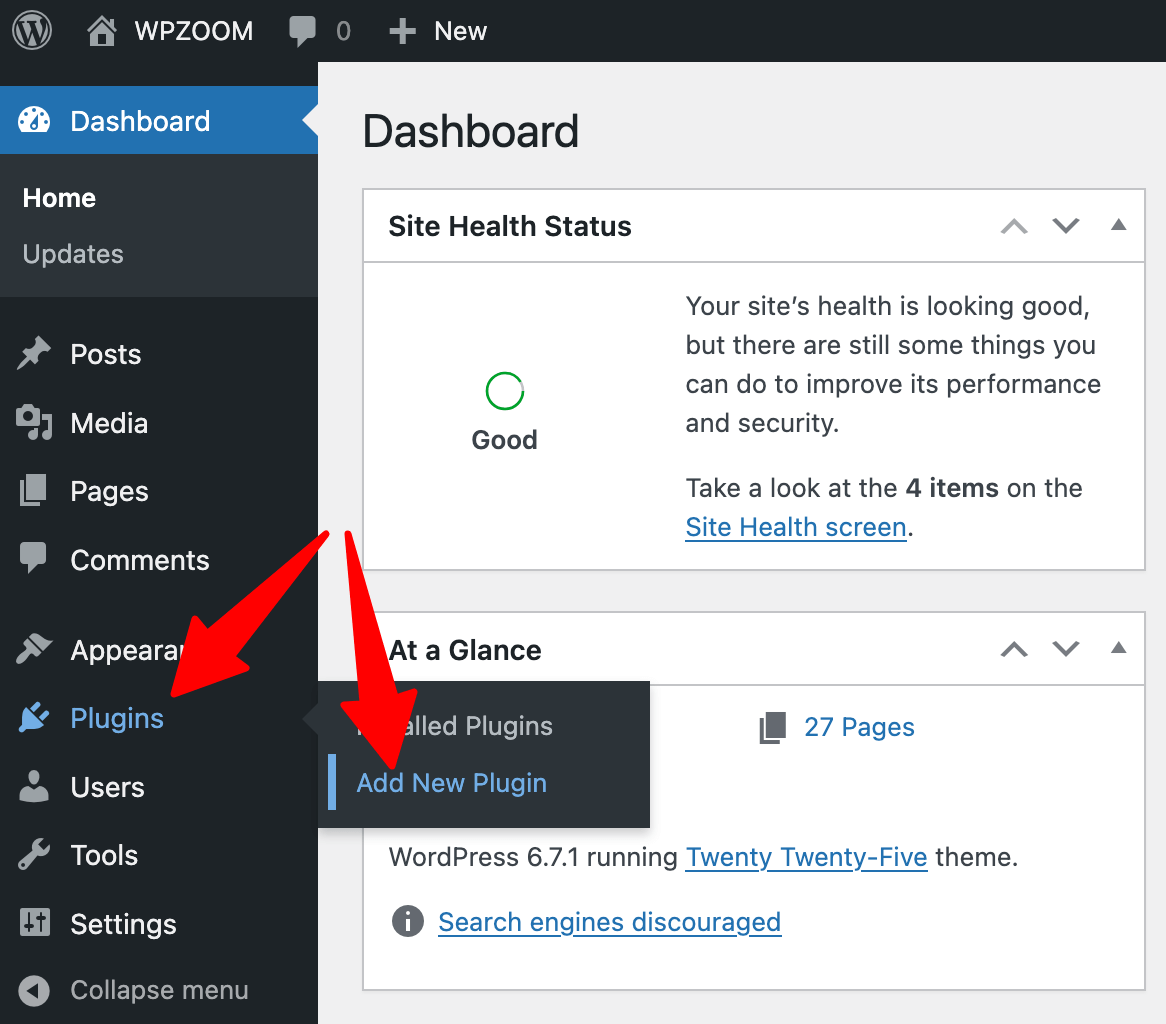
2. Use the WordPress plugin search bar on the top right to find the plugin you need by name or functionality (e.g., “SEO,” “contact form”). Let’s say you want to add a contact form to your website. Search for WPZOOM Forms, our popular free contact form plugin.
3. Locate the plugin in the search results and click Install Now.

4. Once installation is complete, click Activate to start using the plugin.
The plugin will appear in your dashboard menu, ready for configuration.
Notes:
- This method only works for free plugins listed in the WordPress repository.
- After activation, some plugins add their own settings page in the dashboard; others integrate into existing menus.
- If you can’t find a plugin in search, it may be a premium product that requires manual upload (see Method 2).
Installing plugins via the dashboard is quick, requires no technical skills, and is the most common approach for beginners.
Upgrade Your Website with a Premium WordPress Theme
Find a theme that you love and get a 10% discount at checkout with the FLASH10 code
Choose your theme
Method 2: Install a WordPress Plugin from a ZIP File
Some plugins—especially premium WordPress plugins—are not listed in the WordPress plugin directory and must be installed manually. In this case, you’ll need the plugin’s ZIP file, which you can typically download after purchase.
Step-by-step instructions:
1. If you purchase a paid WordPress plugin like WPZOOM Forms PRO, the developer will send you a download link or provide access via your account dashboard. Download the plugin’s ZIP file.
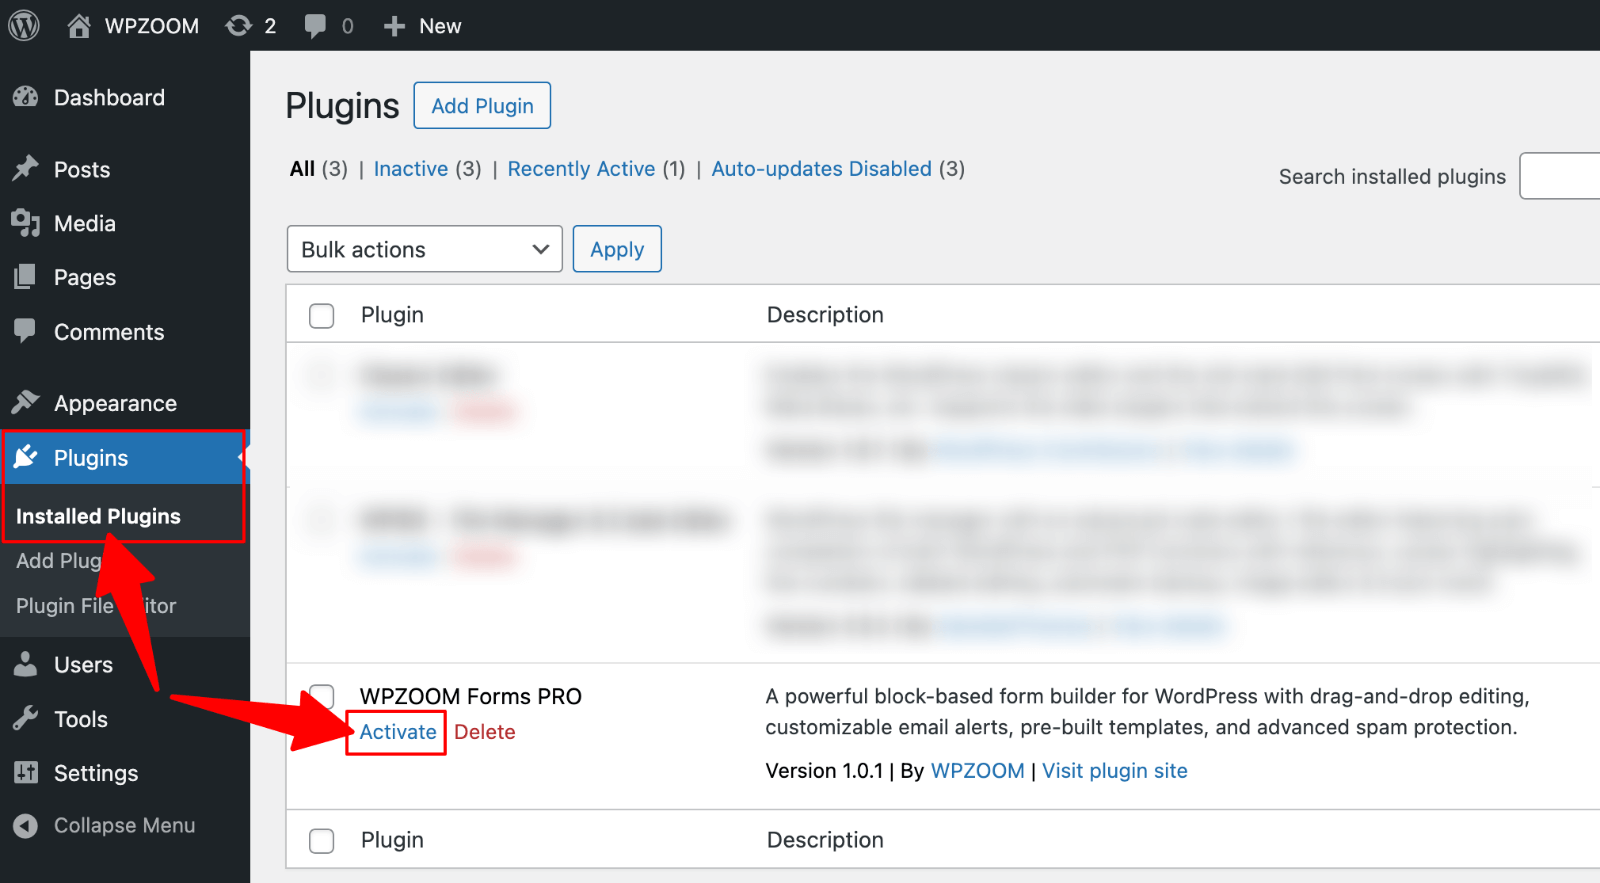
2. In your WordPress dashboard, go to Plugins → Add New.
3. Click the Upload Plugin button at the top of the page.
4. Select the ZIP file from your computer and click Install Now.

5. Once installation is complete, click Activate Plugin to enable it.
After installation, the plugin may prompt you for an API key or license code to unlock premium features and receive updates.
Notes:
- Always download plugins from reputable sources to avoid security risks.
- Keep your ZIP file as a backup in case you need to reinstall the plugin.
- For security and compatibility, ensure your WordPress and PHP versions meet the plugin’s requirements.
This method is essential for installing premium tools that offer advanced functionality beyond what’s available in the free repository. It’s quick, straightforward, and requires no FTP access—just a valid ZIP file and a few clicks in the dashboard.
Method 3: Manually Install a WordPress Plugin via FTP/SFTP
If you can’t install a plugin from the dashboard—due to file size limits, permission restrictions, or server settings—you can upload it manually using FTP or SFTP. This method gives you direct access to your site’s file structure.
Step-by-step instructions:
1. Download and extract the plugin ZIP file on your computer. You should see a folder containing the plugin’s files.
2. Install an FTP client such as FileZilla and connect to your web server using your FTP or SFTP credentials (provided by your hosting provider).
3. In the FTP client, navigate to your site’s /wp-content/plugins/ directory.
4. Upload the extracted plugin folder into the /plugins/ directory.

5. Once the transfer is complete, log in to your WordPress dashboard.
6. Go to Plugins → Installed Plugins, locate the newly uploaded plugin, and click Activate.
Once activated in the dashboard, it will function the same as a plugin installed through the dashboard interface.
Notes:
- FTP (File Transfer Protocol) is unencrypted, while SFTP (Secure File Transfer Protocol) encrypts the connection—making it the preferred method for security.
- If you receive a “permission denied” or “cannot create directory” error, check your hosting file permissions.
- Avoid uploading unverified plugins to reduce the risk of malware infections.
Manual installation via FTP/SFTP is slightly more technical but invaluable when dashboard uploads fail. It’s also the go-to method for developers managing multiple WordPress sites or testing plugins before public release.
Method 4: Install a WordPress Plugin via WP-CLI
For advanced users and developers, WP-CLI (WordPress Command Line Interface) offers a fast, efficient way to install and manage plugins without using the dashboard. This method is especially useful for bulk installations, automation scripts, or when working on headless WordPress setups.
Step-by-step instructions:
1. Ensure WP-CLI is installed on your server or local development environment. Many managed WordPress hosts include it by default.
2. Connect to your site via SSH.
3. Identify the plugin’s slug (the directory name in the WordPress plugin repository). For example, WPZOOM Forms’s slug is wpzoom-forms.
4. Run the install command. For example, to install and activate WPZOOM Forms in one step, you’d run:
wp plugin install wpzoom-forms5. Activate the plugin immediately after installation:
wp plugin activate wpzoom-formsNotes:
- WP-CLI is ideal for managing WordPress plugins across multiple sites quickly.
- You can also update, deactivate, or delete plugins using WP-CLI commands.
- This method requires SSH access, which may not be available on all hosting plans.
WP-CLI streamlines WordPress plugin installation for technical workflows, offering speed and precision that the dashboard can’t match.
Troubleshooting Common Plugin Installation Issues
While installing a WordPress plugin is usually straightforward, you may encounter errors that prevent successful installation or activation. Here are some of the most common issues and their solutions:
1. “Permission denied” or “cannot create directory”
This typically means WordPress doesn’t have the correct file permissions to write to your server.
Fix: Adjust file and folder permissions via your hosting control panel or FTP client (recommended: folders 755, files 644).
2. Out of PHP memory
If your site exceeds the allocated PHP memory, installations may fail.
Fix: Increase the memory limit in wp-config.php by adding:
define( 'WP_MEMORY_LIMIT', '256M' );3. PHP version compatibility issues
Some plugins require a specific PHP version.
Fix: Check your PHP version in the hosting panel and update to a supported release.
4. Execution time limit exceeded
Long-running installations can hit the PHP max execution time limit.
Fix: Increase the max_execution_time setting in php.ini or ask your host to adjust it.
5. Error establishing a database connection
This can occur if a plugin’s activation process can’t communicate with the database.
Fix: Verify your database credentials in wp-config.php and contact your host if the issue persists.
Tip: If dashboard installation fails, try manual installation via FTP/SFTP as described earlier. This often bypasses restrictions that cause these errors.
FAQs About WordPress Plugins
1. How do I update a WordPress plugin?
Go to Dashboard → Plugins and look for update notifications below each plugin. Click Update Now to install the latest version. For bulk updates, select multiple plugins and choose Update from the dropdown menu.
2. Should I delete inactive plugins?
Yes. Even if deactivated, inactive plugins can pose security risks and take up server space. It’s best to remove any plugin you’re not actively using.
3. Is it safe to use outdated WordPress plugins?
No. Outdated WordPress plugins may have unpatched vulnerabilities and compatibility issues. Always update or replace plugins that are no longer maintained by their developers.
4. Can I install both free and paid WordPress plugins?
Absolutely. A free WordPress plugin can be installed from the WordPress repository, while a paid WordPress plugin (premium) is usually purchased from a developer or marketplace and uploaded manually via ZIP file or FTP.
5. How many plugins can I install?
There’s no strict limit. Performance depends more on plugin quality than quantity. Well-coded plugins have minimal impact, while poorly optimized ones can slow your site.
6. How do I uninstall a WordPress plugin?
Go to Plugins → Installed Plugins, deactivate the plugin, then click Delete. For premium plugins, you may also need to revoke the license key before removal.
7. Will deleting a plugin remove its data?
Not always. Some plugins keep their settings in the database after deletion. Check the plugin’s documentation if you want to completely erase all related data.
Take Your WordPress Site Further with WPZOOM Plugins
Once you’ve mastered plugin installation, it’s time to enhance your site with tools that make a real difference. WPZOOM offers a range of premium WordPress plugins designed for speed, flexibility, and ease of use — from powerful form builders to advanced recipe cards and media features.
All our plugins are easy to install, regularly updated, and built for performance, so you can focus on creating great content while we handle the functionality.
👉 Explore WPZOOM Plugins and start adding the features your website needs to grow.