Do you need to control who accesses your WordPress content? Password-protect WordPress pages and posts to create exclusive member areas, secure sensitive information, or hide content during development.
This comprehensive guide covers every method, from built-in WordPress features to advanced plugin solutions, providing complete access control.
Table of Contents
- How to Password Protect a WordPress Page or Post
- How to Password Protect Your Entire WordPress Site
- Password Protecting WordPress Categories
- Password Protect Part of WordPress Pages
- Why You Should Password Protect Your WordPress Content
- Complete Your Protected Site with Premium WPZOOM Themes
How to Password Protect a WordPress Page or Post
WordPress includes built-in password protection that works across pages, posts, and custom content types. This native functionality requires no additional plugins and works with both the Block Editor and Classic Editor.
Using the WordPress Block Editor
Getting started takes just minutes. Follow these steps to protect your content:
1. Log in to your WordPress admin dashboard.
2. Navigate to Pages > All Pages or Posts > All Posts and click Edit on the content you want to protect.
3. Look for the Status panel in the right sidebar and click on the Visibility option (usually shows “Published“).
4. Tick the “Password protected” checkbox from the dropdown menu.
5. Enter a strong password in the Password field that appears.
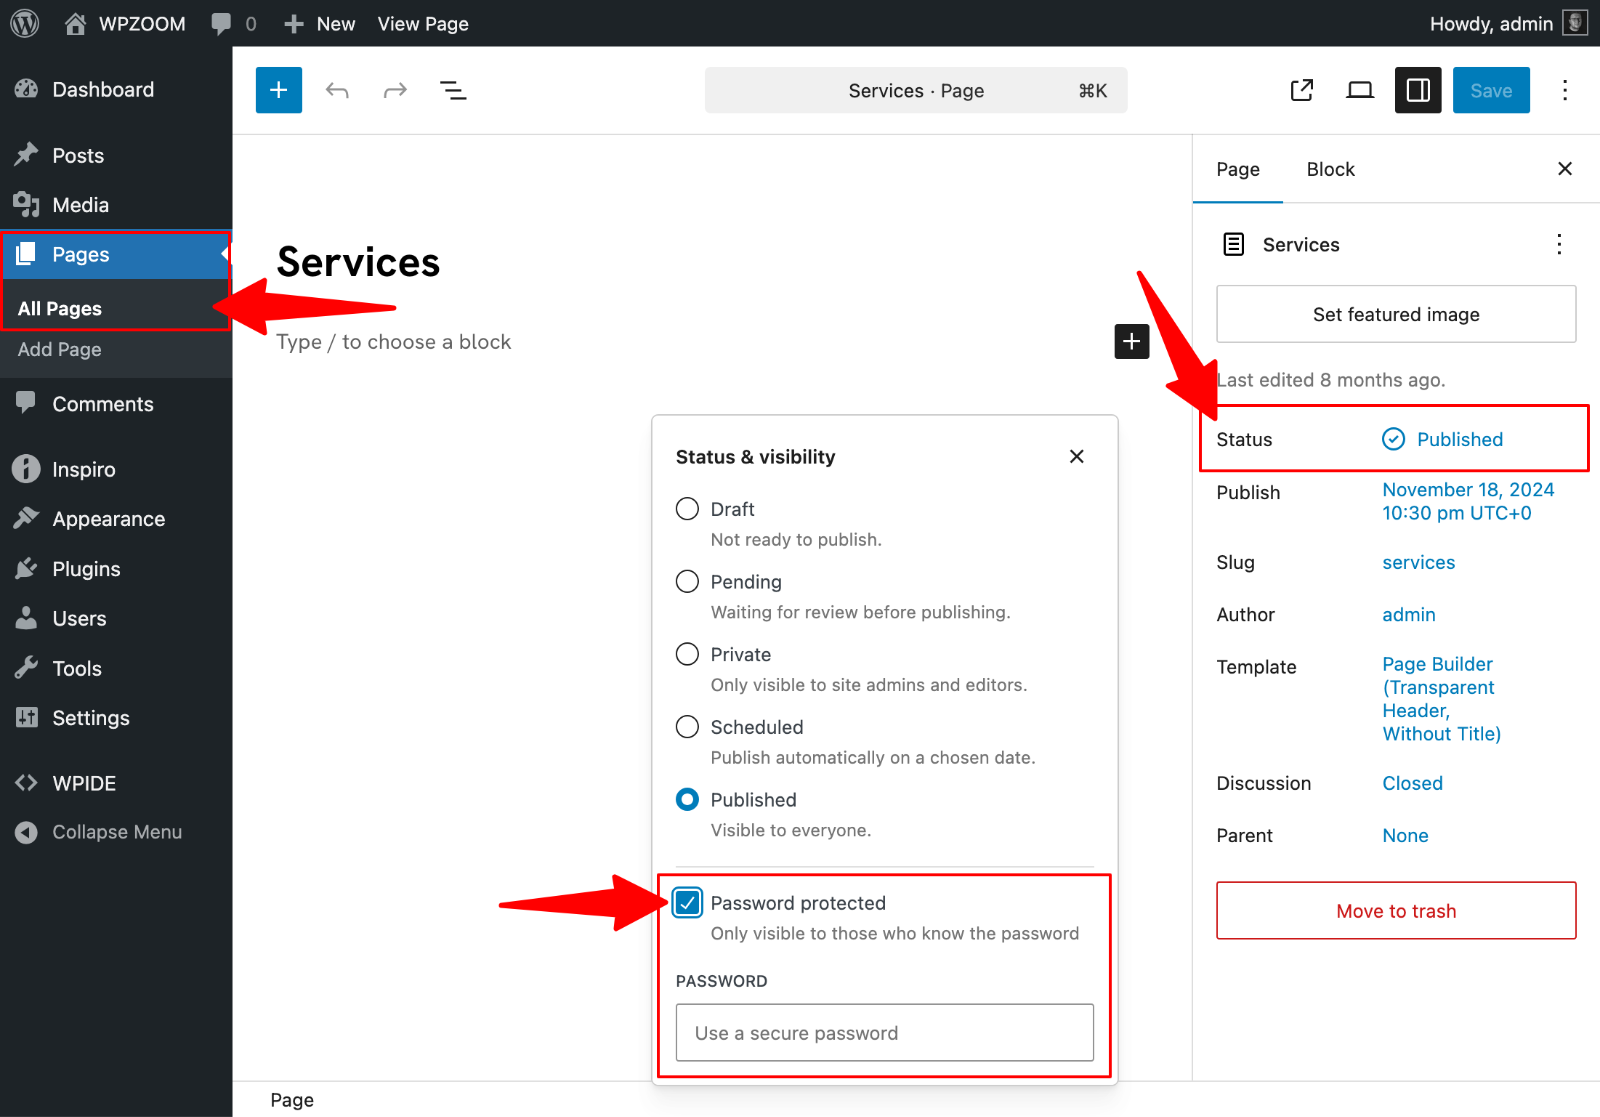
6. Click Update or Publish to save changes.
Security Note: Use strong passwords that combine letters, numbers, and special characters. Avoid easily guessable passwords, such as “password123,” or personal information that could be discovered through social media.
Using the Classic Editor
If you’re using the Classic Editor, the process is similar:
1. Open the page or post you want to protect.
2. Find the Publish box on the right side.
3. Click “Edit” next to Visibility.

4. Select “Password Protected“.
5. Enter your chosen password.

6. Click Update or Publish.
When someone visits your password-protected page, they encounter a simple form requesting the password. The page content remains completely hidden until they enter the correct credentials.
WordPress automatically prepends “Protected:” to your title, indicating the content requires password entry.
Password protection remains active until you manually change the visibility settings back to “Public” or “Private”. This gives you long-term content control without ongoing maintenance.
Helpful feature: Using the same password across multiple pages allows visitors to enter it once and access all content using that password. Different passwords require separate entries.
How to Password Protect Your Entire WordPress Site
Complete site protection prevents all unauthorized access and can be implemented through plugins or server-level HTTP authentication.
SEO Warning: Password protecting your entire WordPress site will prevent search engines from indexing your content. This means your site won’t appear in Google search results, potentially resulting in a loss of organic traffic.
When to Use Site-Wide Protection
Site-wide protection serves these scenarios:
- Development sites during client review periods
- Private family blogs with personal content
- Business intranets restricted to employees
- Maintenance periods requiring visitor exclusion
- Beta testing environments
- Confidential project collaboration
Method 1: Plugin-Based Protection
The Password Protected plugin offers the most accessible approach with extensive customization options. Follow these detailed instructions to protect your entire WordPress site:
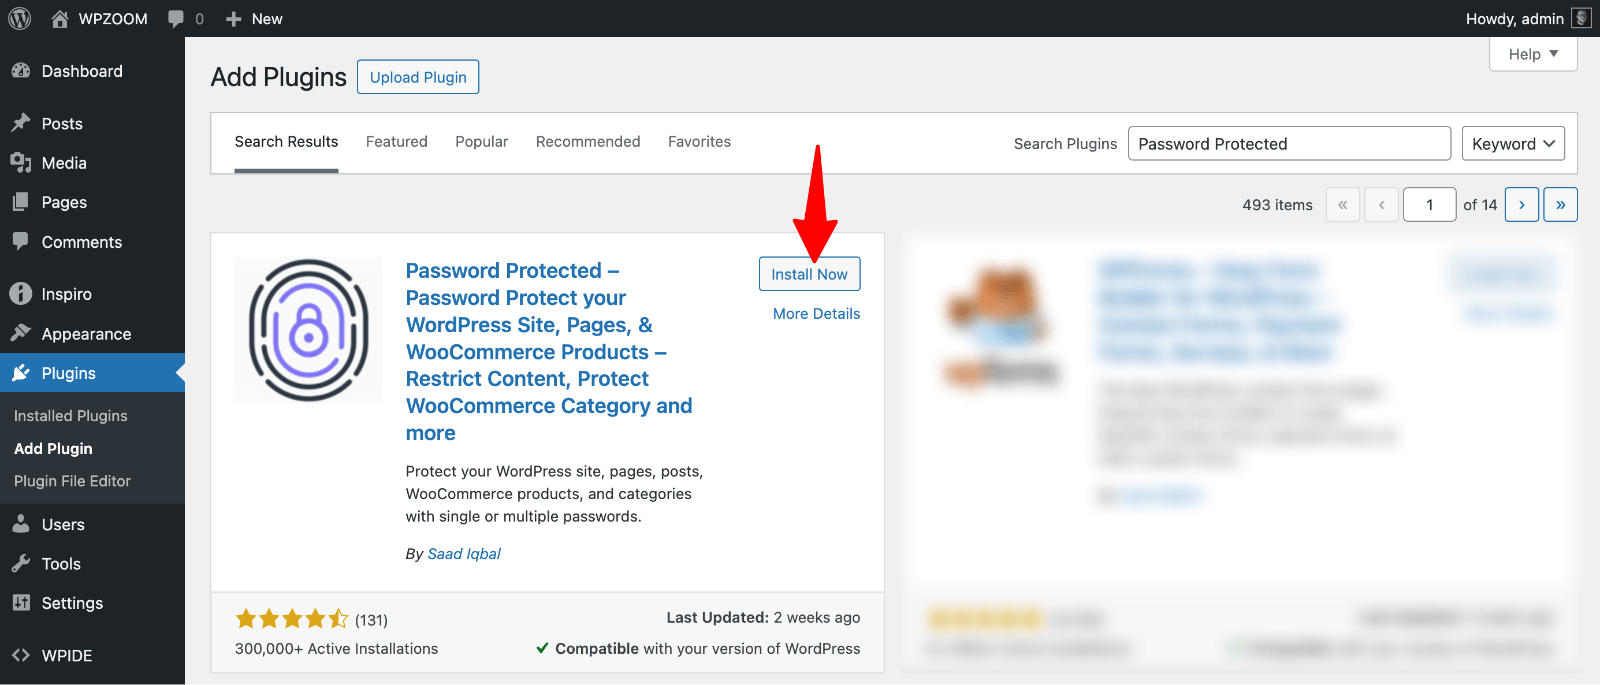
1. Navigate to Plugins > Add New in your WordPress dashboard.
2. Search for “Password Protected” by WPExperts.
3. Click “Install Now” and then “Activate“.
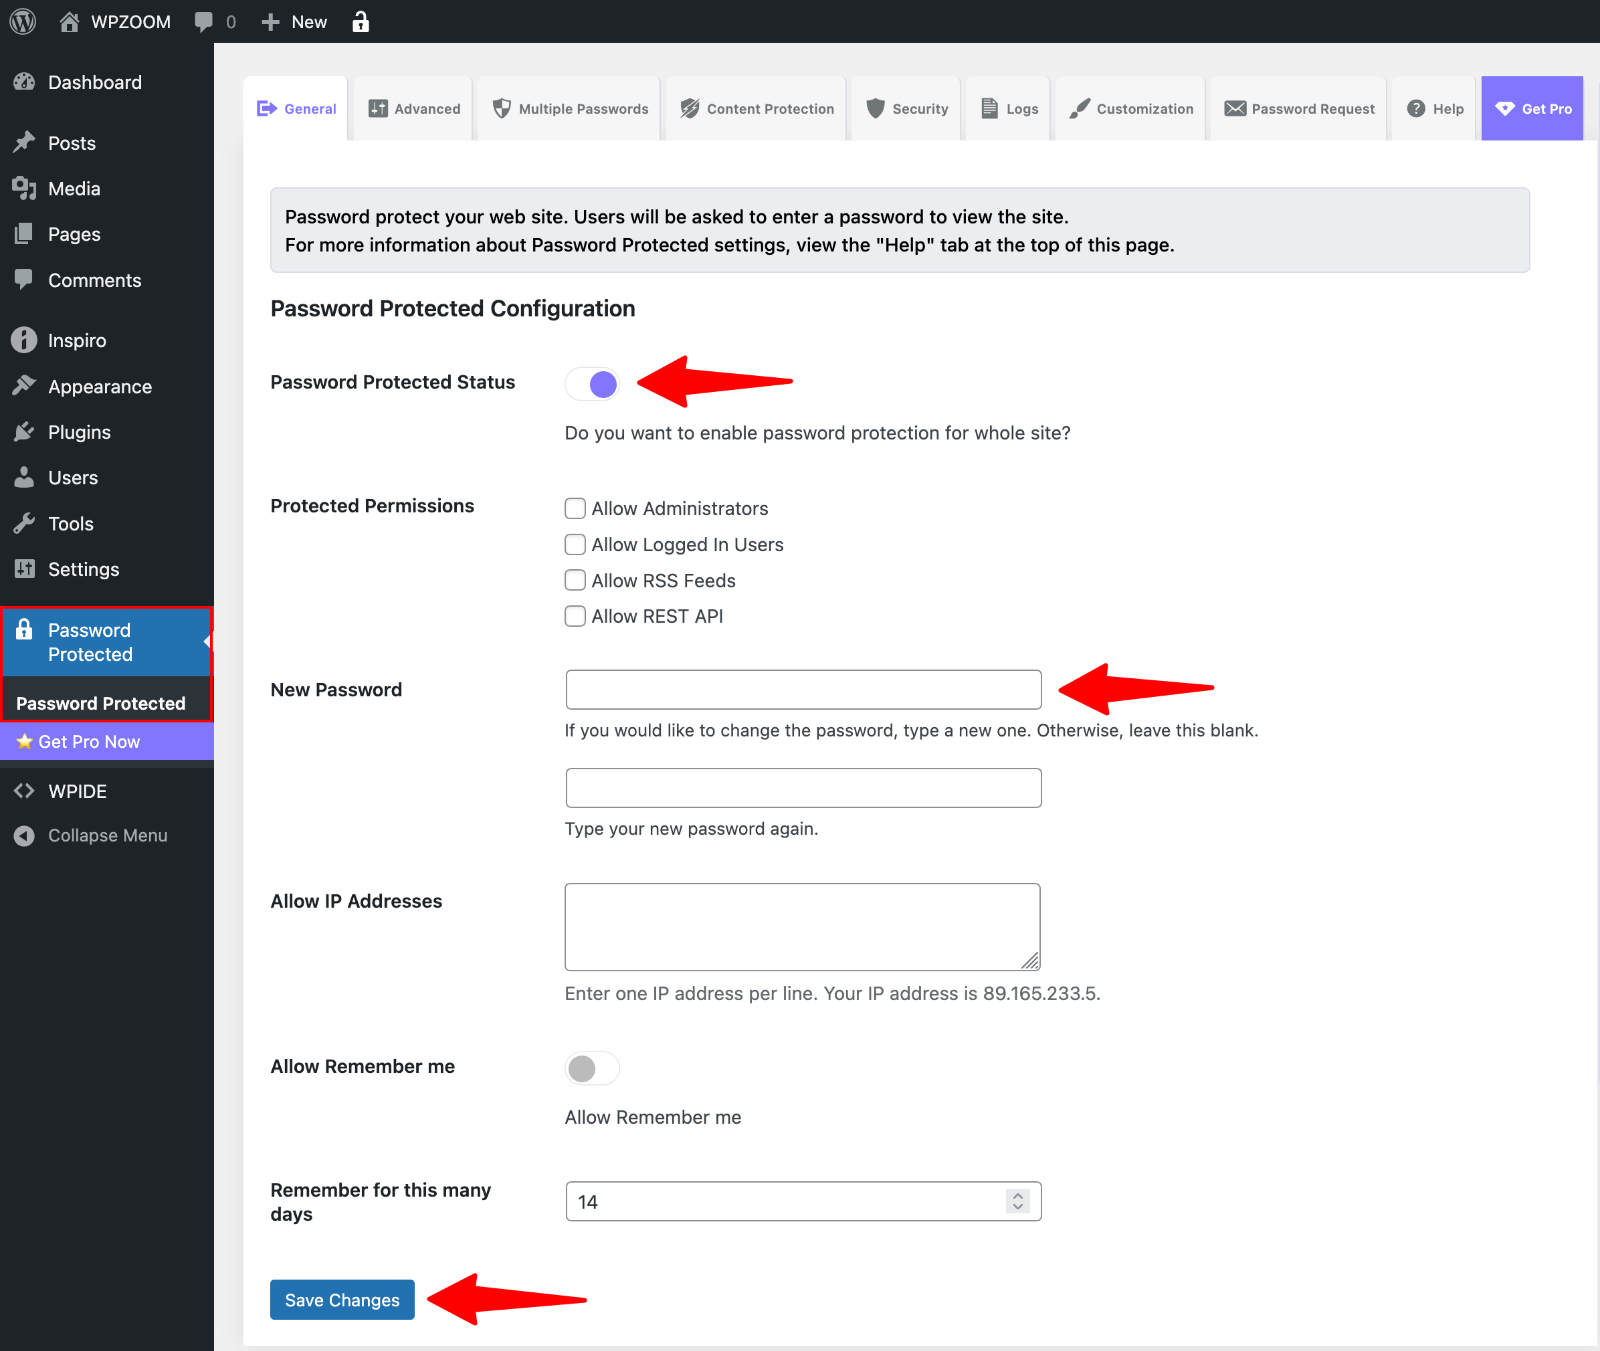
4. Navigate to “Password Protected” in your admin sidebar.
5. Check the “Password Protected Status” box to enable protection.
6. Enter your desired password in the “New Password” field.
7. Click “Save Changes” to activate site-wide protection.
Test your protection by opening a new browser window or incognito mode and visiting your website URL. Verify that the password protection screen appears and test the password to ensure access works correctly.
Method 2: HTTP Authentication
HTTP authentication provides server-level protection that activates before WordPress even loads. This method offers stronger security than plugin-based solutions, but may require more technical setup depending on your hosting provider.
cPanel Setup:
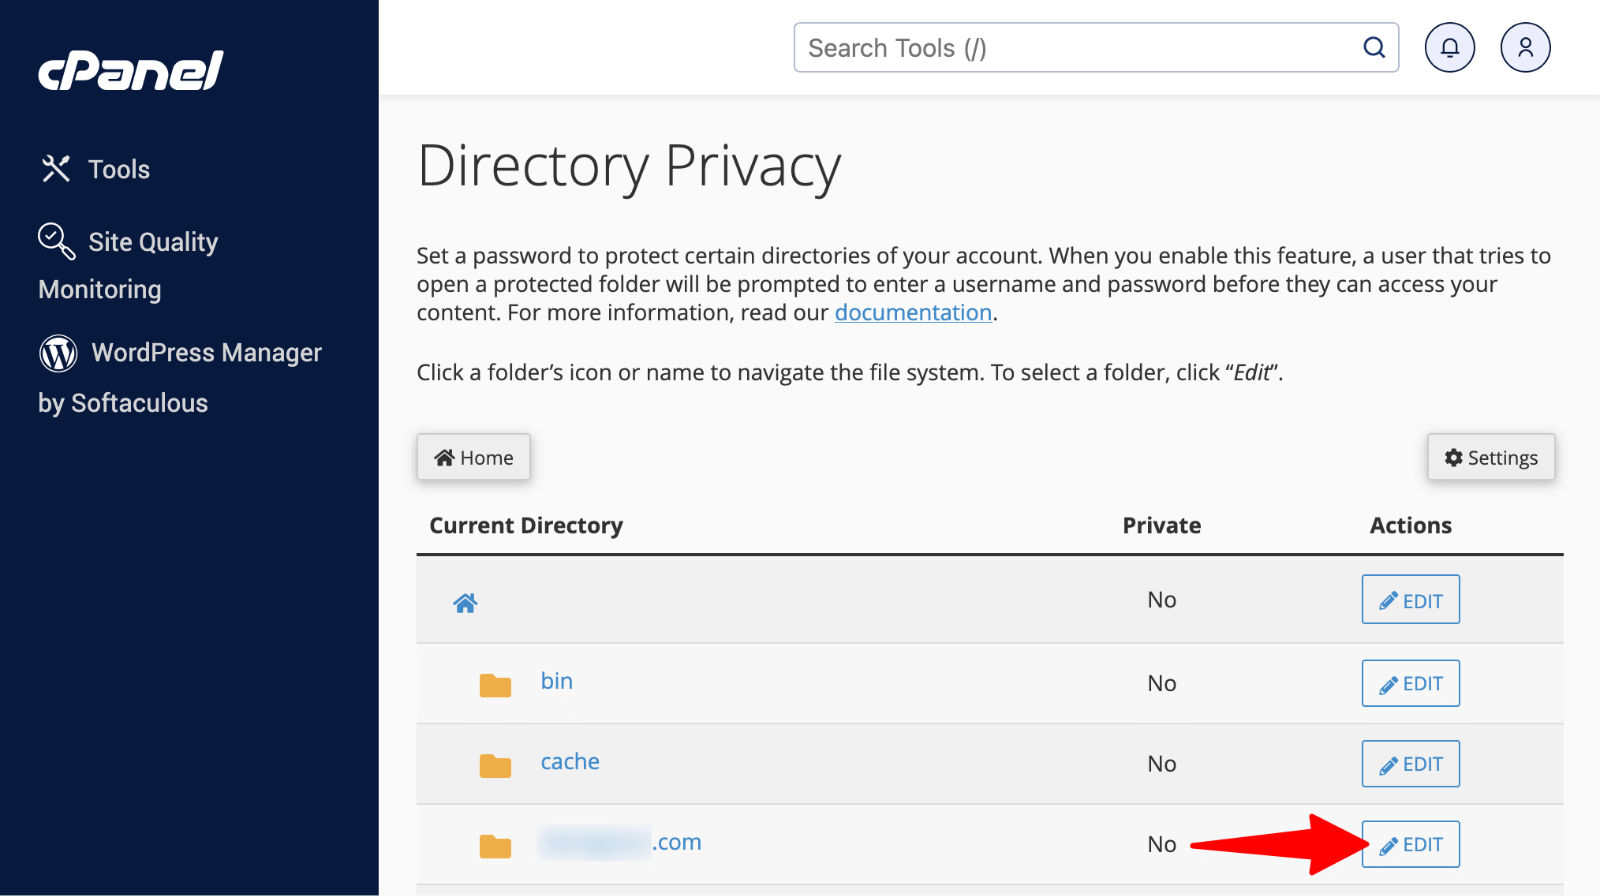
1. Access your hosting control panel.
2. Look for “Directory Privacy” or “Password Protect Directories“.

3. Click “Edit” for your WordPress installation directory.
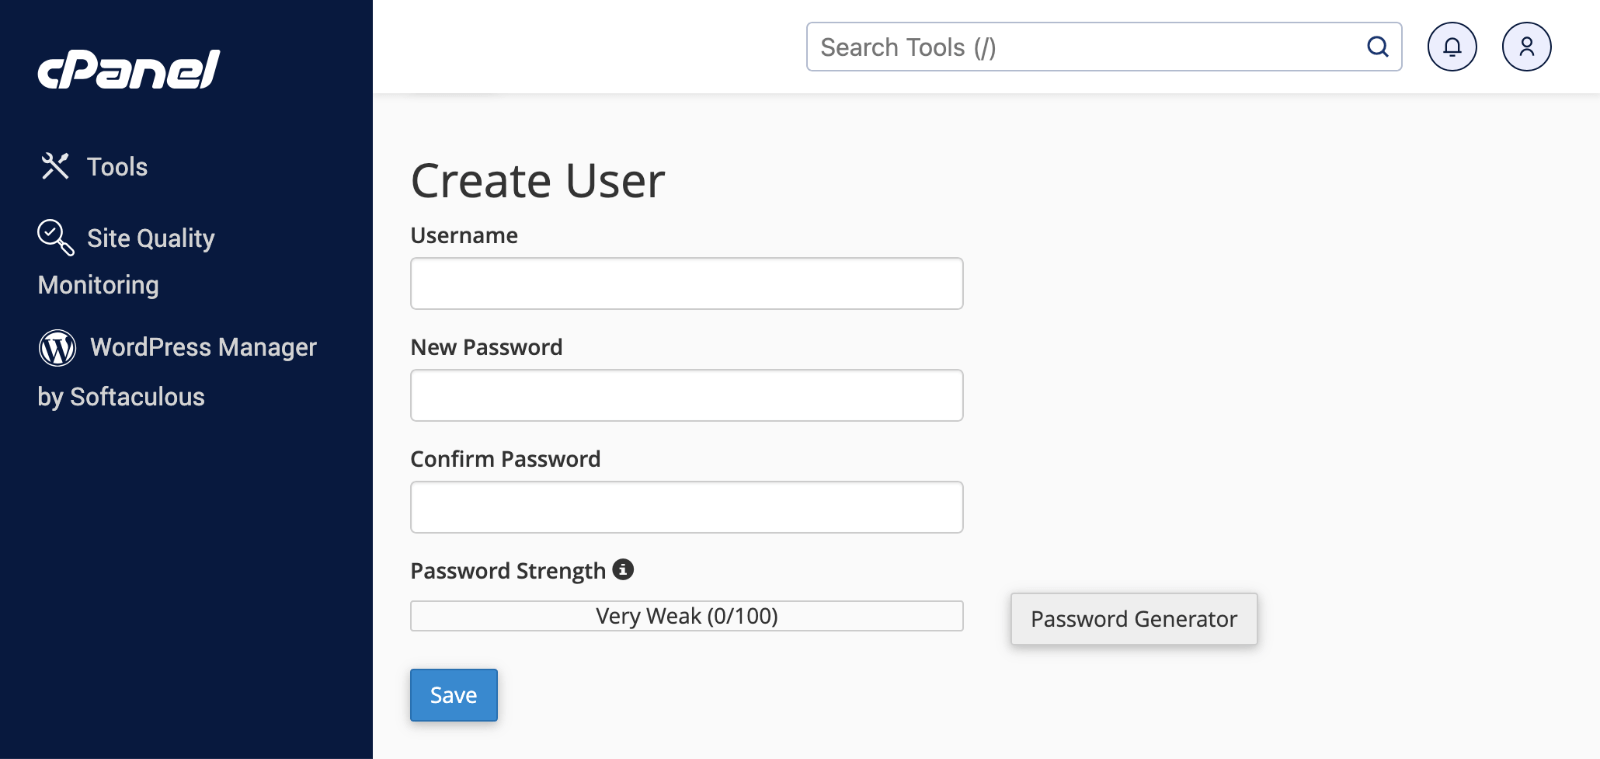
4. Tick the “Password protect this directory.” checkbox and click “Save“.

5. Click “Go back“
6. Create a username and password combination and click “Save“.
Many premium hosting providers have simplified HTTP authentication by offering built-in password protection tools directly within their custom dashboards. These tools typically provide one-click activation with automatic SSL compatibility, eliminating the need for manual file configuration.
Both methods can be quickly activated and deactivated, making them perfect for temporary protection during maintenance or development phases.
Password Protecting WordPress Categories
Category-based password protection enables you to secure multiple related posts simultaneously, creating an efficient content management system for membership sites, premium content areas, or age-restricted material.
The PPWP (Password Protect WordPress) plugin streamlines category protection with advanced features. This plugin provides comprehensive category protection with customizable settings and user management options.
1. Install and activate the PPWP plugin from your WordPress dashboard.
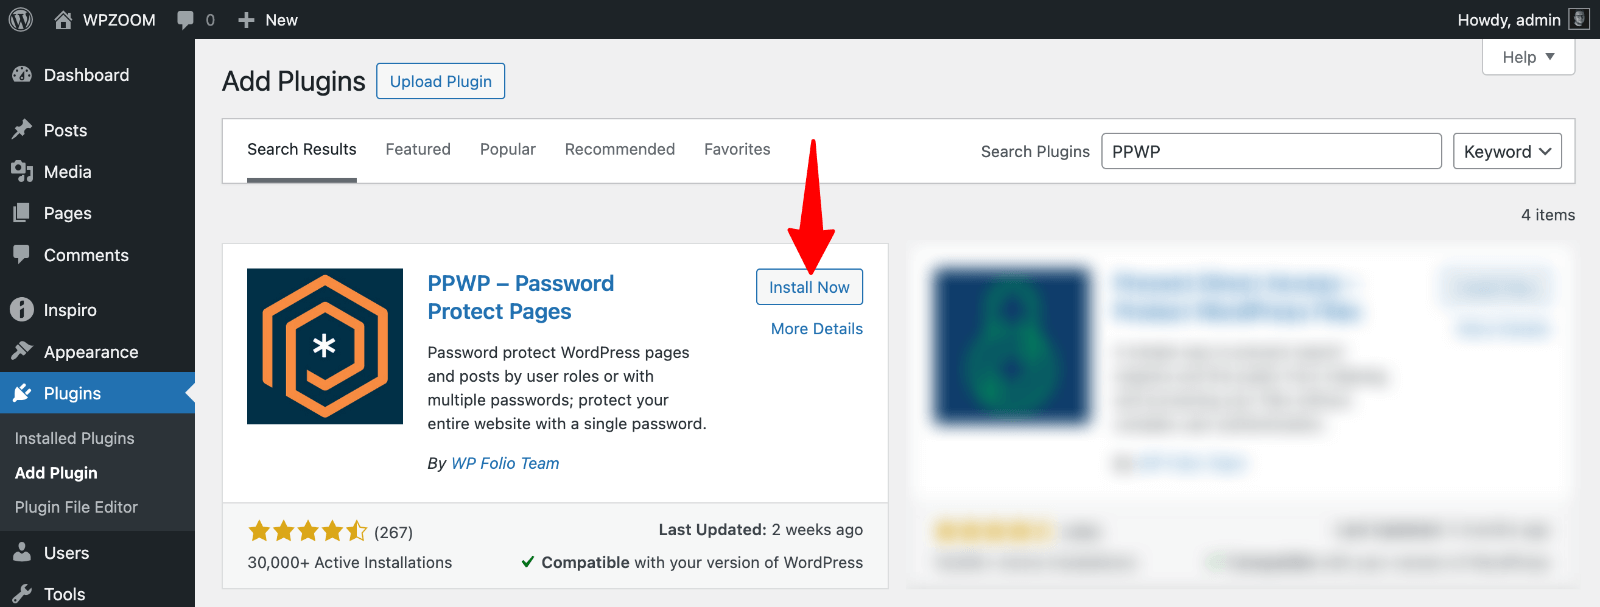
2. Navigate to Posts > Categories in your admin panel.
3. Look for the “Category Protection” section added by PPWP.
4. Turn on “Password Protect Categories“.
5. Select your private categories.
6. Set your desired password for category access.
7. Click “Save Changes“.
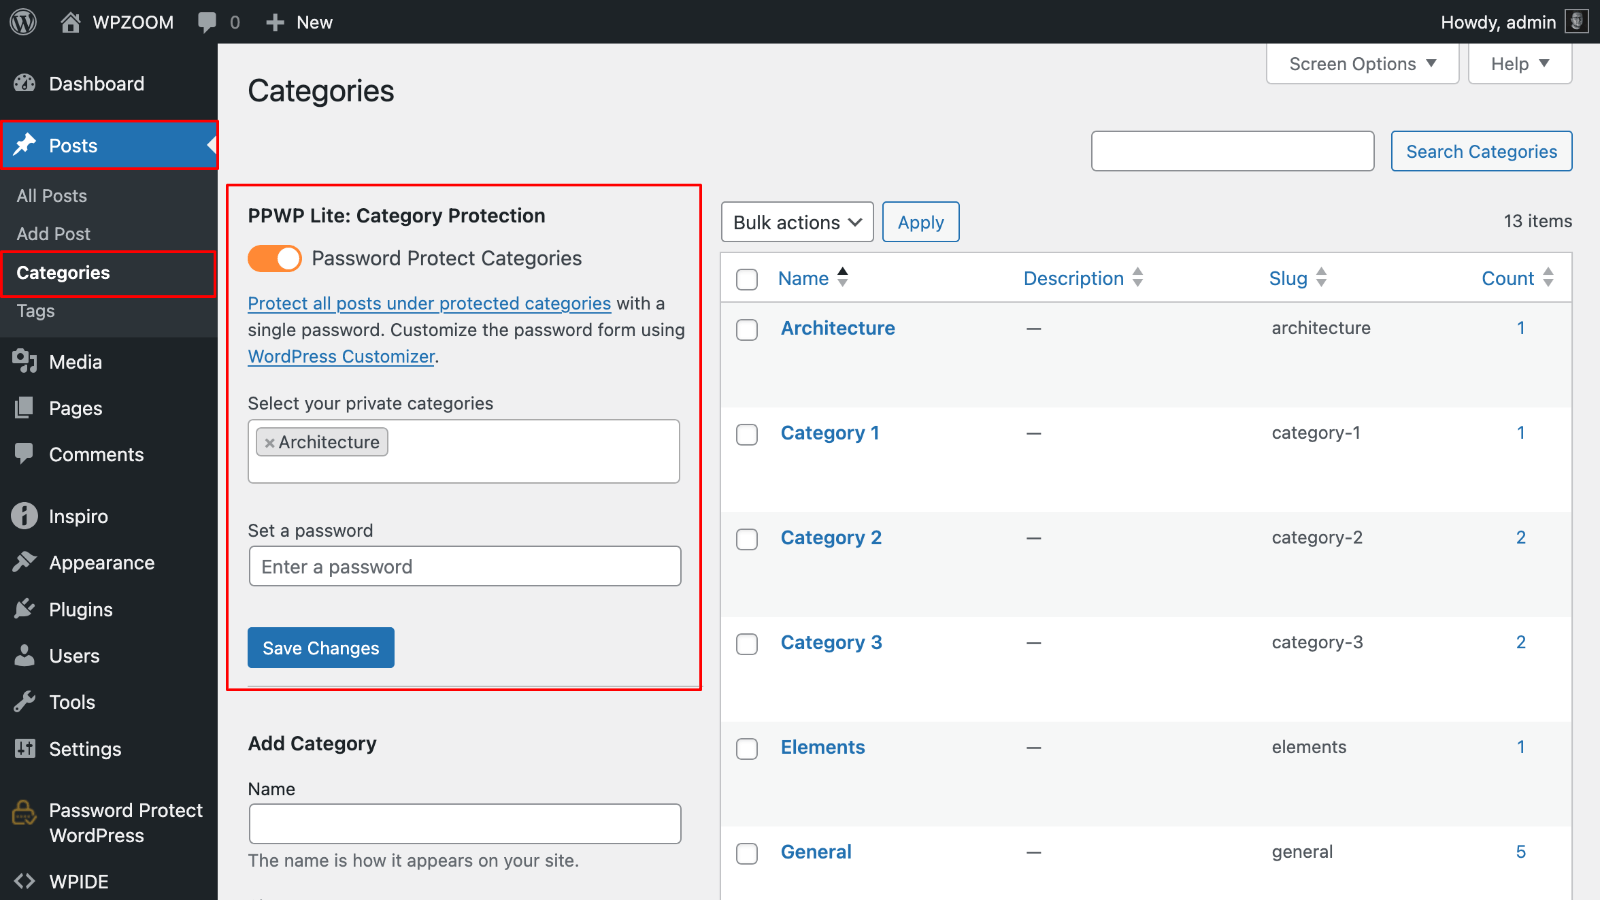
The Password Protected Categories plugin by Barn2 Media includes additional features like multiple passwords per category, password expiration settings, enhanced customization options, and WooCommerce integration. You can protect different categories with different passwords, allowing you to create various access levels for different user groups or content types.
Password Protect Part of WordPress Pages
Partial content protection enables you to create mixed-access pages, where some information remains public, while sensitive or premium sections require a password for access.
Use Cases for Partial Protection
Blog posts might contain free introductory content followed by premium analysis. Product pages could display basic information publicly while keeping detailed specifications and pricing private for members only.
This approach works well for:
- Freemium content models
- Product demonstrations with premium features
- Educational content with advanced sections
- Client portals with mixed access levels
WordPress Partial Content Protection with Passster
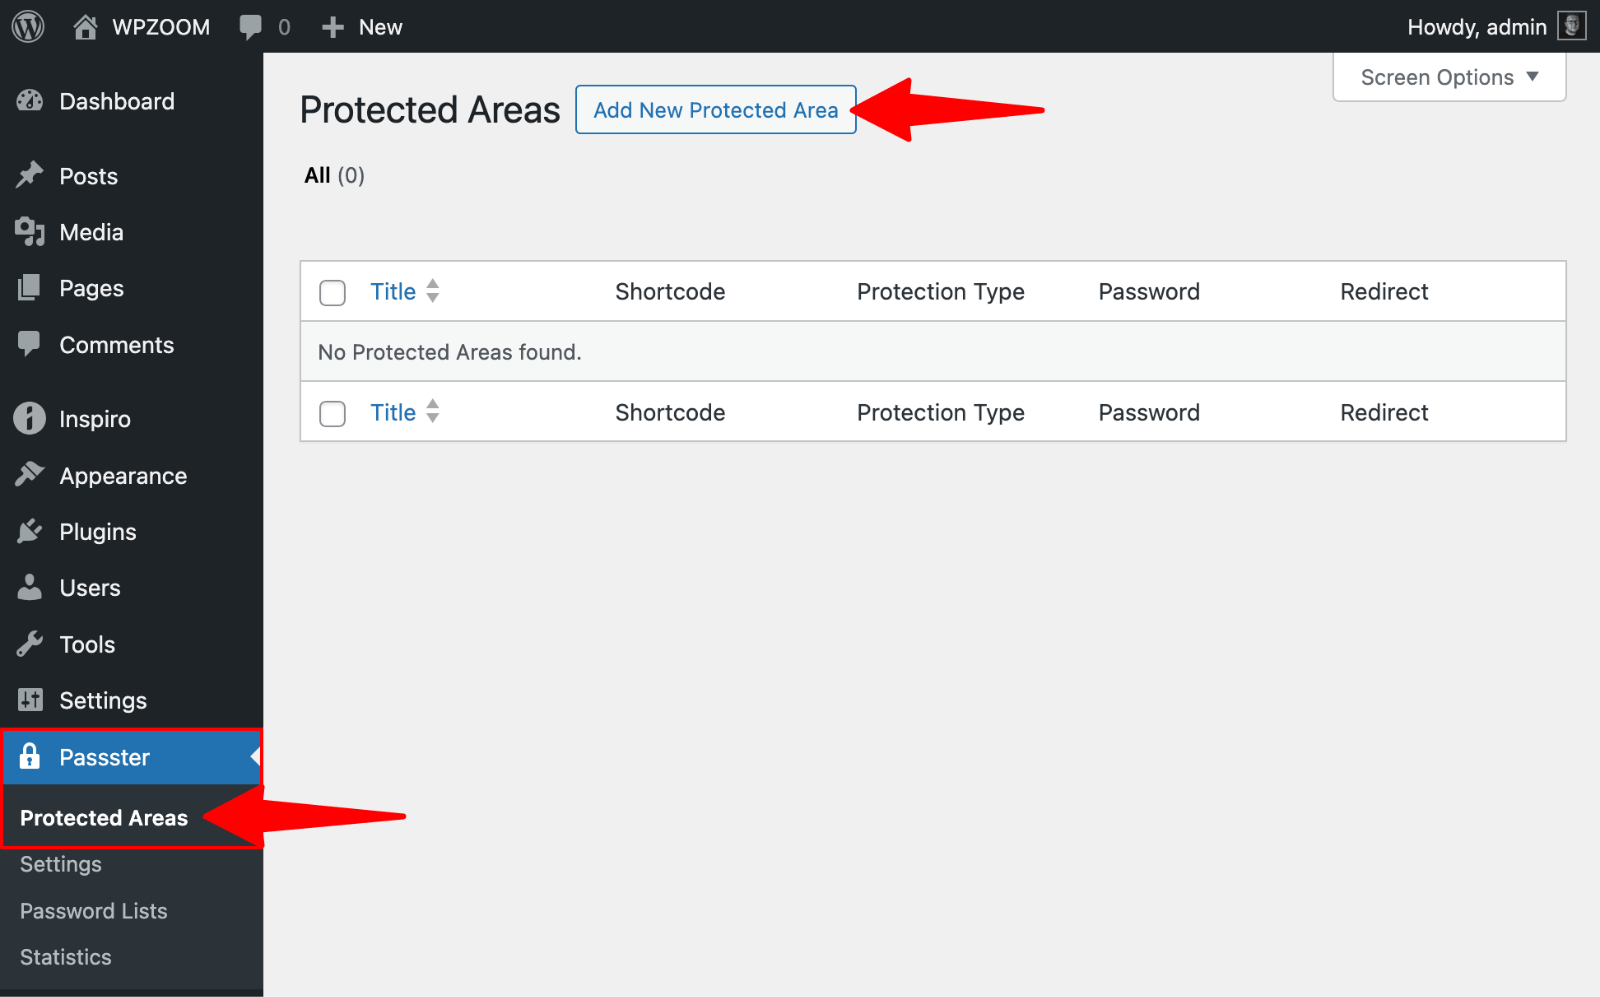
Passster plugin specializes in partial protection using simple shortcodes.
1. Install Passster through your WordPress admin panel.

2. Go to Passster > Protected Areas.
3. Click “Add New Protected Area“.
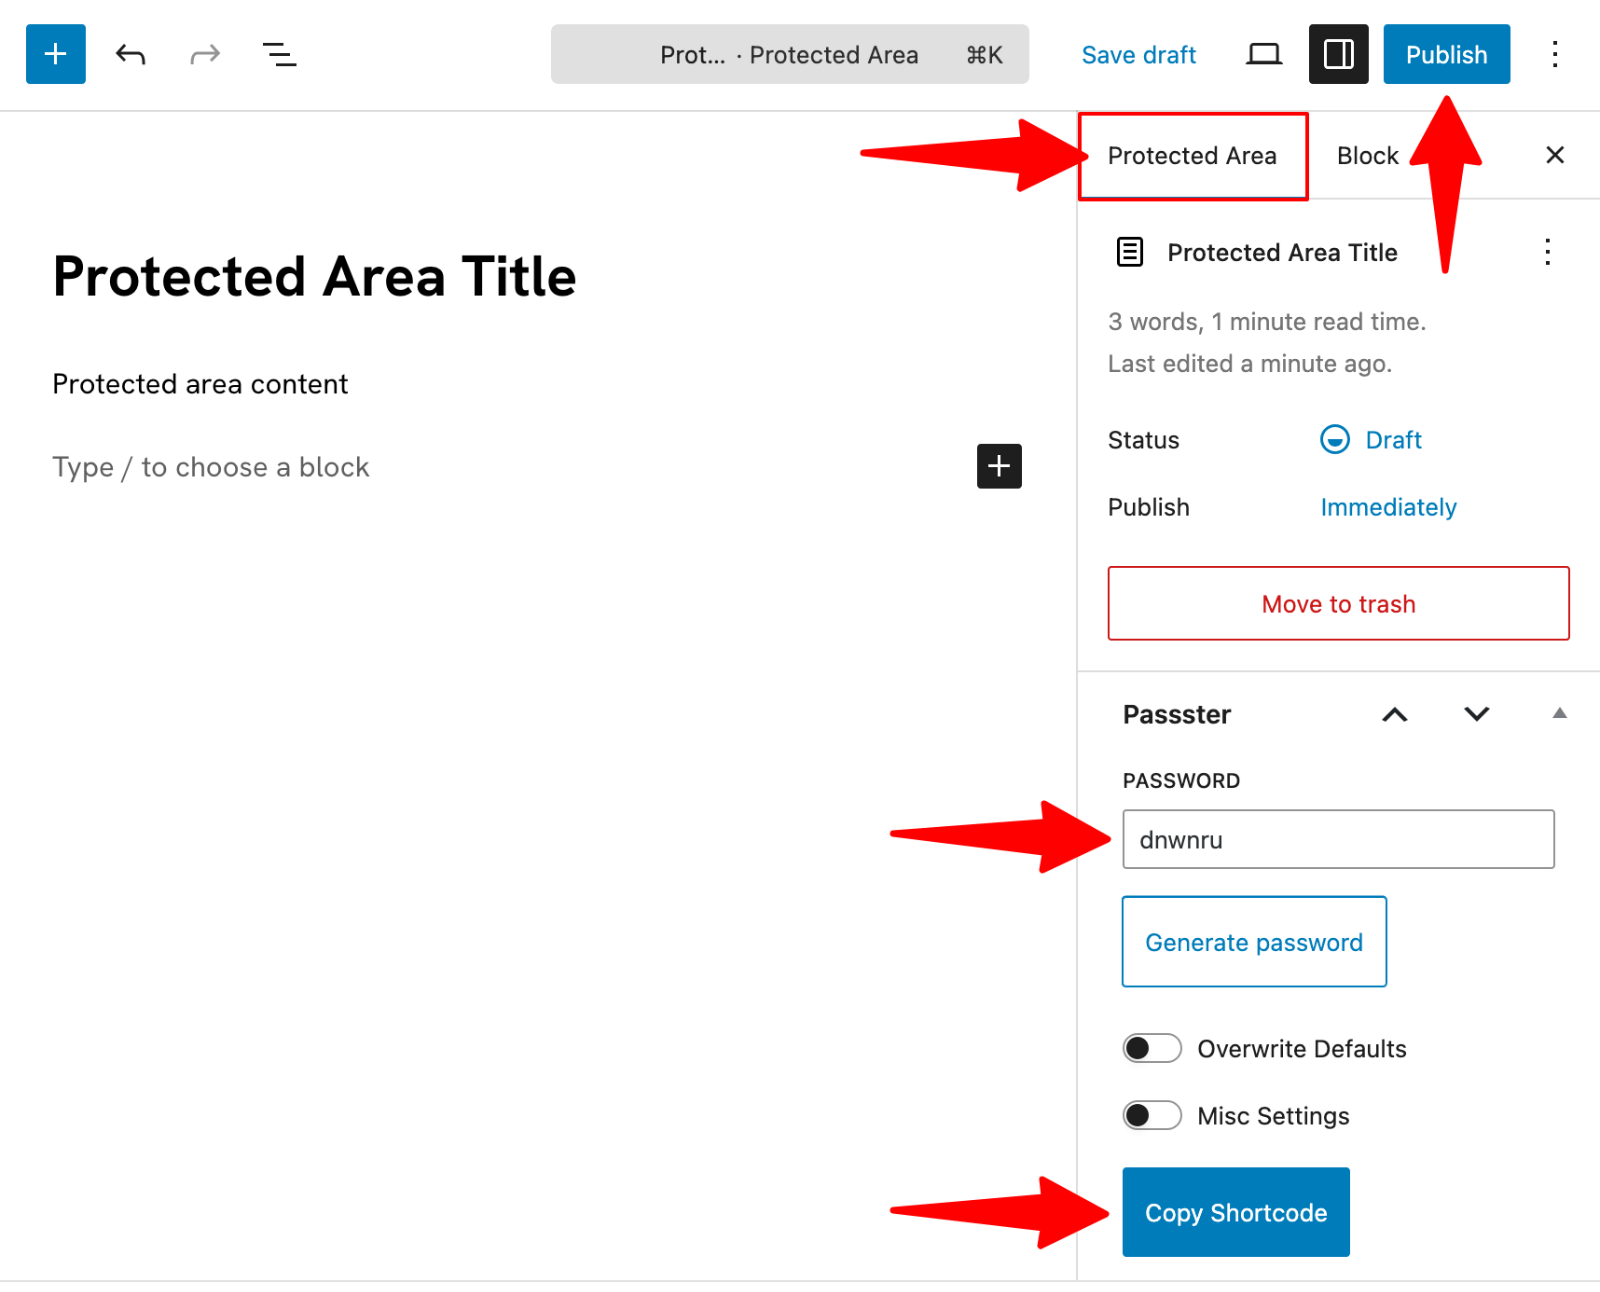
4. Give the area a descriptive name and add the content you want to protect.
5. Choose the “Protected Area” tab.
6. Set up the password and other protection settings.
7. Click “Publish“.
8. Copy the generated shortcode by clicking “Copy Shortcode“.
9. Edit your page or post.
10. Paste the shortcode where you want protected content.
The shortcode replaces actual content with a password form. Visitors must enter the password to see the content.
You can include several password-protected sections on a single page, each with different passwords or access requirements. This creates sophisticated content access control within individual posts.
Why You Should Password Protect Your WordPress Content
Password protection transforms your WordPress site into a secure platform where you control precisely who sees what content. This level of access control serves multiple purposes across different business scenarios.
- Content Exclusivity and Membership Growth – Create premium content areas for subscribers by restricting access to tutorials, exclusive resources, and insider information that drive membership sign-ups and revenue.
- Site Maintenance and Development – Protect your professional image during website updates, redesigns, or troubleshooting by preventing visitors from seeing incomplete work or development phases.
- Client Preview and Feedback – Allow client previews of projects while preventing general public access, enabling you to gather valuable feedback before launching websites or content publicly.
- Business Security and Confidential Information – Share confidential documents, client proposals, and internal resources securely, ensuring sensitive materials reach only intended recipients, not search engines or unauthorized visitors.
- Regulatory Compliance – Meet industry requirements for restricted content access while maintaining user-friendly navigation, helping businesses comply with legal and regulatory standards for information sharing.
- WooCommerce and E-commerce Benefits – Offer pre-release products, member-only pricing, and exclusive merchandise to select customers, creating VIP shopping experiences that encourage customer loyalty and retention.
The key advantage lies in flexibility. You can protect individual pages, entire categories, specific content sections, or your complete website, depending on your needs.
Complete Your Protected Site with Premium WPZOOM Themes
Professional WordPress themes from WPZOOM provide the perfect foundation for any website project, whether you’re building membership sites with exclusive content or showcasing your business portfolio.
Our themes ensure your content looks as professional as it is secure. With clean code, fast loading times, and mobile-responsive designs, WPZOOM themes help you create websites that both search engines and visitors love.