Every WordPress website owner faces the same dilemma: customize your theme and risk losing changes during updates, or stay with default designs forever. WordPress child themes solve this problem completely.

By learning how to create a WordPress child theme, you unlock safe customization possibilities without update fears. This comprehensive tutorial covers everything from basic setup to professional-level modifications, ensuring your website stays unique, functional, and secure.
Table of Contents
- What Is a WordPress Child Theme?
- When Should You Use a Child Theme?
- Preparing to Create a WordPress Child Theme
- How to Create a WordPress Child Theme Manually
- Using Plugins to Create a WordPress Child Theme
- Customizing Your Child Theme
- Common Errors and Troubleshooting
- Best Practices for Maintaining a Child Theme
What Is a WordPress Child Theme?
A WordPress child theme is a secondary theme that inherits the styles, layout, and functionality of a parent theme. It allows you to customize or override specific files without altering the original theme, ensuring updates to the parent theme won’t erase your changes.
Child themes operate through inheritance. WordPress checks the child theme folder first for specific files. If found, it uses the child version; otherwise, it uses the parent theme’s version. This means you can customize only what you want to change while leaving everything else untouched.
The parent theme remains a complete, standalone theme, while the child theme depends on it for any files it doesn’t override. This creates a safety net – if something breaks, simply deactivate the child theme to return to the stable parent version.
When Should You Use a Child Theme?
Several scenarios make child themes not just helpful but essential for your website’s long-term success.
- Safe Design Customization. You need a child theme whenever you plan to modify your theme’s CSS, add custom functions, or change template files. Even small changes, such as adjusting colors or fonts, benefit from child theme protection. Direct parent theme modifications carry risks, as updates can overwrite your custom code.
- Testing New Features Safely. Child themes offer an excellent testing environment for new layouts, color schemes, or custom functionality, without risking the stability of your live site. If experiments go wrong, deactivating the child theme immediately restores your site.
- Preserving Customizations Through Updates. Theme updates are crucial for security, but many avoid them, fearing they will lose customizations. Child themes eliminate this concern, allowing regular parent theme updates while preserving every custom modification perfectly.
Preparing to Create a WordPress Child Theme
Proper preparation prevents problems and ensures a smooth child theme creation process.
- Backing Up Your Website. Create a complete backup before making any changes to your WordPress installation. Your backup should include both website files and the database.
- Choosing the Right Parent Theme. Select a parent theme that closely matches your desired design and functionality. Look for themes with good update histories and active developer support. Well-maintained themes like Inspiro Premium from WPZOOM receive regular updates, ensuring security and new features.
- Setting Up a Development Environment. Work on a staging site rather than your live website. You can test changes thoroughly before applying them to your live website.
How to Create a WordPress Child Theme Manually
Creating a WordPress child theme manually gives you complete control over the process. This method requires basic file management skills but provides the most flexibility.
Step1. Creating the Child Theme Folder
The easiest way to create your child theme folder is using the WPIDE plugin, which provides a complete file management interface directly in your WordPress dashboard.
1. Install and activate WPIDE.
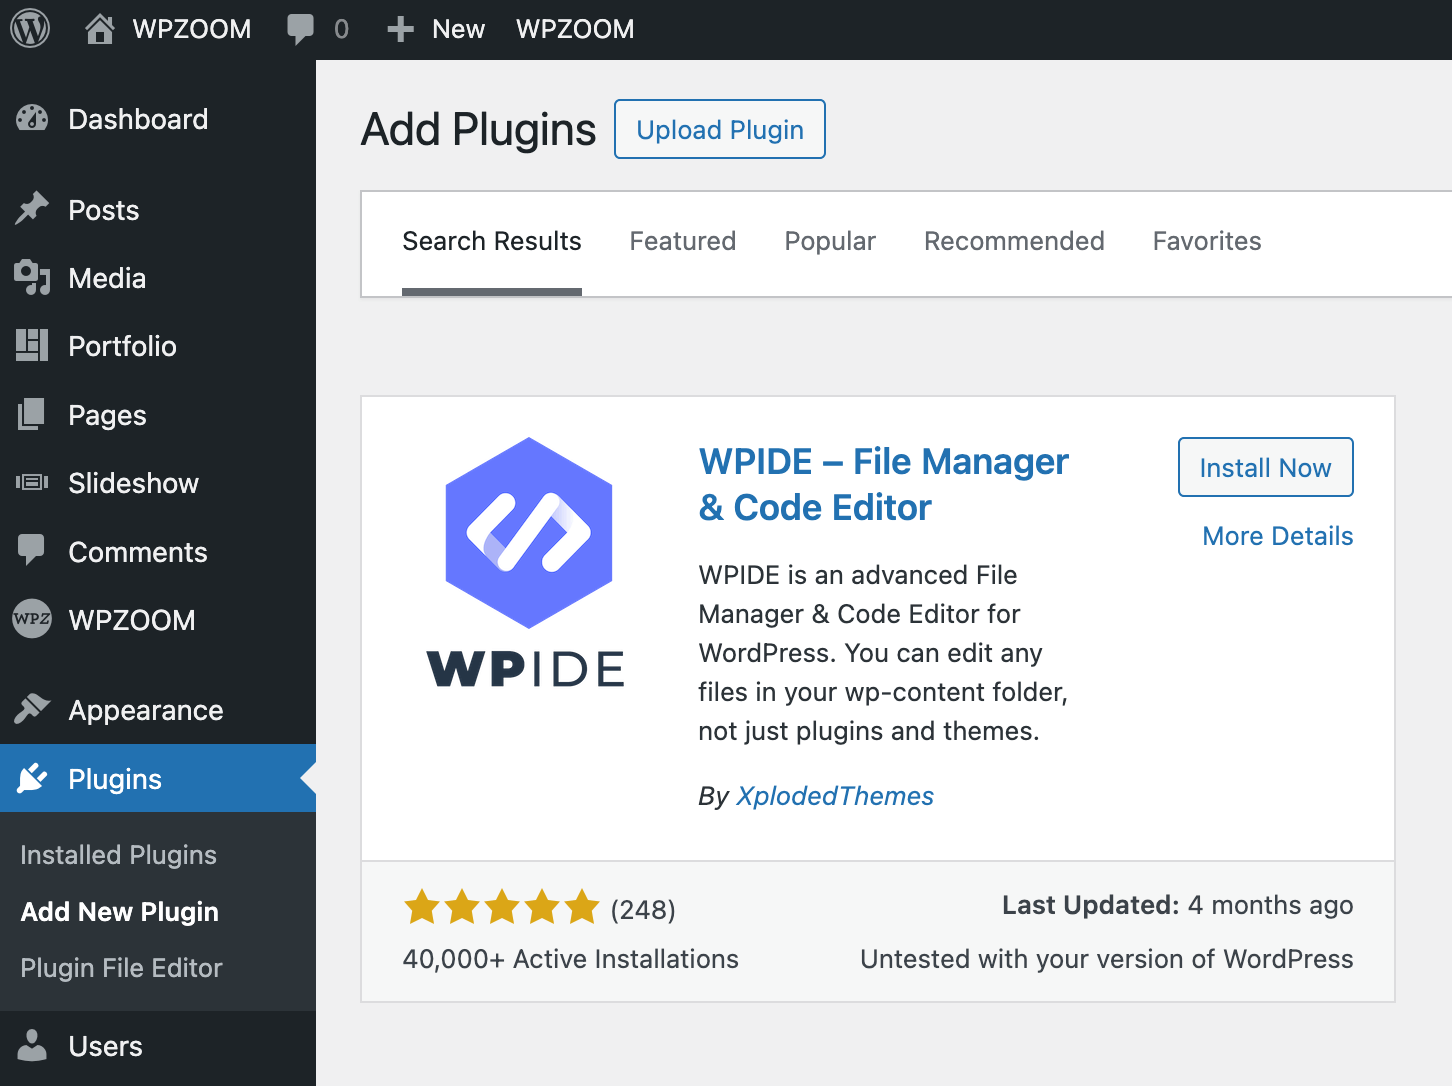
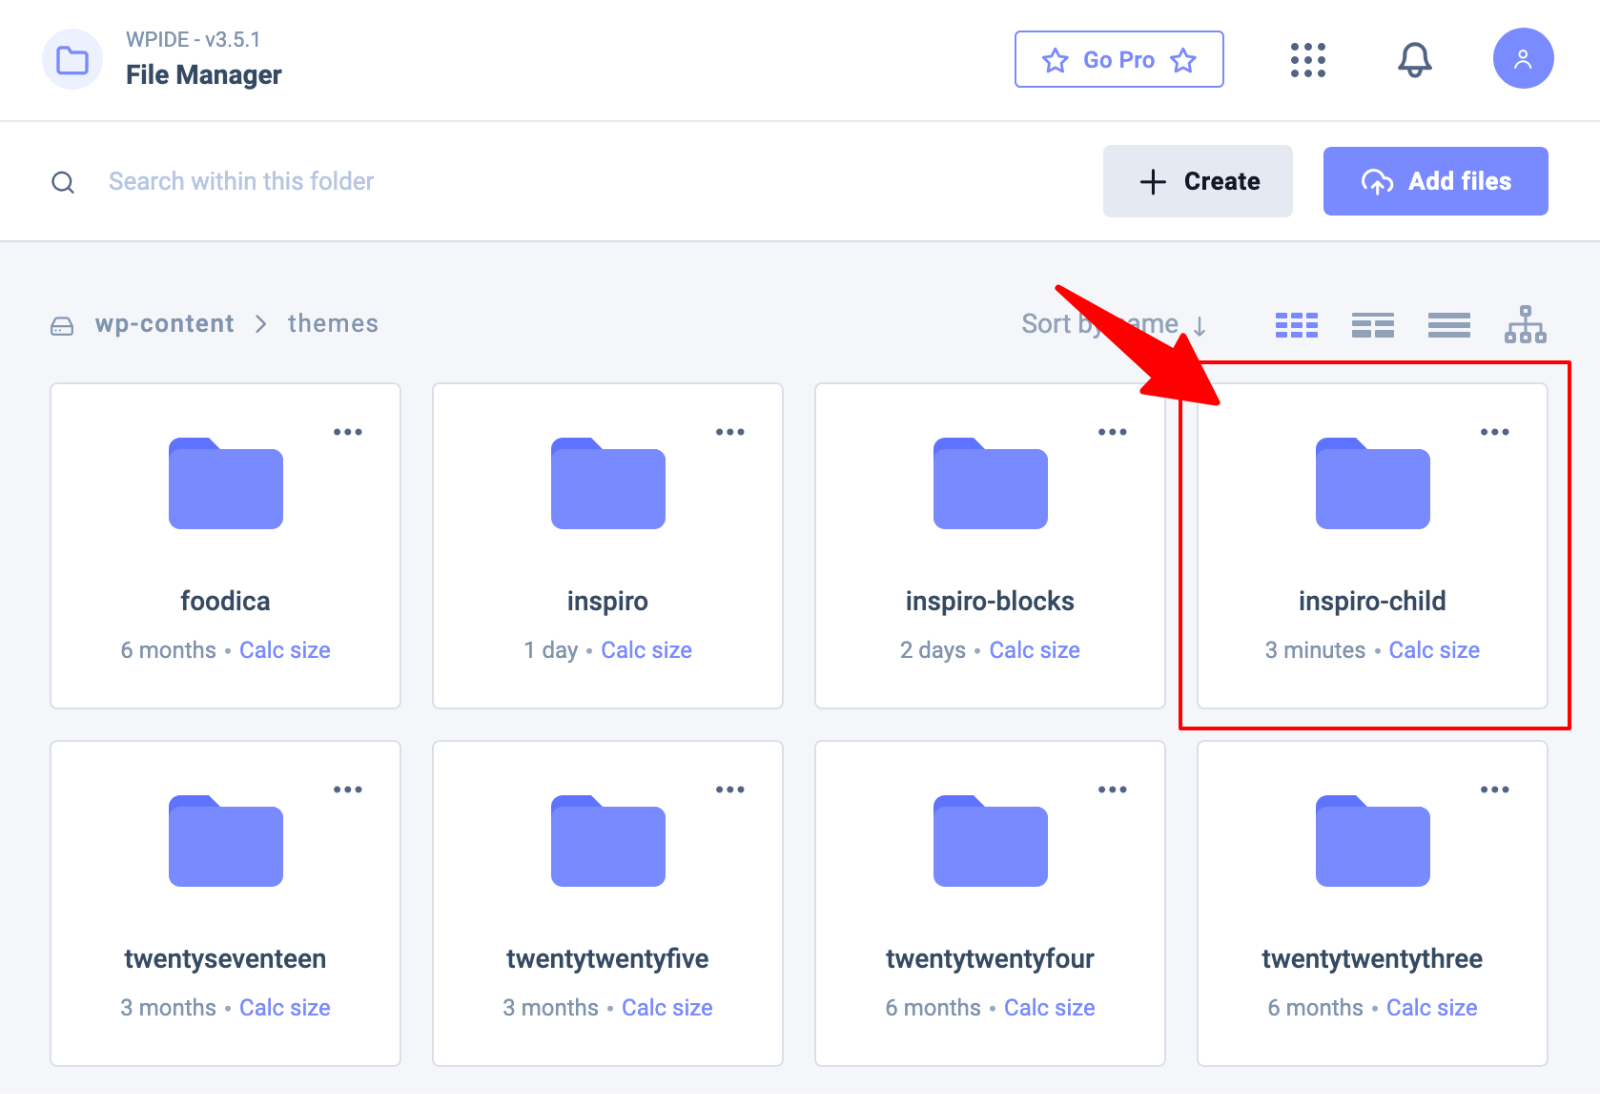
2. Then navigate to WPIDE > File Manager in your admin area and open the wp-content/themes folder where all WordPress themes are stored.

4. Click the “+ Create” button and choose “Create folder” to create your child theme directory.
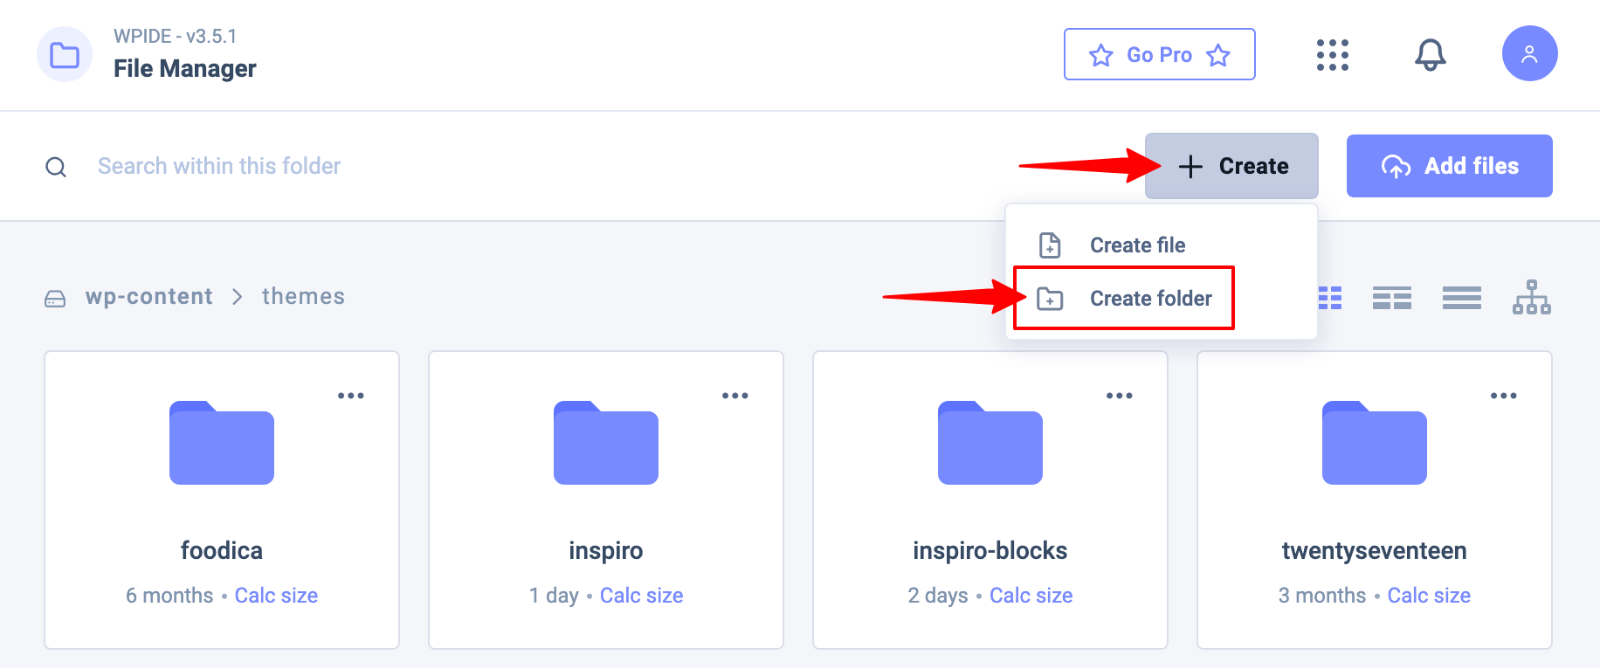
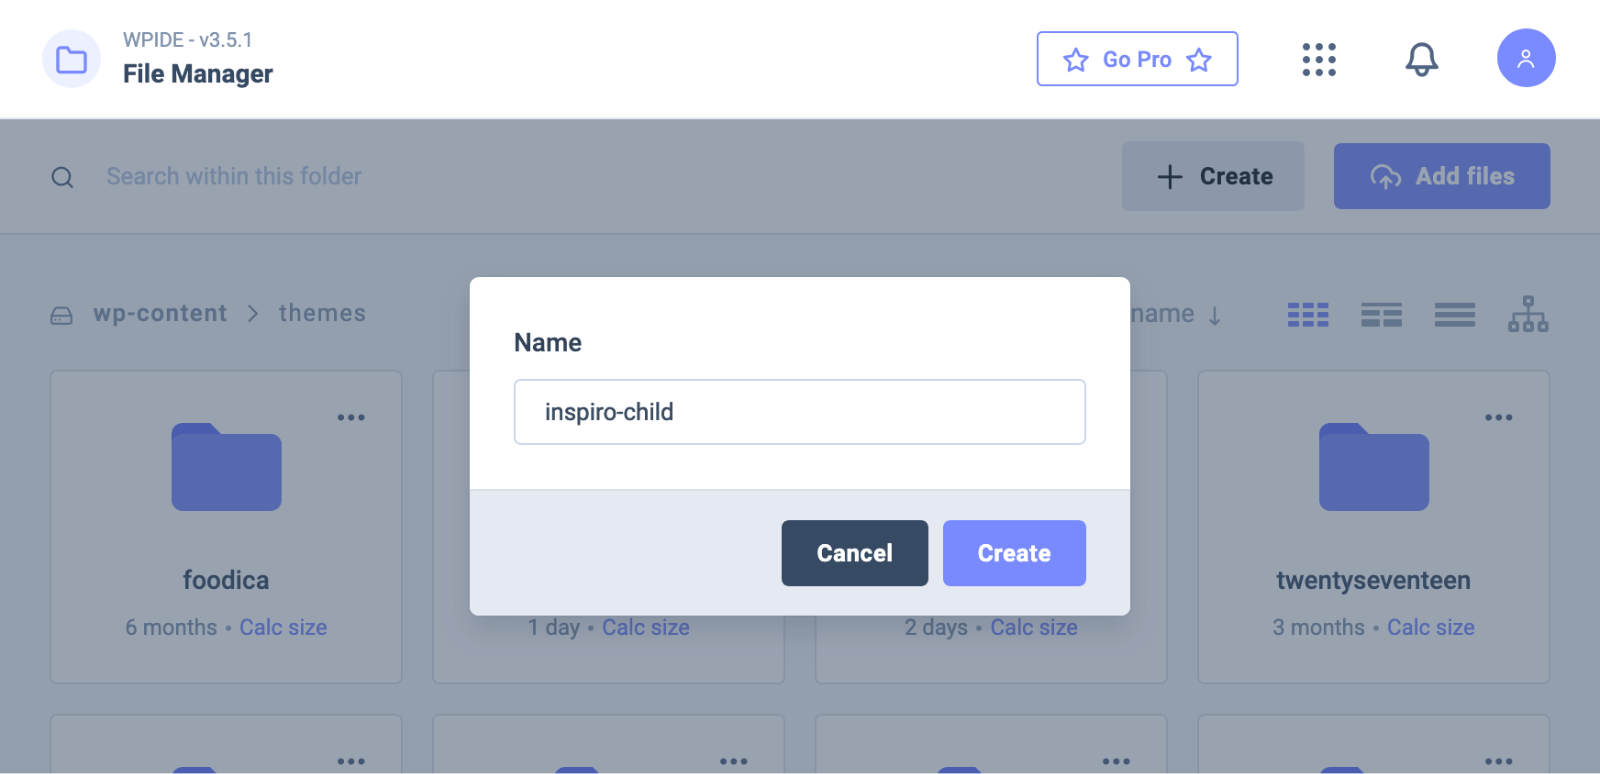
5. Name your folder after your parent theme with a “-child” suffix. For example, if your parent theme is “inspiro,” name your child theme folder “inspiro-child.”
This naming convention makes it easy to identify parent and child theme relationships. It also adheres to WordPress best practices and helps other developers understand your site’s structure.
Alternatively, you can use FTP clients like FileZilla or your hosting provider’s File Manager to create the folder; however, WPIDE offers the convenience of working directly within WordPress, eliminating the need for additional software or login credentials.
Step 2. Creating the Stylesheet (style.css)
Every child theme needs a style.css file with specific header information. Create a new file called style.css in your child theme folder:
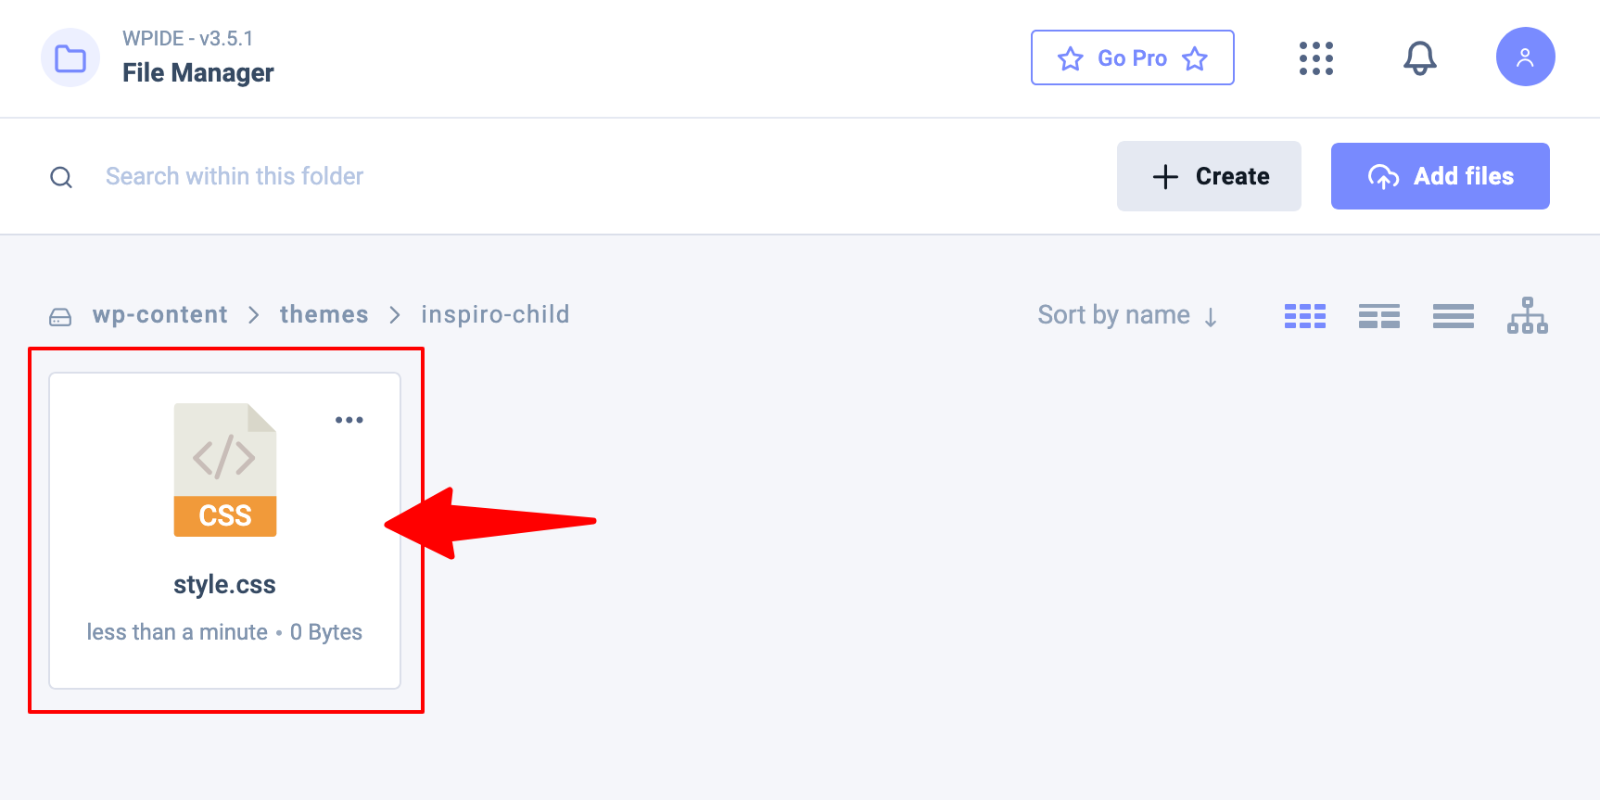
1. In WPIDE, click on your newly created “inspiro-child” folder.
2. Click the “ + Create” button and choose “Create file“.

3. Name the new file style.css and click Create.

4. Click the style.css file to start editing it.
5. Add the following code:
/*
Theme Name: Inspiro Child
Theme URI: http://example.com/inspiro-child/
Description: Inspiro Child Theme
Author: Your Name
Author URI: http://example.com
Template: inspiro
Version: 1.0.0
*/

/* Add your custom styles here */
The Template line is crucial. It must match your parent theme’s folder name exactly. This tells WordPress which parent theme to inherit from.
Replace the other details with information about your child theme. The Theme Name appears in your WordPress dashboard, so choose something descriptive and clear.
6. Click Save.

Step 3. Creating the Functions.php File
Your child theme needs a functions.php file to properly enqueue the parent theme’s stylesheet.
Create this file in your child theme folder in the same way you’ve created the style.css file and add the following code:
<?php
function enqueue_parent_styles() {
    wp_enqueue_style( 'parent-style', get_template_directory_uri() . 'https://b8f4g5a7.delivery.rocketcdn.me/style.css' );
}
add_action( 'wp_enqueue_scripts', 'enqueue_parent_styles' );
?>
This code tells WordPress to load the parent theme’s CSS file. Without this function, your child theme won’t inherit the parent’s styling, and your website will appear broken.
Step 4. Activating the Child Theme
Once you’ve created both files, your child theme should appear in your WordPress dashboard.
1. Go to Appearance > Themes and look for your new child theme.
2. Click the Activate button to switch from your parent theme to your child theme.
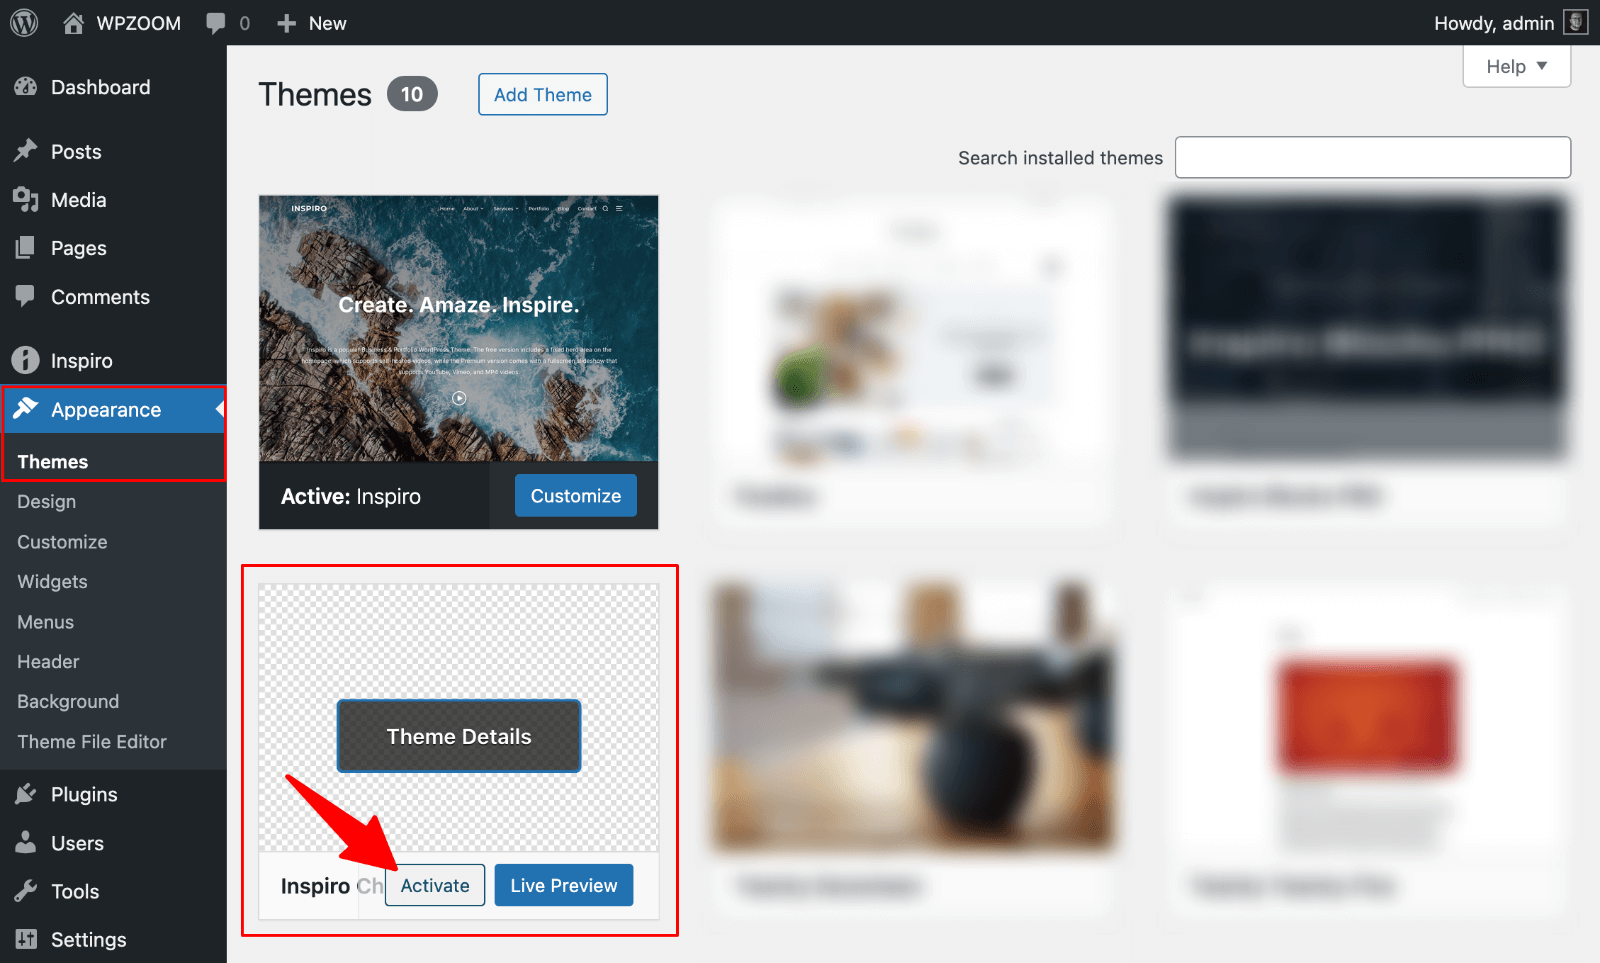
Your website should look identical to before, but now you’re running on the child theme.
If your child theme doesn’t appear or looks broken, double-check your file contents for typos. The Template line in style.css and the function name in functions.php are common sources of errors.
Using Plugins to Create a WordPress Child Theme
WordPress plugins can simplify child theme creation, especially for beginners who prefer visual interfaces over manual file editing. Different plugins work better with classic themes versus block themes.
Classic Themes: WP Child Theme Generator Plugin
The WP Child Theme Generator plugin offers a straightforward method for creating child themes for classic WordPress themes. This plugin handles all the technical details while giving you a user-friendly interface.
1. Install and activate the plugin from your WordPress dashboard.
2. Navigate to Appearance > Child Theme Gen to access the plugin’s settings.

3. Select your parent theme from the dropdown menu and configure the details of your child theme. The plugin allows you to customize the theme’s name, description, and author information.
5. Click Create Child Theme to generate your child theme automatically.
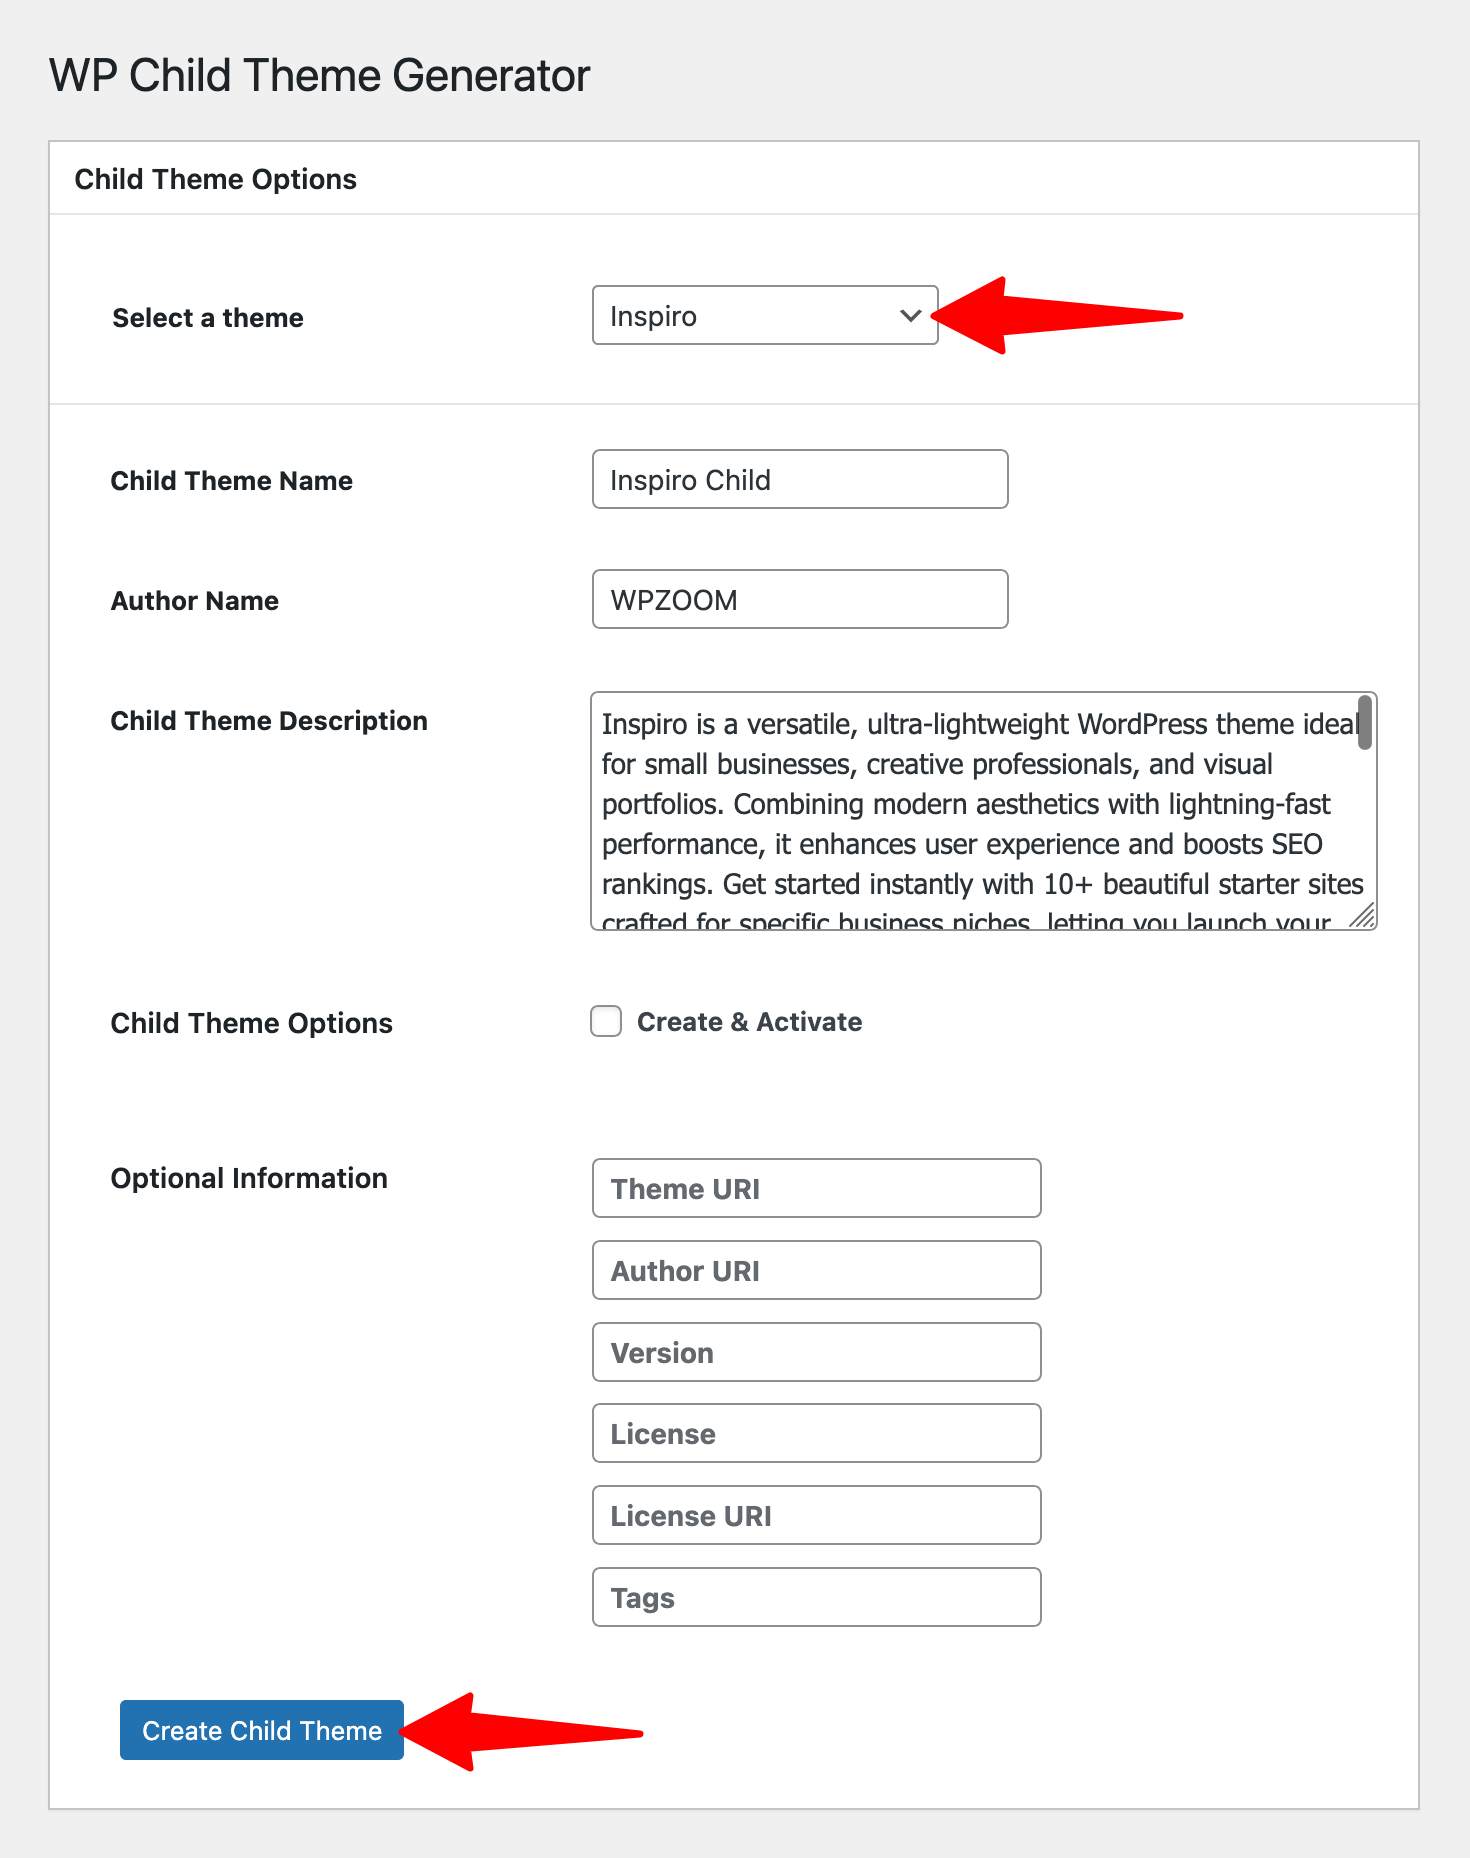
The plugin creates all necessary files and folders, then activates your new child theme immediately.
Block Themes: Create Block Theme Plugin
Block themes require a different approach due to their theme.json configuration system. The Create Block Theme plugin specializes in working with modern block-based themes.
This plugin integrates with WordPress’s Site Editor, enabling you to make visual changes that are automatically saved to your child theme. This approach eliminates the need for manual editing of JSON files.
1. Install the Create Block Theme plugin.
2. Navigate to Appearance > Create Block Theme.
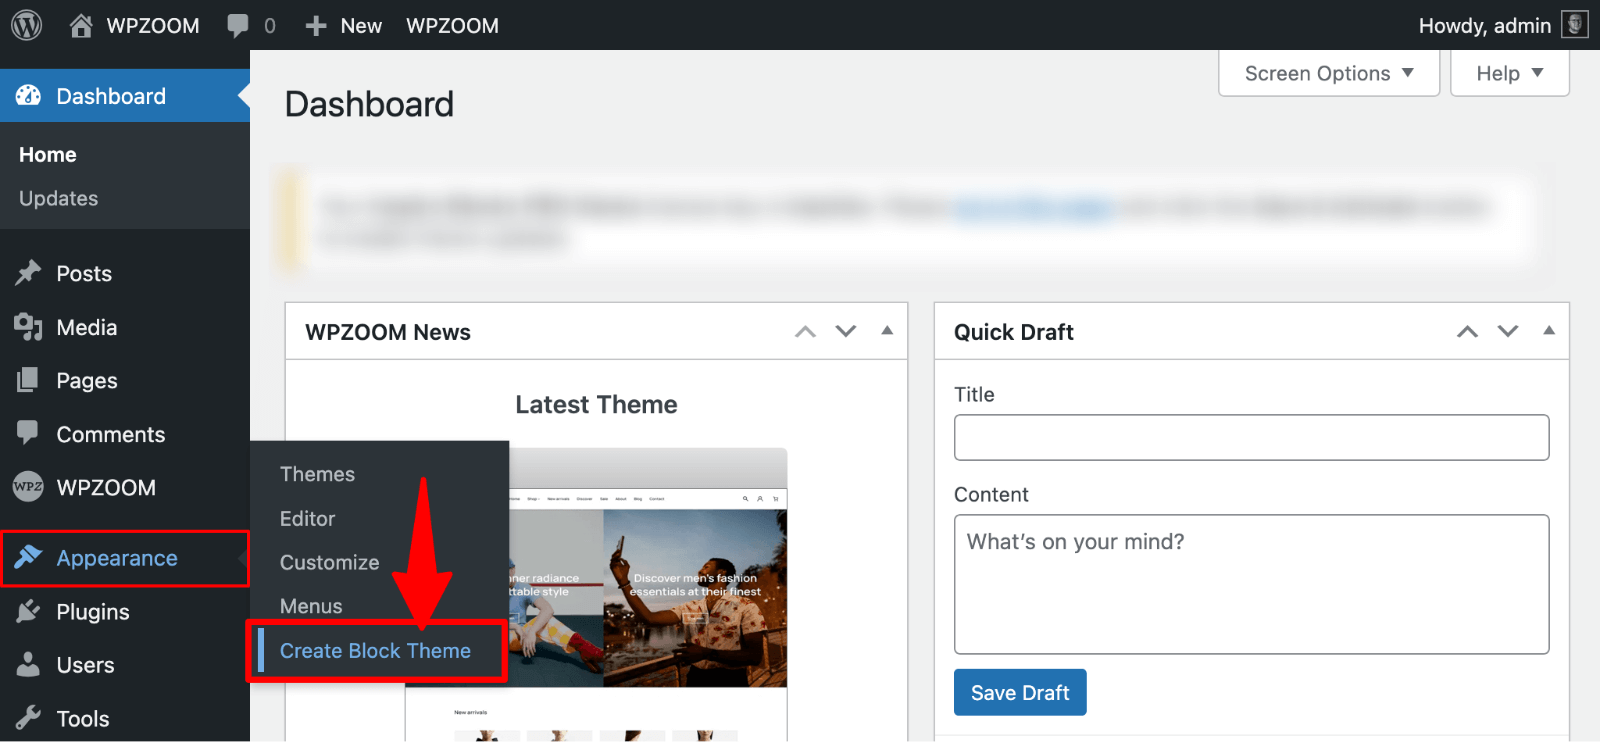
3. Select the option to create a child theme of your current active theme.

4. Fill in your child theme’s information, including name, description, author details, and click “Create Child Theme“.
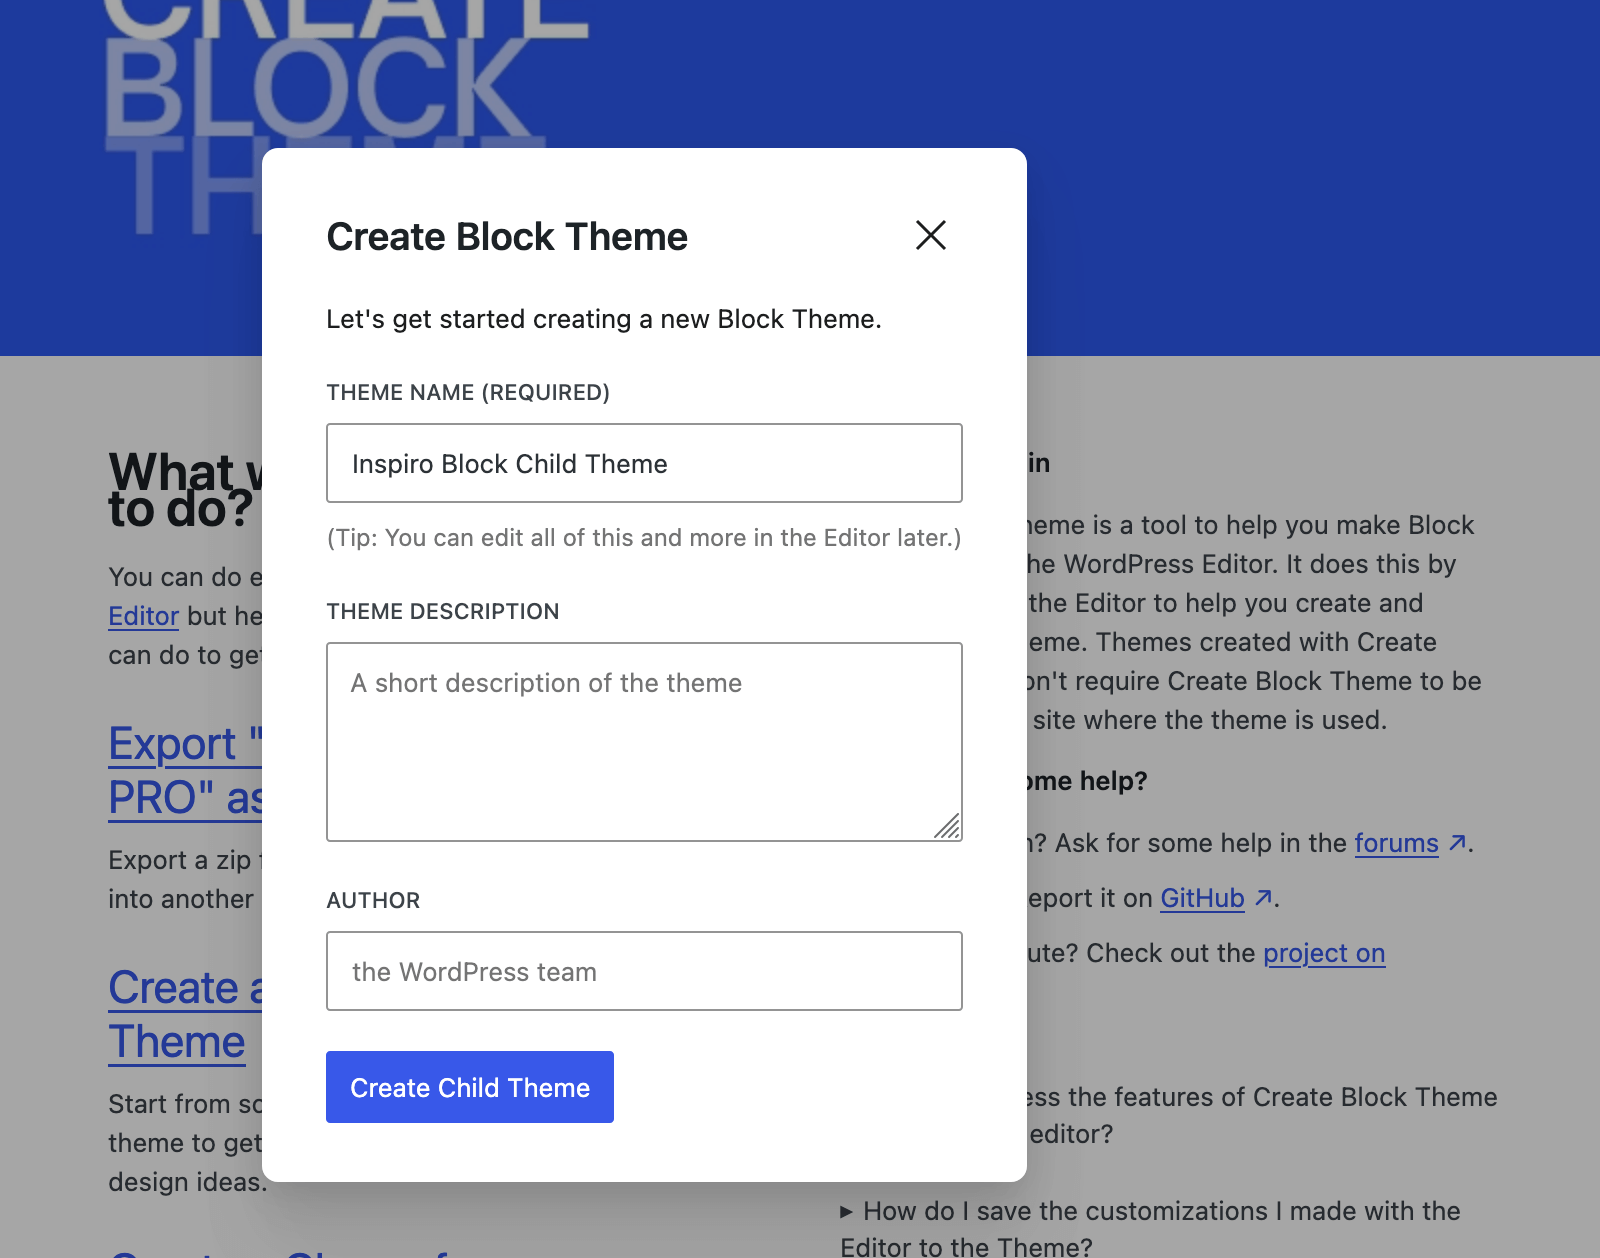
The plugin generates a complete child theme with proper theme.json configuration.
The plugin’s strength lies in its ability to capture changes made in the Site Editor. Make modifications using WordPress’s visual tools, then save those changes directly to your child theme files.
Customizing Your Child Theme
Once your child theme is active, you can begin customizing your website safely. Child themes support various customization methods, from simple CSS changes to complex template modifications.
Editing the Style.css File
Your child theme’s style.css file is where most visual customizations happen. Add custom CSS rules below the header information to override parent theme styles.
Use browser developer tools to identify elements you want to modify. Right-click on page elements and select “Inspect” to see their CSS classes and current styling.
Copy relevant CSS selectors from the parent theme and modify them in your child theme. Your child theme’s CSS takes precedence over the parent theme’s styling.
Adding Custom Functions to Functions.php
Your child theme’s functions.php file can add new functionality or modify existing features. This file works like a plugin that’s automatically activated with your theme.
Add custom functions below the enqueue statement in your functions.php file. Each function should have a unique name to avoid conflicts with the parent theme or plugins.
For example, to add a custom widget area, include this code:
function custom_widget_area() {
    register_sidebar(array(
        'name' => 'Custom Widget Area',
        'id' => 'custom-widget',
        'before_widget' => '<div class="custom-widget">',
        'after_widget' => '</div>',
        'before_title' => '<h3>',
        'after_title' => '</h3>',
    ));
}
add_action('widgets_init', 'custom_widget_area');
Modifying Template Files
Template files determine how various parts of your website are displayed. You can override any parent theme template by copying it to your child theme folder.
- Copy the template file from your parent theme directory to your child theme directory. Maintain the same file name and folder structure for WordPress to recognize the override.
- Edit the copied template file to make your desired changes. Common modifications include adding custom headers, footers, or post layouts.
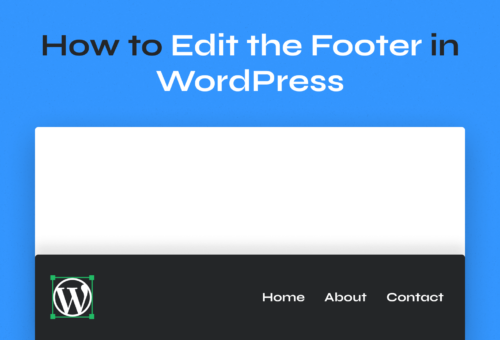
For example, to customize your footer, copy footer.php from your parent theme to your child theme, then edit the child theme version with your changes.
Customizing Block Themes via Theme.json
Block themes use theme.json files for global styling and configuration. Child block themes can override parent theme.json settings with their own configurations.
- Create a theme.json file in your child theme directory. Include only the settings you want to override rather than copying the entire parent file.
- Use the WordPress Site Editor to make visual changes, then save those changes to your child theme using the Create Block Theme plugin.
This approach lets you customize colors, typography, spacing, and layout settings through WordPress’s visual interface while maintaining code-level control.
Adding JavaScript and PHP Hooks
WordPress hooks let you modify theme behavior without editing core files. Use action and filter hooks in your child theme’s functions.php file to add custom functionality.
Enqueue custom JavaScript files using WordPress’s script registration system. This approach ensures proper loading order and prevents conflicts with other scripts.
For example, to add custom JavaScript functionality:
function enqueue_custom_scripts() {
    wp_enqueue_script('custom-script', get_stylesheet_directory_uri() . 'https://b8f4g5a7.delivery.rocketcdn.me/js/custom.js', array('jquery'), '1.0', true);
}
add_action('wp_enqueue_scripts', 'enqueue_custom_scripts');
Create a js folder in your child theme directory and add your custom.js file there. This organization keeps your files structured and maintainable.
Common Errors and Troubleshooting
Child theme problems usually have straightforward solutions.
- Stylesheet Issues: CSS Not Overriding Parent Theme. When your child theme’s CSS doesn’t override the parent theme, check your functions.php file to ensure the enqueue function works correctly. Add the !important declaration to CSS rules that aren’t taking effect.
- Child Theme Not Appearing in Dashboard. If your child theme doesn’t appear in WordPress, verify your style.css file includes all required header fields, especially Theme Name and Template lines. The Template value must exactly match your parent theme’s folder name.
- Enqueue Functions and Caching Issues. Double-check functions.php for syntax errors. Missing semicolons or incorrect function names cause failures. Clear browser cache with Ctrl+F5 and purge caching plugin cache through your dashboard. Consider temporarily disabling caching while developing your child theme.
Best Practices for Maintaining a Child Theme
- Regularly Updating Parent Themes. Keep your parent theme updated to receive security patches, bug fixes, and new features. Check for updates monthly through your WordPress dashboard. Test updates on staging sites before applying them to live websites.
- Managing Versions and Documentation. Document your child theme changes with clear comments and version numbers. Update your child theme’s version number in the style.css header whenever you make significant changes. Keep a changelog recording what you changed, when, and why.
- Backing Up Customizations. Regularly back up your child theme files separately from general website backups. Store backups in multiple locations and test them periodically by restoring to staging environments.
Transform Your Website with WPZOOM Themes
WPZOOM themes offer the perfect foundation for your child theme projects. Each theme features clean, professional code that makes customization straightforward, responsive designs that work flawlessly across devices, and regular updates for security and performance.
Whether you’re building client websites or growing your own business, our themes save you development time while delivering premium results. Explore WPZOOM’s collection and discover themes that work as hard as you do.