Migrating your WordPress site to HTTPS is essential for security, SEO, and user trust. This comprehensive guide covers the full HTTP to HTTPS migration process, from SSL certificate installation to resolving mixed content issues, ensuring your site displays the secure padlock icon.
Table of Contents
- What is HTTPS?
- How to Switch from HTTP to HTTPS in WordPress
- Common Issues and How to Resolve Them
- Enhance Your HTTPS WordPress Site with Professional Themes
What is HTTPS?
HTTPS (HyperText Transfer Protocol Secure) encrypts data exchanged between a website and a user’s browser using SSL encryption via SSL/TLS certificates. This protects sensitive information from interception and ensures secure communication. HTTPS also improves trust and SEO rankings by signaling a secure connection to both users and search engines.
SSL (Secure Sockets Layer) certificates authenticate your website’s identity and enable secure connections. Modern browsers display a padlock icon for HTTPS sites and warn users about “Not Secure” HTTP sites, especially when forms are present.
Why is HTTPS Important?
Key benefits of switching to HTTPS include:
- Enhanced Security: Encrypts data transmission, protecting user information
- Increased User Trust: Visitors see the secure padlock icon instead of warnings
- Access to Modern Features: Required for HTTP/2, service workers, and many APIs
- Compliance Requirements: Essential for e-commerce and data collection
WordPress security is fundamental because the platform powers over 40% of all websites. Implementing HTTPS protects your admin area, user logins, and any sensitive data your site handles.
How to Switch from HTTP to HTTPS in WordPress
Step 1: Backup Your WordPress Website
Creating a complete backup is crucial before making any changes to your WordPress site. This ensures you can restore your site if anything goes wrong during the HTTPS migration.
For detailed instructions on backing up your WordPress site, including multiple methods and best practices, check out our comprehensive guide: How to Backup Your WordPress Website.
Step 2: Obtain and Install an SSL Certificate
Before you can switch to HTTPS, begin with SSL installation via your hosting provider or a certificate authority. Most modern web hosting providers now include SSL certificates through Let’s Encrypt or their own certificate authority as a standard feature, making this step much simpler than it used to be.
Before purchasing anything, check your hosting control panel first to see if SSL is already available.
How to get SSL through your hosting provider:
1. Log in to your hosting control panel (cPanel, Plesk, or custom dashboard).
2. Look for “SSL Certificates,” “SSL/TLS,” or “Security” section.
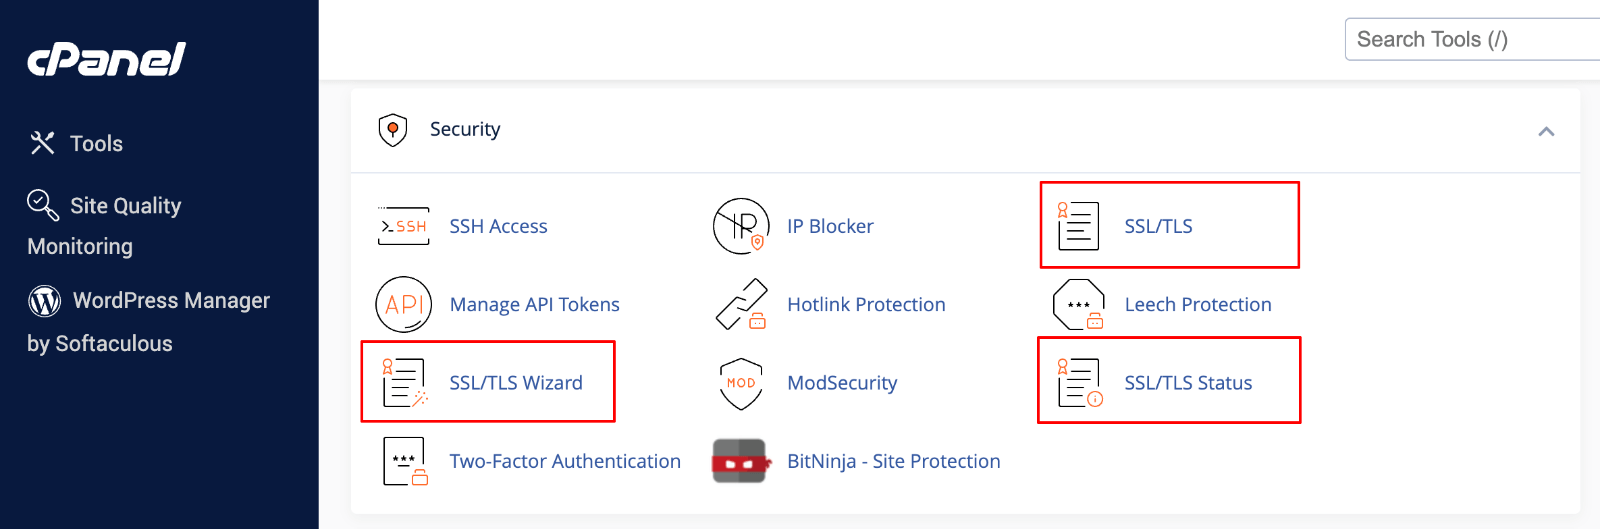
3. Check if SSL is already enabled for your domain.

4. If not available, look for “Let’s Encrypt” or “Free SSL” option.
5. Select your domain and click “Install” or “Enable”.
6. Wait for the certificate to be issued and installed (usually 5-15 minutes).
If your host doesn’t offer SSL, contact your hosting provider’s support team first – many can install free Let’s Encrypt certificates upon request. If SSL isn’t available through your host, consider upgrading to a hosting plan that includes SSL or switching to a hosting provider that offers modern security features.
Alternative SSL sources:
- Let’s Encrypt direct: Free certificates you can install manually
- Certificate authorities: Paid options like Sectigo, DigiCert, or GlobalSign for enhanced validation
After installing your SSL certificate, the next step is to force HTTPS in WordPress to ensure all connections are securely encrypted.
Step 3: Update WordPress URLs in Admin Settings
Once your SSL certificate is active, update your WordPress site URLs to change HTTP to HTTPS in your WordPress settings.
- Log in to your WordPress admin dashboard
- Navigate to Settings > General
- Update both URL fields:
- WordPress Address (URL): Change from http:// to https://
- Site Address (URL): Change from http:// to https://
- Click Save Changes

⚠️ Warning: WordPress will automatically log you out after saving these changes. Log back in using the HTTPS URL.
Step 4: Redirect HTTP to HTTPS Automatically
After updating your WordPress URLs, you need to redirect all HTTP traffic to HTTPS. This ensures visitors accessing old HTTP links are automatically sent to the secure HTTPS version.
Method 1: Using the Really Simple Security Plugin
For beginners, using a plugin like Really Simple Security (formerly Really Simple SSL) is the easiest way to handle HTTPS redirects and mixed content issues.
1. Go to Plugins > Add New in your WordPress dashboard.
2. Search for “Really Simple Security”.
3. Click Install Now and then Activate.

4. The plugin will automatically detect your SSL certificate.
5. Click “Activate SSL” when prompted.

What Really Simple Security does automatically:
- Detects SSL certificate installation
- Updates WordPress site URLs
- Sets up 301 redirects from HTTP to HTTPS
- Fixes mixed content warnings
- Forces SSL on admin and login pages
Method 2: Manual Redirect via .htaccess
For users who prefer manual control or require improved performance, implementing HTTPS redirects via .htaccess offers a permanent solution.
Apache servers (.htaccess method):
1. Access your website files via FTP or File Manager.
2. Navigate to your website’s root directory (usually public_html).
3. Locate the .htaccess file.
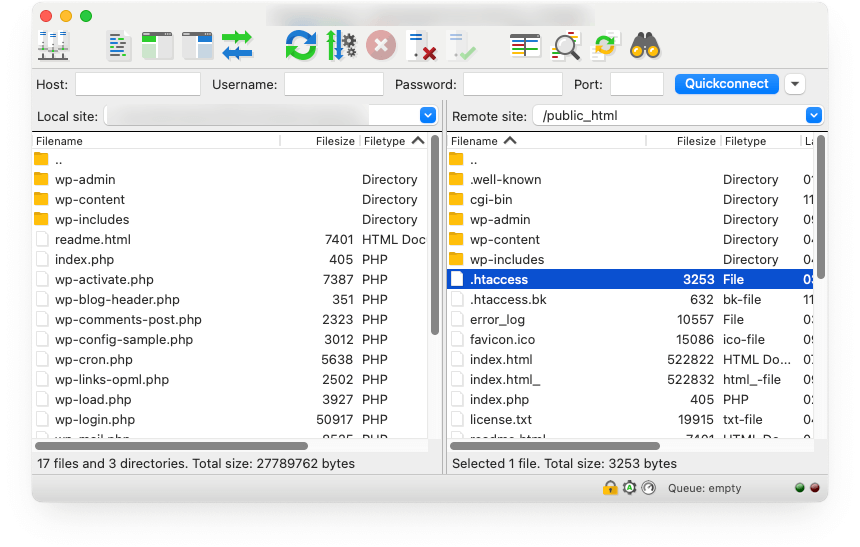
4. Add this code at the top of the file, before any existing WordPress rules:
<IfModule mod_rewrite.c>
RewriteEngine On
RewriteCond %{HTTPS} off
RewriteRule ^(.*)$ https://%{HTTP_HOST}%{REQUEST_URI} [L,R=301]
</IfModule>
NGINX servers:
If your hosting uses NGINX, add this to your server configuration:
server {
    listen 80;
    server_name example.com www.example.com;
    return 301 https://example.com$request_uri;
}
⚠️ Warning: Always backup your .htaccess file before editing. Incorrect syntax can make your site inaccessible.
After implementing redirects, visit your site’s HTTP URL. You should be automatically redirected to the HTTPS version, which will display a secure padlock icon.
Step 5: Update Internal URLs
After implementing HTTPS redirects, you must update the internal URLs in your WordPress database to ensure all content uses HTTPS URLs and to prevent mixed content warnings.
The most efficient way to handle URL updating is by using the Better Search Replace plugin to replace all HTTP links with HTTPS:
- Install and activate the “Better Search Replace” plugin
- Go to Tools > Better Search Replace
- Configure the search and replace:
- Search for: http://yoursite.com
- Replace with: https://yoursite.com
- Select tables: Choose all tables or leave blank for all
- Run as dry run: Check this first to preview changes
- Click Run Search/Replace to preview
- If the results look correct, uncheck “Run as dry run” and run again
Upgrade Your Website with a Premium WordPress Theme
Find a theme that you love and get a 10% discount at checkout with the FLASH10 code
Choose your theme
Common Issues and How to Resolve Them
Even after following all the setup steps, you might encounter some issues. Here are the most common problems and their solutions.
1. Mixed Content Issues
If your site loads over HTTPS but doesn’t show the secure padlock icon, you likely have mixed content warnings. These occur when HTTPS pages still load some resources (images, scripts, stylesheets) over HTTP.
To identify and resolve these issues, you’ll need to inspect your site and systematically check for any remaining HTTP resources.
Inspect your site using browser inspection tools:
- Open your website in Chrome or Firefox
- Right-click and select Inspect or press F12
- Click the Console tab
- Look for mixed content warnings in red text
- Note the specific files causing issues
If you still see mixed content warnings after completing the database updates, the issue likely stems from your theme or plugins loading resources with hardcoded HTTP URLs.
Fixing remaining mixed content:
If you still see mixed content warnings, check:
- Theme files: Look for hardcoded HTTP URLs in theme templates
- Plugin issues: Deactivate plugins one by one to identify culprits
- Custom code: Check any custom HTML, CSS, or JavaScript
- External resources: Update any hardcoded external links to HTTPS
2. SSL Not Showing on Admin Pages
Login and admin pages still show “Not Secure” warnings.
To force SSL on all admin and login pages, add the following line to your wp-config.php file:
define('FORCE_SSL_ADMIN', true);Clear any caching plugins and test by logging out and logging back in.
3. Redirection Loops
The website keeps redirecting endlessly between HTTP and HTTPS.
Common causes and solutions:
- Conflicting redirects: Check for multiple redirect rules in .htaccess
- Plugin conflicts: Deactivate SSL plugins temporarily
- Wrong WordPress URLs: Verify that both site URLs use HTTPS
Enhance Your HTTPS WordPress Site with Professional Themes
Now that your WordPress site runs securely on HTTPS, elevate your design with WPZOOM’s premium themes. Our responsive, SEO-optimized themes are fully compatible with SSL certificates and modern security standards. Choose from our professional collection designed to showcase your secure site beautifully while maintaining optimal performance and user experience.