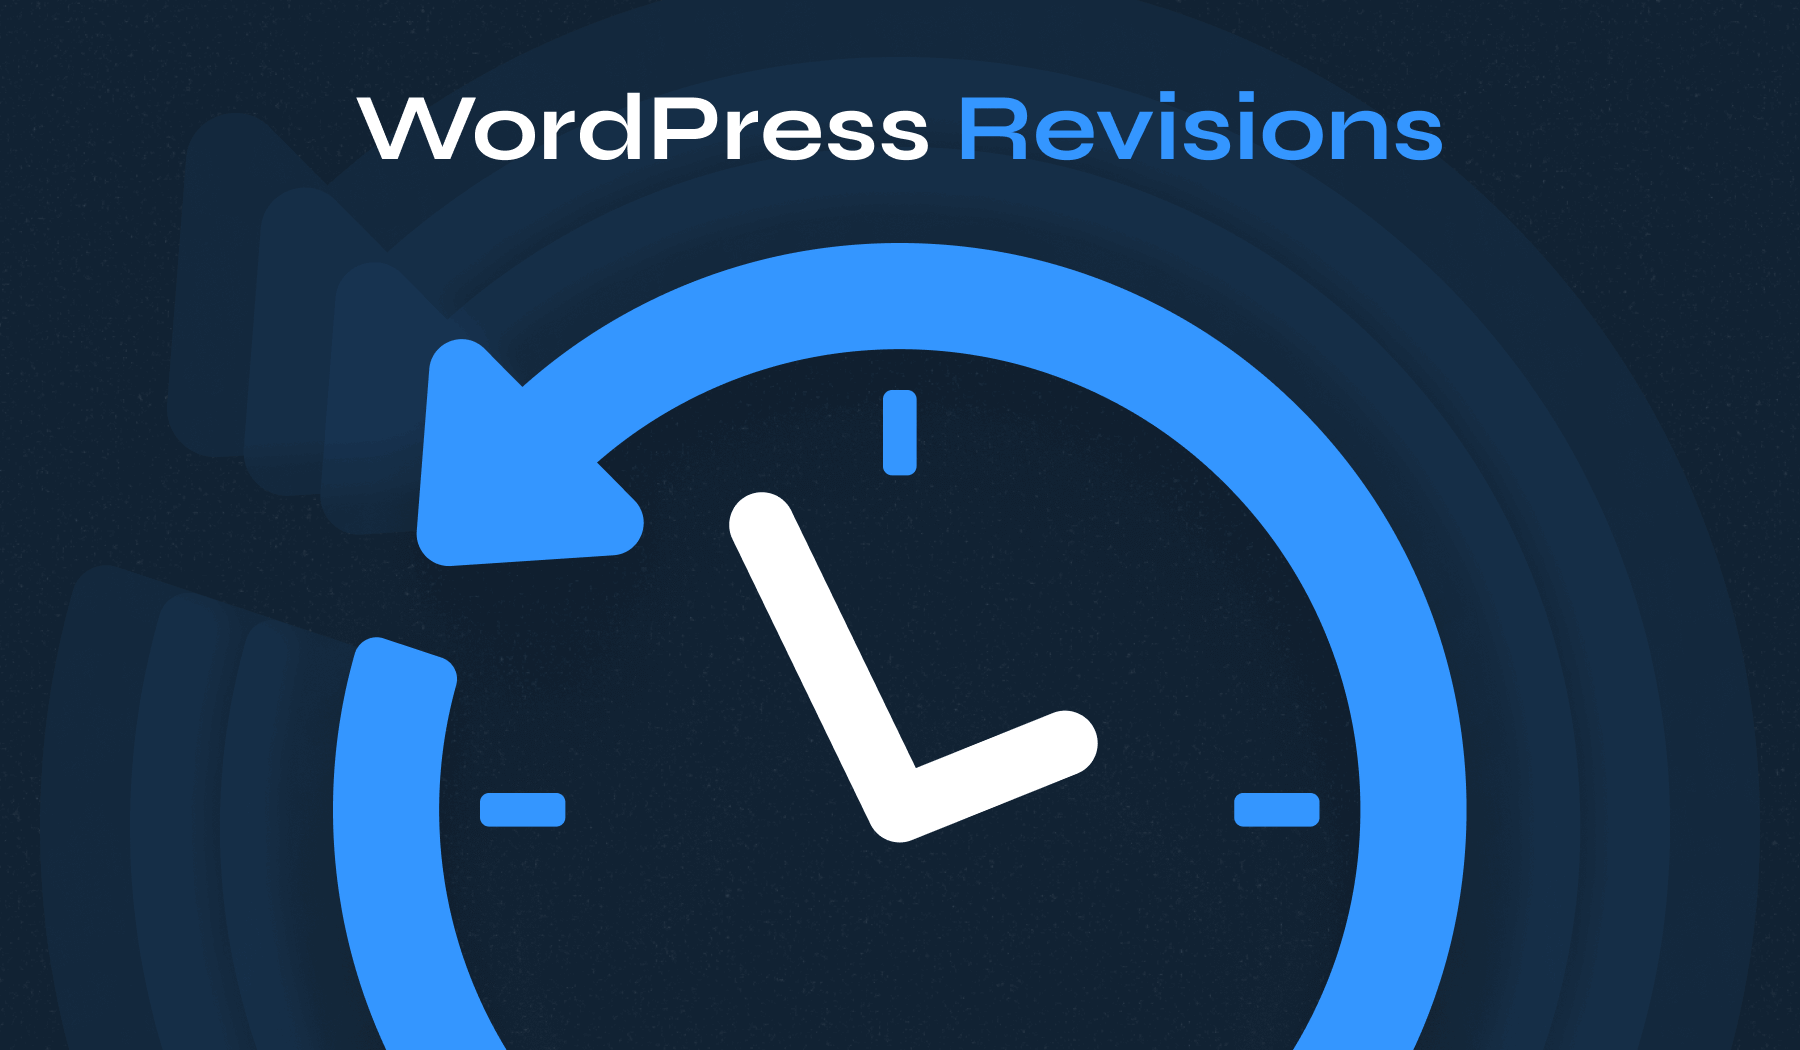
You’ve spent hours perfecting a blog post, hit “Update,” and realize you accidentally deleted three paragraphs. Your stomach drops. WordPress revisions give you that second chance—a built-in safety net that automatically tracks every change you make to posts and pages. Whether you need to recover deleted content, compare different versions, or simply undo a mistake, the revision system has your back.
This guide shows you how to access, use, and manage WordPress revisions so you can work confidently without fear of losing important content. We’ll also cover optimization strategies to keep your database lean and your site fast.
Table of Contents
- What Are WordPress Revisions?
- How to Access and View WordPress Revisions
- How to Use and Compare WordPress Revisions
- How to Restore a Previous WordPress Revision
- The Benefits of WordPress Revisions
- The Problem with Unlimited Revisions
- How to Limit WordPress Revisions
- How to Delete Old WordPress Revisions
- How to Enable WordPress Revisions
- How to Disable WordPress Revisions
- Advanced Revision Management
- Troubleshooting: WordPress Revisions Not Showing
- WordPress Revisions vs. Backups
- Best Practices for Managing WordPress Revisions
What Are WordPress Revisions?
WordPress revisions are saved versions of your posts or pages that record changes over time. Each time you save or update content, WordPress stores a revision. You can view, compare, and restore previous revisions directly from the editor to recover content or undo mistakes.
Think of them as checkpoints. You can always return to an earlier state if something goes wrong.
Every time you click “Save Draft,” “Update,” or “Publish,” WordPress captures a complete copy of your content at that moment. These snapshots include your text, formatting, and other content elements, stored in your WordPress database in the wp_posts table with a post_type value of “revision.”
The revision system works silently in the background without requiring activation. You can edit confidently, knowing you won’t permanently lose previous versions of your work.
Autosaves vs. Manual Revisions
WordPress creates two types of saves:
- Autosave happens every 60 seconds while you’re editing. It’s a temporary safety net that protects your work if your browser crashes. Autosaves are overwritten with each new autosave and don’t clutter your revision history.
- Manual revisions are created when you click “Save Draft,” “Update,” or “Publish.” These are permanent database entries that become part of your revision history and stay until you delete them.
The key difference? Autosaves are temporary placeholders, while manual revisions accumulate as a permanent record of changes.
How to Access and View WordPress Revisions
Finding your revision history depends on which editor you’re using.
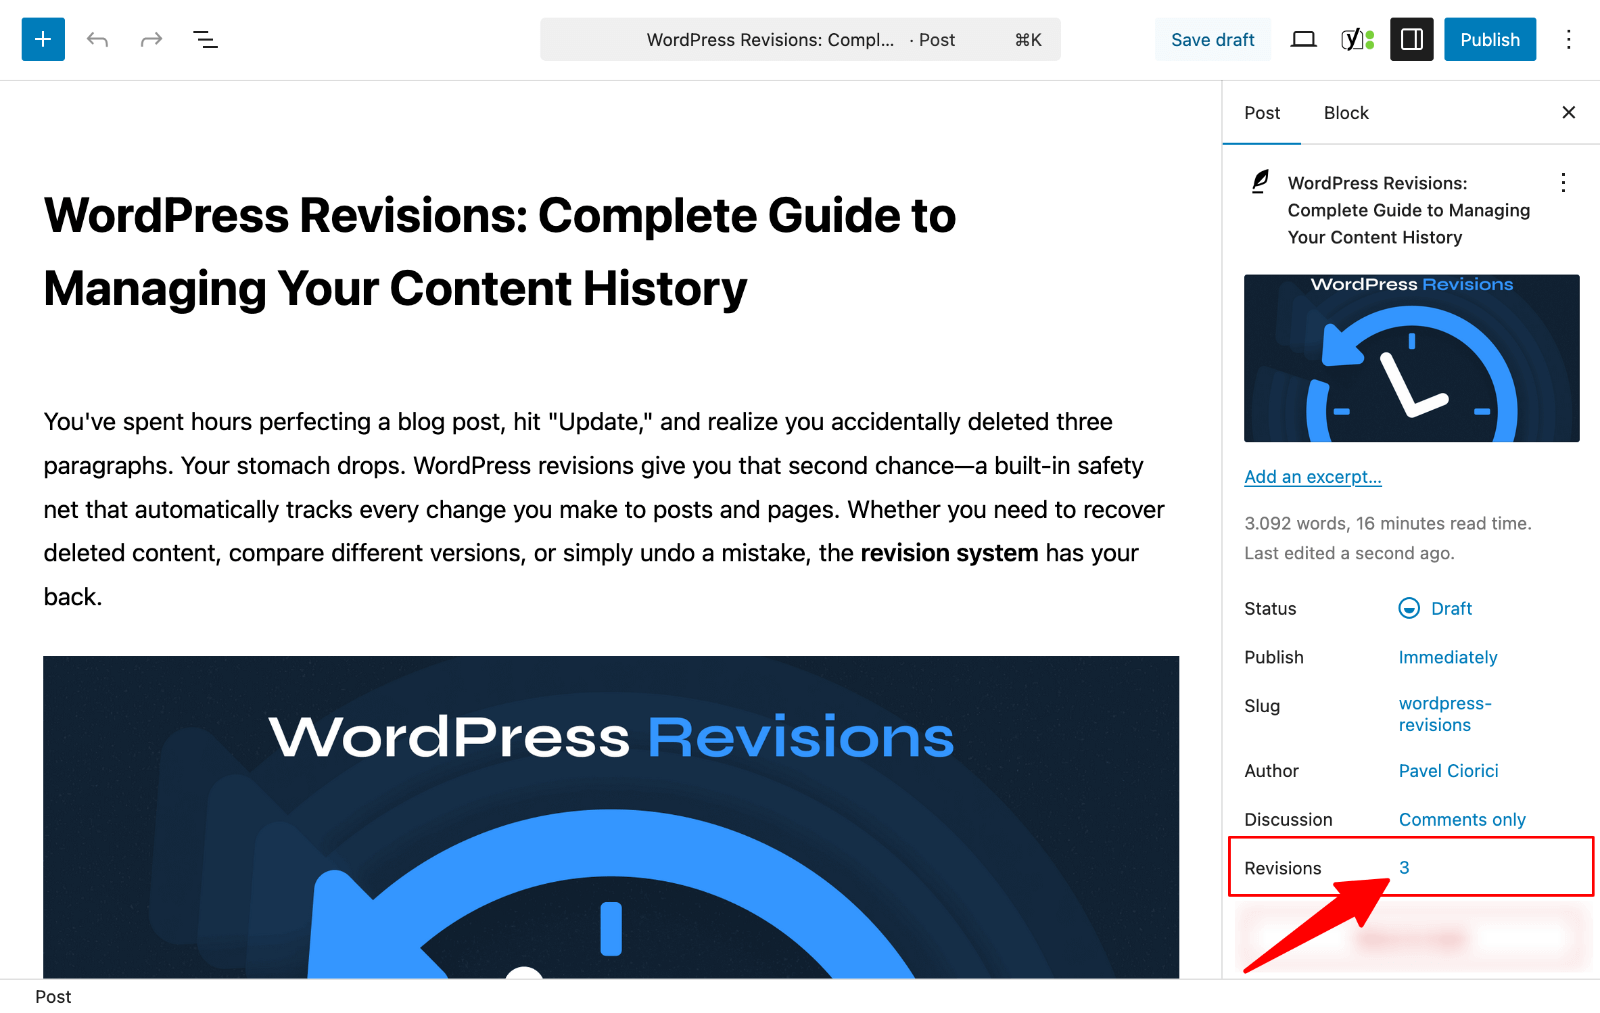
Finding Revisions in Gutenberg Editor
- Open your post or page in the WordPress editor.
- In the right sidebar’s Settings panel, look for the “Revisions” label with a number next to it. Click that number to open your revision history.
Finding Revisions in Classic Editor
Look for the Publish box on the right side of your screen.
You’ll see a “Revisions” option there with the number of saved versions.
Click “Browse” to open your revision history.
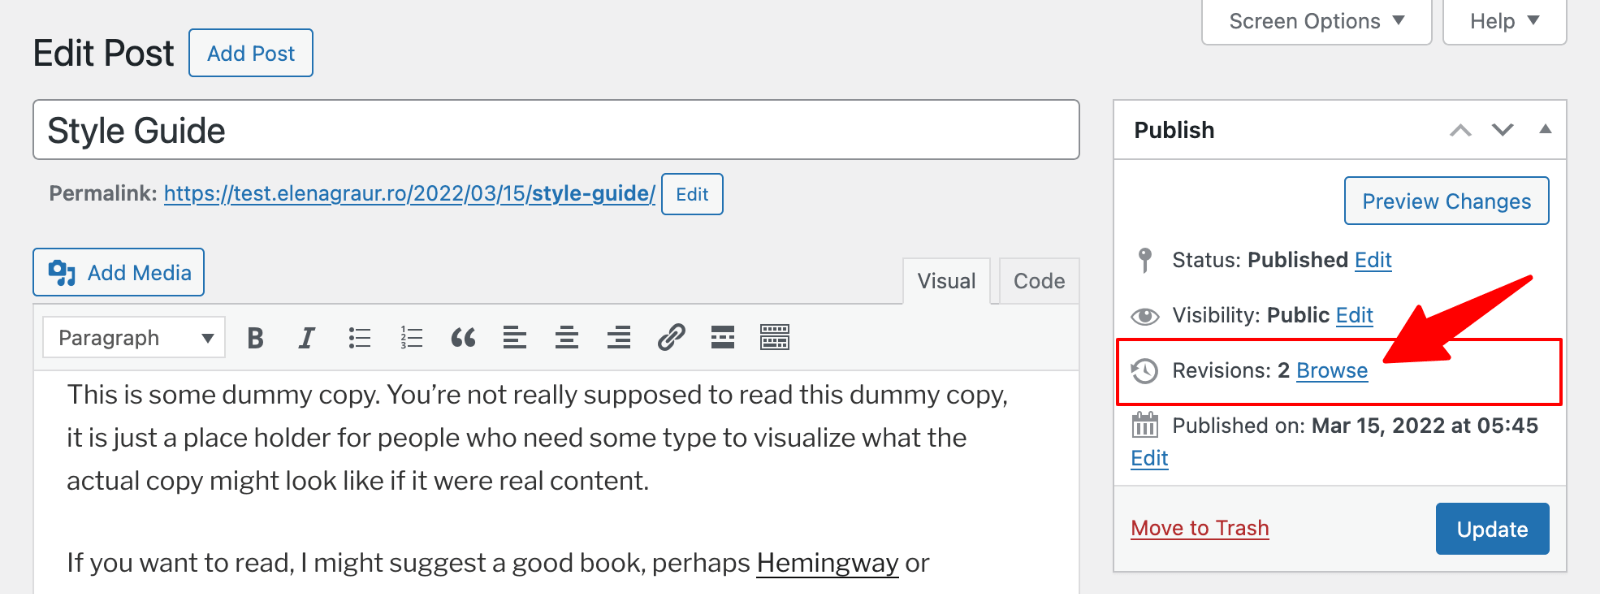
Can’t find it? Click Screen Options at the top right and make sure the “Revisions” checkbox is enabled.
User Roles and Revision Access
Not everyone has the same access to revisions. WordPress user roles and permissions determine what you can do:
- Administrators and Editors can view and restore revisions for any post or page, regardless of who created it.
- Authors can only see revisions for their own posts.
- Contributors can view revisions for their draft posts, but can’t restore them after publication.
How to Use and Compare WordPress Revisions
The revision history screen provides a powerful comparison tool that helps you understand what changed between versions.
Viewing the Revision History Screen
The revision screen splits into two columns showing different versions side by side. The left column typically shows the previous version, while the right displays the selected version.
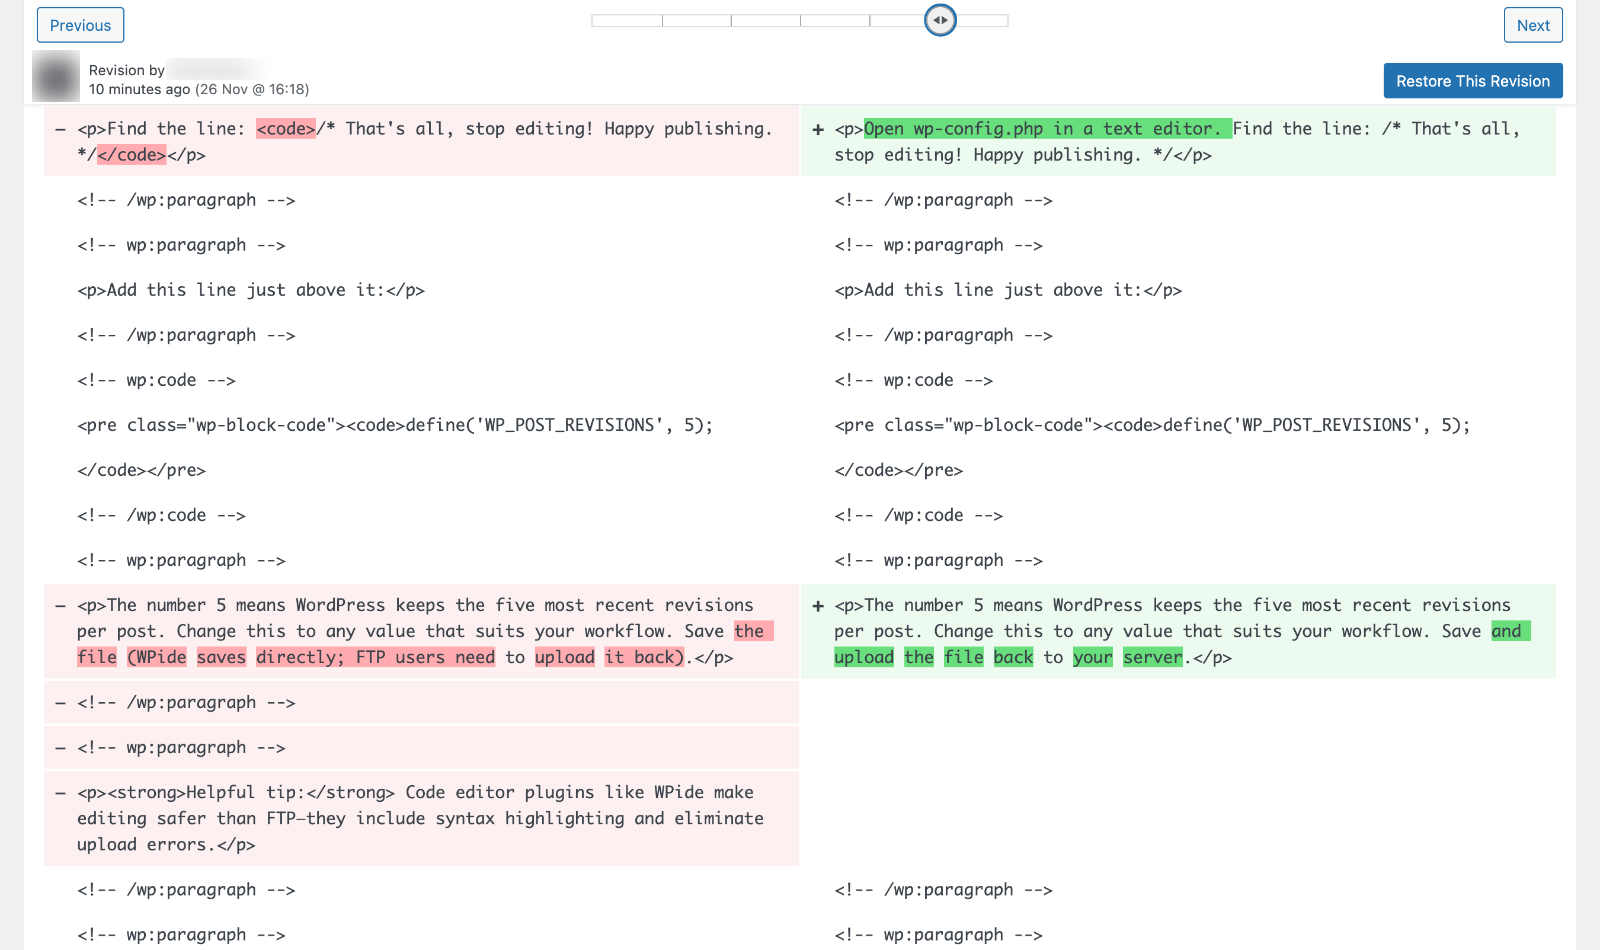
WordPress uses color coding to highlight changes:
- Green backgrounds show text that was added
- Red backgrounds show text that was deleted
- Unchanged text appears without highlighting
At the top of each column, you’ll see the date, time, and author of the revision, crucial information for tracking who edited what and when.
Navigating Between Revisions
Use the slider tool at the top to move through your revision history. Drag left for older revisions or right for newer ones. You can also use “Previous” and “Next” buttons for precise control.
Watch the timestamps as you move through revisions to locate specific versions. Maybe you remember making an important edit on Tuesday afternoon.

Comparing Any Two Revisions
By default, WordPress compares consecutive revisions. To compare non-sequential versions, enable the “Compare any two revisions” checkbox near the top. This unlocks two separate slider controls, letting you see what changed between Monday’s first draft and Friday’s final version.
Understanding Revision Display Format
Revisions show HTML code and block comments, like <!– wp:paragraph –> instead of clean text. This is normal. WordPress stores content in HTML format, and Gutenberg uses block markup to define structure.
Don’t let this intimidate you. You can still identify changes by reading the text between HTML tags. The color coding works regardless, so you can see exactly what was added or removed.
Upgrade Your Website with a Premium WordPress Theme
Find a theme that you love and get a 10% discount at checkout with the FLASH10 code
Choose your theme
How to Restore a Previous WordPress Revision
Found the version you want? Restoration is straightforward.
- Use the slider to navigate to the exact revision you need.
- Double-check the timestamp and content. There’s no confirmation dialog, so accuracy matters.
- Click the “Restore This Revision” button.
- WordPress immediately reverts your content to that version and returns you to the editor.
The content appears in the editor after restoration. You don’t need to click “Update” unless you want to make additional changes first.
⚡ Important detail: restoring a revision doesn’t delete anything permanently. WordPress creates a new revision that’s a copy of the old version you restored. If you restore the wrong version by mistake, you can simply restore a different one. Your complete history remains intact.
The Benefits of WordPress Revisions
- Content Recovery and Error Protection. Accidents happen. You might delete crucial paragraphs, experience browser crashes, or face power outages while working. WordPress revisions protect you from all these scenarios, capturing your work at regular intervals so you’ll never lose more than a few minutes of changes.
- Multi-Author Collaboration. With multiple site contributors, revisions become invaluable. You can see exactly who made which changes and when. This accountability helps teams coordinate work and avoid conflicts. If someone edits your article but you’re unhappy with their changes, review the revision history to see exactly what they modified, then restore the previous version or create a hybrid.
- Content Experimentation. Revisions give you freedom to experiment without risk. Want to try a completely different introduction? Go for it. If the new version doesn’t work, you can always return to the original. This encourages creative risk-taking that often leads to better content.
The Problem with Unlimited Revisions
WordPress’s default behavior saves unlimited revisions. This creates real problems over time.
Every revision gets stored as a separate entry in your WordPress database. Over time, these accumulate dramatically. Say you have 800 posts, each edited an average of 100 times. That’s 80,000 revision entries, 100 times more post-related data than necessary.
This bloat causes slower query execution, longer backup times, increased storage costs, and degraded site performance. While revisions alone won’t crash your site, they contribute to performance issues that affect user experience and SEO rankings. Proper revision management balances safety with efficiency.
How to Limit WordPress Revisions
Method 1: Edit the wp-config.php File Manually
The wp-config.php file controls fundamental WordPress settings, including revision behavior. Access your site files via FTP, SFTP, or your hosting File Manager. Navigate to your site’s root directory.
⚡ Pro Tip: Back up your site before editing wp-config.php. A single typo can break your entire site.
- Open wp-config.php in a text editor.
- Find the line: /* That’s all, stop editing! Happy publishing. */
- Add this line just above it:
define('WP_POST_REVISIONS', 5);The number 5 means WordPress keeps the five most recent revisions per post. Change this to any value that suits your workflow. Save and upload the file back to your server.
Method 2: Use WP Revisions Control Plugin
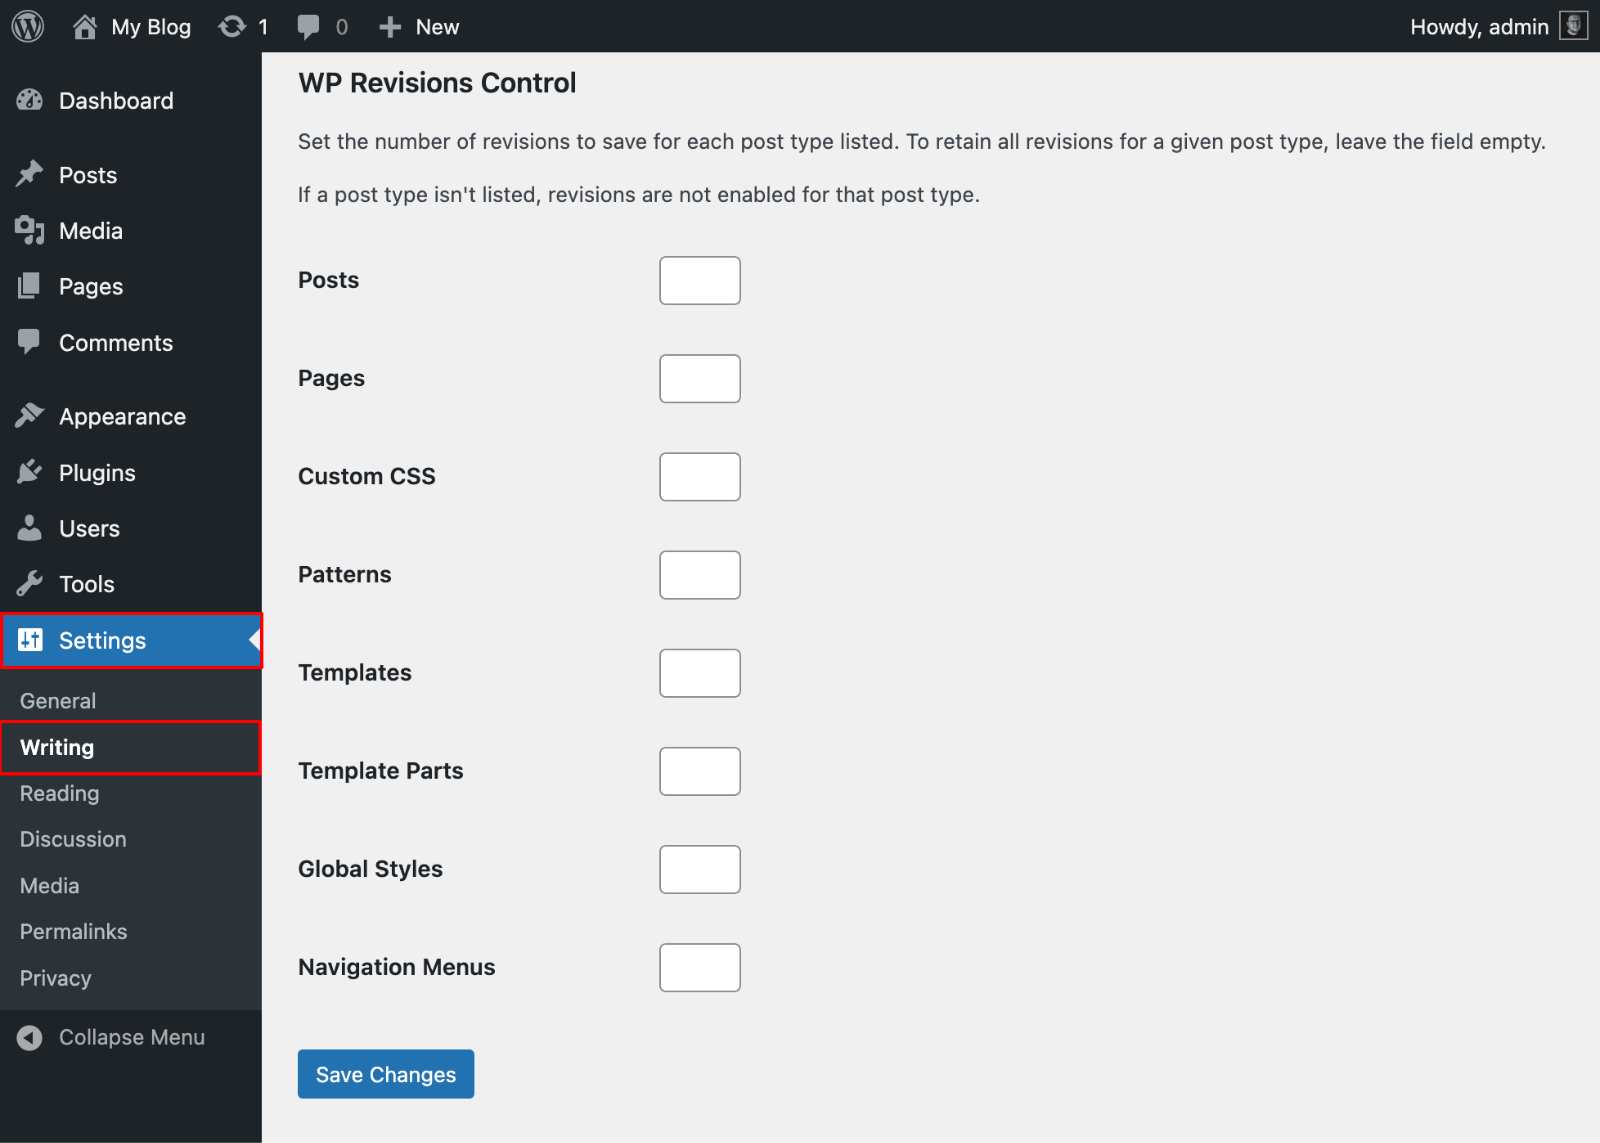
For a user-friendly alternative, install WP Revisions Control from the plugin repository.
- After activation, go to Settings → Writing.
- You’ll see a “Revisions” section at the bottom, letting you set different limits for different post types.
- Keep 10 revisions for blog posts, but only 3 for pages that rarely change.
- Set the limit to 0 to disable revisions for specific post types that don’t need tracking, like testimonials.
- Click “Save Changes“.
Recommended Revision Limits
Personal blogs: 3-5 revisions provide ample safety without bloat.
Business sites: 5-10 revisions balance team collaboration needs with database efficiency.
High-traffic publications: 10-15 revisions support multiple authors and frequent updates.
Most sites work well with 5 revisions—enough to cover several days of editing without excessive database growth.
How to Delete Old WordPress Revisions
Limiting future revisions is great, but what about existing ones clogging your database?
Deleting old revisions frees database storage, improving site performance. Queries run faster, backups complete more quickly, and you have less data to manage during migrations. Sites running for years without limiting revisions can reduce database size by 20-40% through cleanup.
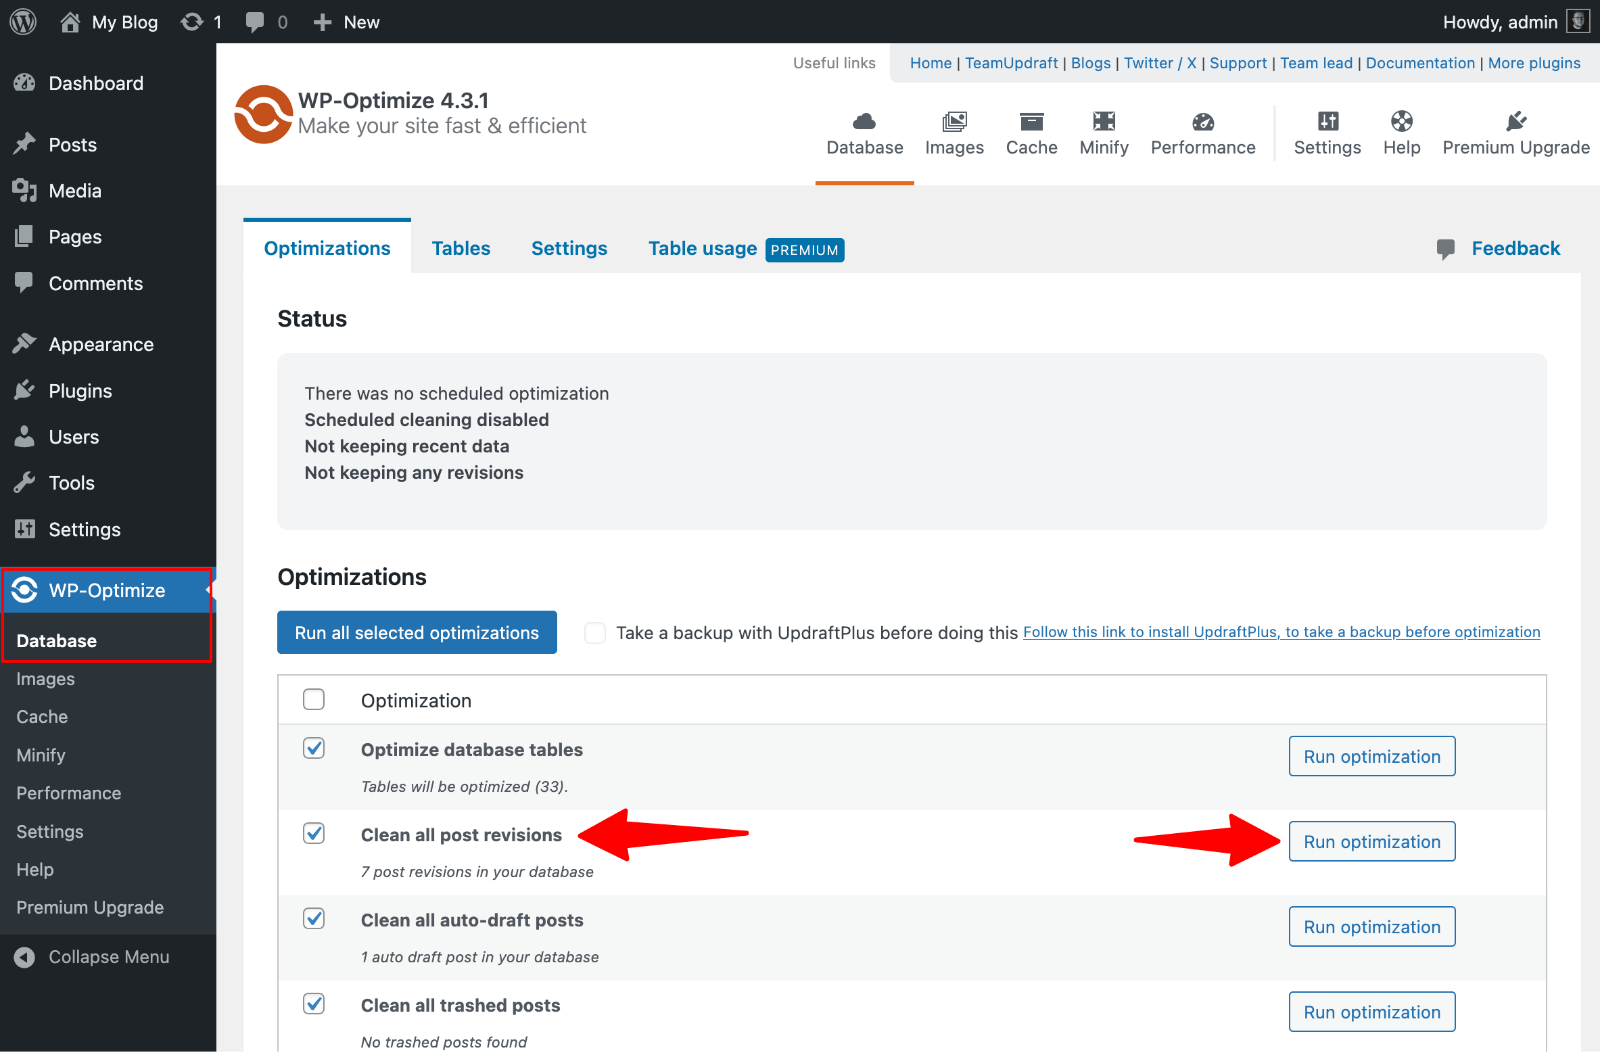
Method 1: Use WP-Optimize Plugin
Install and activate WP-Optimize from the plugin repository.
- Navigate to WP-Optimize → Database → Optimizations.
- Find “Clean all post revisions” and check its checkbox. You’ll see exactly how many revisions exist.
- Click “Run optimization” to delete all post revisions at once.
The plugin shows how much database space you recovered.
Schedule automatic cleanup weekly or monthly to maintain a lean database without manual intervention.
Method 2: Use WP-Sweep Plugin
WP-Sweep offers granular control.
- After installing the plugin, go to Tools → Sweep. The plugin displays detailed database statistics, including revision counts.
- Click “Sweep” next to the revisions category to delete them.
WP-Sweep processes 500 items at a time, so multiple clicks may be needed for thousands of revisions. This staged approach is safer on shared hosting that might time out with large operations.

Method 3: Delete Revisions via phpMyAdmin (Advanced)
⚡ Warning: Advanced users only. Always back up your database first.
1. Access phpMyAdmin through your hosting control panel.
2. Select your WordPress database.
3. Click the SQL tab.
4. Execute:
DELETE FROM wp_posts WHERE post_type="revision";Replace wp_ with your actual database prefix.
5. Click “Go” to execute.
phpMyAdmin shows how many rows were deleted.
This method is powerful but risky, there’s no undo. Only use if you’re comfortable with databases and have confirmed backups.
How to Enable WordPress Revisions
Some hosts disable revisions by default to save resources. Here’s how to turn them back on.
1. Open your wp-config.php file via FTP or File Manager.
2. Look for:
define('WP_POST_REVISIONS', false);3. Change it to:
define('WP_POST_REVISIONS', true);If no WP_POST_REVISIONS line exists, revisions are using WordPress’s default (enabled). Add the line above if you want to be explicit.
4. Save and upload the file.
Open any post and make several small edits, clicking “Update” between each change.
Check the Document tab or Publish box to see if “Revisions” appears with multiple entries. If you see timestamped revisions, the system works correctly.
How to Disable WordPress Revisions
While not recommended for most users, there are scenarios where disabling revisions makes sense, like minimizing database size on large sites or for custom post types that remain static after publication.
Method 1: Edit wp-config.php
Open wp-config.php and add this line before “stop editing”:
define('WP_POST_REVISIONS', false);This disables revision creation for all posts and pages. The autosave feature still works during active editing.
Method 2: Use Disable Post Revision Plugin
For granular control, install the Disable Post Revision plugin.
Go to Settings → Writing and select which post types should have revisions disabled.
Disable for pages but keep active for blog posts, or disable for custom post types while keeping them for main content.
Advanced Revision Management
Enabling Revisions for Custom Post Types
WordPress only enables revisions for posts and pages by default. For custom post types, explicitly enable support:
function create_portfolio_post_type() {
    register_post_type('portfolio',
        array(
            'labels' => array(
                'name' => __('Portfolio Items'),
                'singular_name' => __('Portfolio Item')
            ),
            'public' => true,
            'supports' => array('title', 'editor', 'thumbnail', 'revisions'),
        )
    );
}
add_action('init', 'create_portfolio_post_type');
Include ‘revisions’ in the supports array. This is useful for WooCommerce product descriptions, which are custom post types without default revision support.
Control Revisions on Per-Post Basis
Use the wp_revisions_to_keep filter for dynamic control:
function custom_revision_limit($num, $post) {
    if (in_category('cornerstone', $post)) {
        return 20;
    }
    return $num;
}
add_filter('wp_revisions_to_keep', 'custom_revision_limit', 10, 2);
Add this to your theme’s functions.php file. This keeps 20 revisions for cornerstone content while other posts use the default limit.
Troubleshooting: WordPress Revisions Not Showing
Sometimes revisions don’t appear when expected. Here are common causes and solutions.
- Post hasn’t been saved multiple times. WordPress only creates revisions after multiple save events. New drafts saved once won’t have revisions yet.
- Revisions disabled in wp-config.php. Check for a line setting WP_POST_REVISIONS to false or 0. Remove or change it to true.
- Hidden in Screen Options. For Classic Editor users, click Screen Options at the top right and enable the Revisions checkbox.
- Plugin or theme conflicts. Some plugins or themes interfere with revisions. Temporarily switch to a default theme and deactivate plugins to identify conflicts.
- Hosting provider limitations. Some managed WordPress hosts impose revision limits. WP Engine limits to 3 revisions with 60-day purging. Check your hosting documentation.
WordPress Revisions vs. Backups
Revisions and backups serve different purposes and complement each other.
WordPress revisions store content-level changes for individual posts and pages. They track text and formatting, but only for single pieces of content. Revisions live in your database and are managed through WordPress.
WordPress backups capture your entire site: all posts, pages, themes, plugins, settings, files, and the complete database. Backups are stored separately from your site, often on remote servers. They protect against catastrophic failures like server crashes, hacks, or database corruption.
You need both. Revisions handle everyday scenarios like fixing typos and recovering deleted paragraphs. Backups handle disasters like site hacks and hosting failures. Use Jetpack VaultPress Backup or BlogVault for comprehensive backup solutions.
Best Practices for Managing WordPress Revisions
- Set reasonable limits: 5-10 revisions balance safety and efficiency for most sites.
- Schedule regular cleanup monthly or quarterly to prevent database bloat.
- Use backups for long-term history rather than relying on revisions.
- Monitor database size to catch unexpected growth.
- Enable revisions for all important custom post types.
- Consider team collaboration needs. Multiple editors may justify higher revision limits.
- Test the system periodically to verify that revisions save and restore properly.
- Educate your team so everyone understands the safety net.
Keep Your Content Safe With the Right Foundation
Managing WordPress revisions properly protects your content while keeping your site fast and your database lean. But revisions are just one piece of a well-maintained WordPress site, the foundation matters too.
WPZOOM themes are designed with performance and reliability in mind, including built-in optimization features that work alongside WordPress’s native systems. When you’re creating valuable content, you need a theme that won’t slow you down or add unnecessary database overhead.