WordPress themes control your website’s appearance and functionality. Learning how to install a WordPress theme is a fundamental skill for any website owner. Whether you choose a free theme from the WordPress directory or invest in a premium design, the installation process is straightforward.
This guide covers three proven methods: installing through the WordPress dashboard, uploading a ZIP file, and using FTP. Each approach works for different situations and skill levels. You’ll have your new theme active and ready for customization within minutes.
Table of Contents
- How to Install a WordPress Theme from the Dashboard
- Installing a Premium Theme via Upload Method
- How to Install WordPress Themes Manually Using FTP
- Essential Tips After Installing a WordPress Theme
- Ready to Transform Your Website with Professional Themes?
How to Install a WordPress Theme from the Dashboard
The WordPress dashboard method is perfect for free themes from the official WordPress theme directory. This approach requires no technical skills and can be completed in just a few clicks.
Step 1: Access the Theme Section
Log in to your WordPress dashboard. Navigate to Appearance → Themes from the left sidebar. You’ll see your currently active theme along with any installed themes.
Click the Add Theme button at the top of the page. This opens the WordPress theme directory where thousands of free themes await.

Step 2: Search for Your Theme
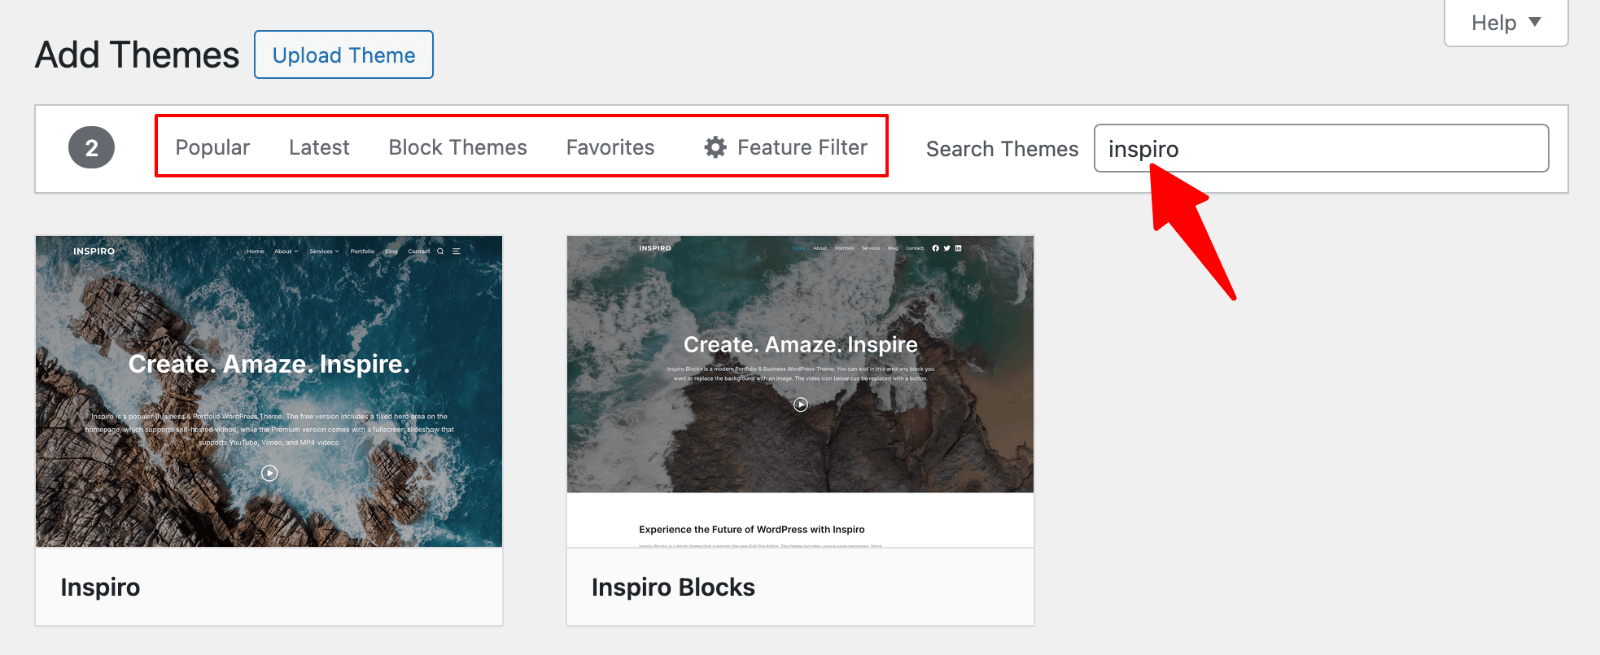
Use the search bar to find specific themes. For this example, we’ll install Inspiro Lite by WPZOOM. Type “Inspiro” in the search field.
The search results display themes matching your query. You can also browse by categories like Featured, Popular, or Latest. The Feature Filter button lets you sort themes by layout, features, or subject matter.
Step 3: Preview and Install
Hover over the Inspiro Lite theme thumbnail. Two options appear: Install and Preview.
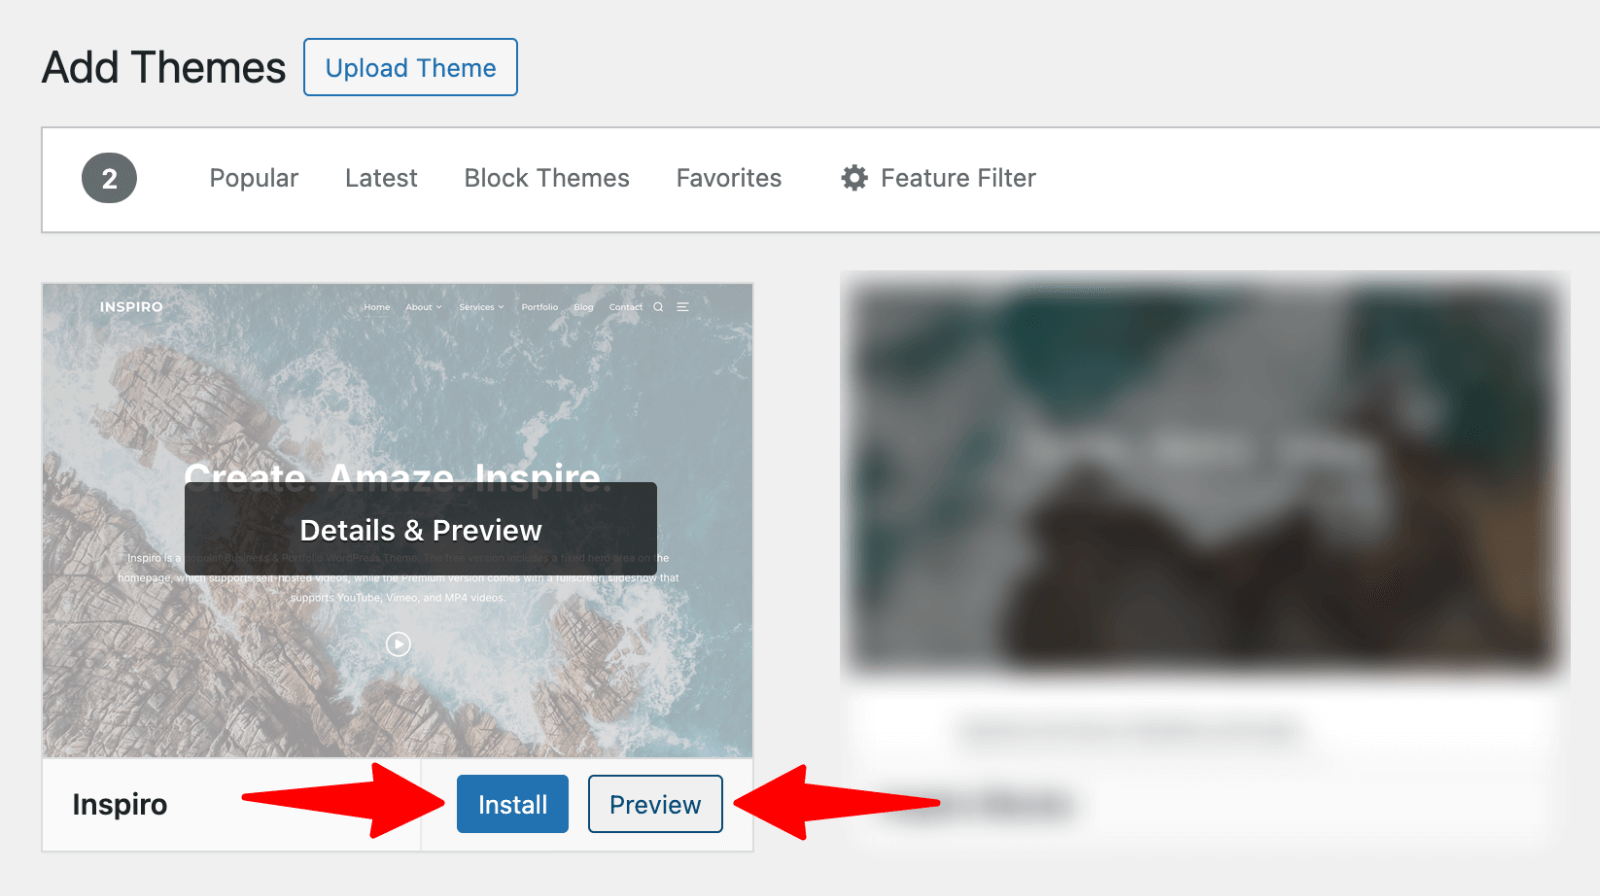
Click Preview to see how the theme looks with sample content. This helps you visualize your site’s potential appearance before installation.
When ready, click Install. WordPress downloads and installs the theme files automatically. This process takes a few seconds.
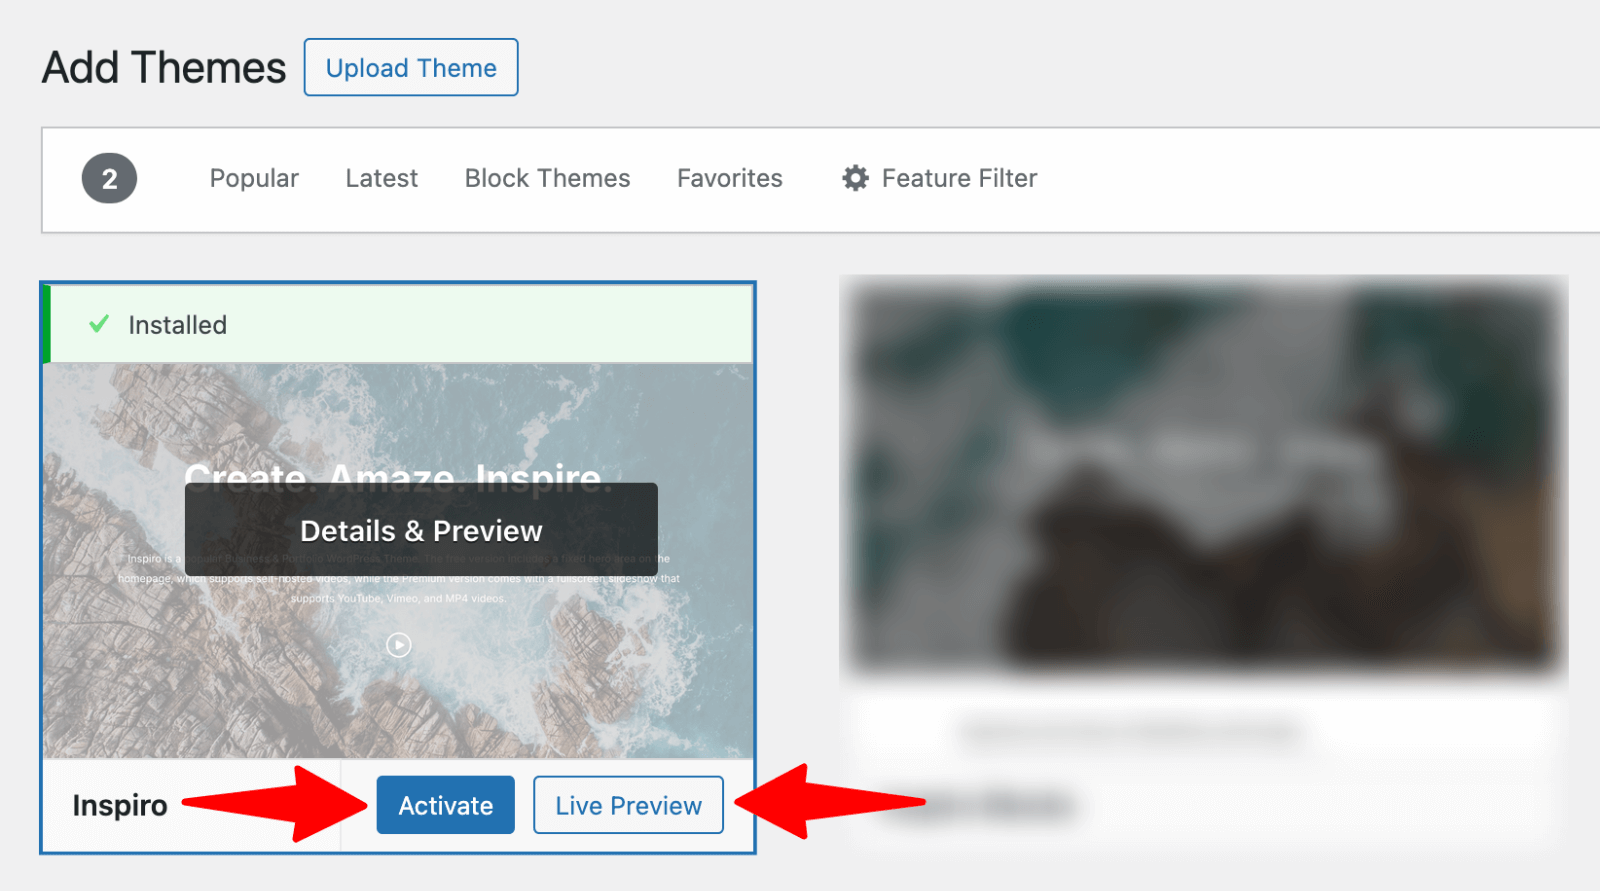
Step 4: Activate Your Theme
After installation, WordPress displays a success message. Two buttons appear: Activate and Live Preview.
Click Live Preview to see how your actual content looks with the new theme. If satisfied, click Activate to make the theme live on your website.
Step 5: Initial Customization
Most themes include customization options accessible through Appearance → Customize. The WordPress Customizer lets you modify colors, fonts, layouts, and other design elements.
Inspiro Lite offers various customization settings including header options, color schemes, and layout preferences. Take the time to explore these options to find the best match for your brand identity.

Learn how to fine-tune layouts, fonts, and colors in our guide on how to customize a WordPress theme.
Upgrade Your Website with a Premium WordPress Theme
Find a theme that you love and get a 10% discount at checkout with the FLASH10 code
Choose your theme
Installing a Premium Theme via Upload Method
Premium themes require a different installation approach since they’re not available in the WordPress directory. The upload method works for any theme you’ve purchased and downloaded as a ZIP file.
Step 1: Download Your Theme
Purchase and download your premium theme. For this example, we’ll use Inspiro Premium by WPZOOM. After purchase, download the ZIP file from your WPZOOM account.
Save the ZIP file to your computer’s Downloads folder or desktop for easy access. Don’t unzip the file yet – WordPress needs the original ZIP format.
Step 2: Navigate to Upload Section
In your WordPress dashboard, go to Appearance → Themes → Add Theme. Instead of searching the directory, click the Upload Theme button at the top of the page.
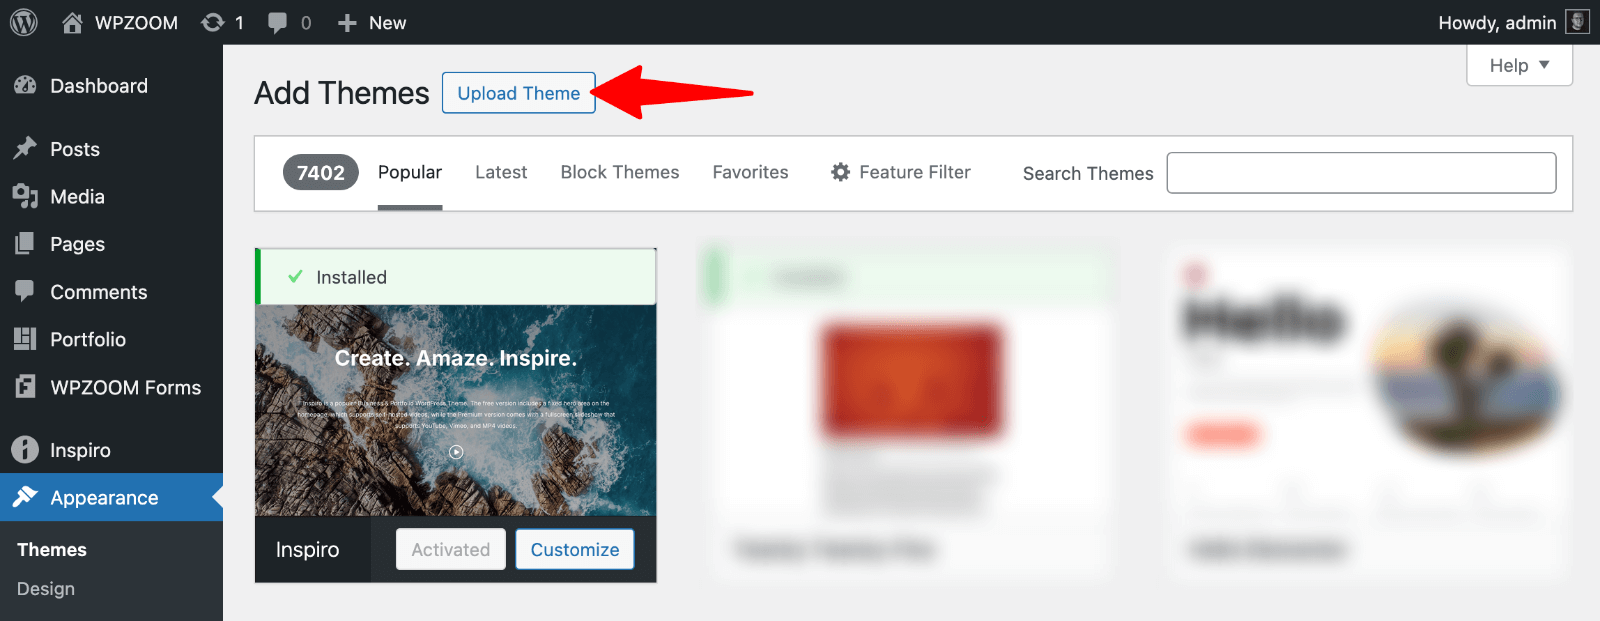
This opens a file upload interface where you can select your premium theme’s ZIP file.
Step 3: Upload and Install
Click Browse… and select your Inspiro Premium ZIP file. WordPress displays the filename once selected.
Click Install Now to begin the upload and installation process.

Depending on your internet connection and file size, the process takes between 30 seconds and a few minutes. WordPress extracts the theme files and places them in the correct directory automatically.
Step 4: Activate and Configure
After a successful installation, click Activate to enable your premium theme.
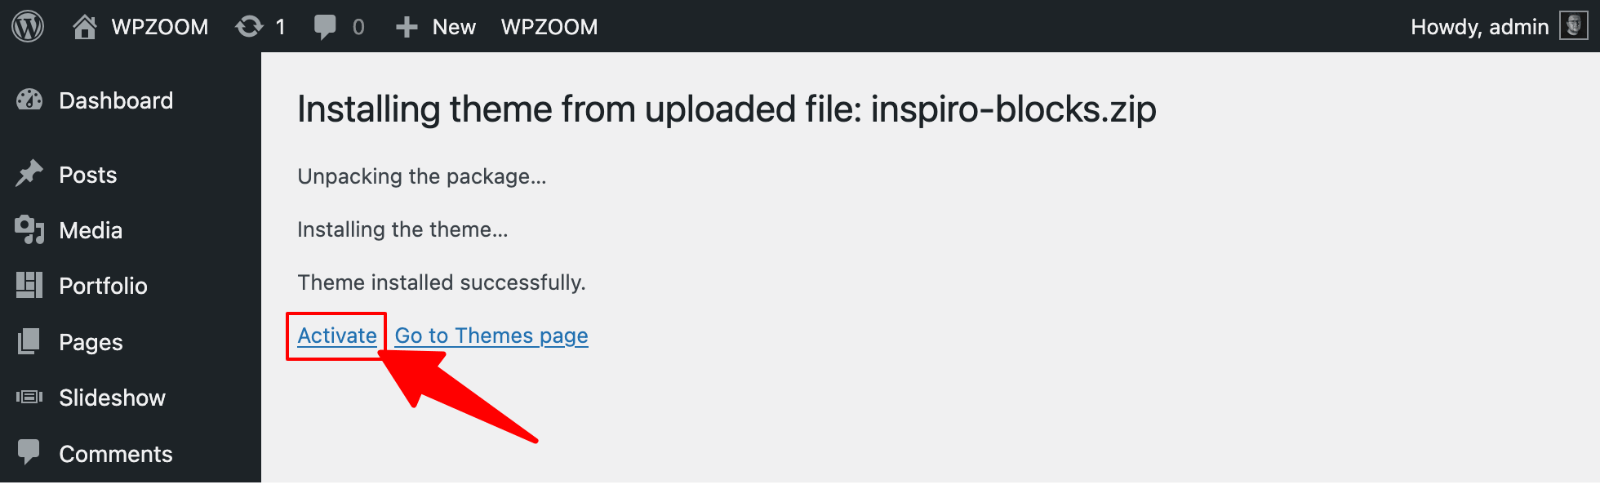
WordPress immediately applies the new design to your website.
Premium themes often include setup wizards, starter sites, or additional configuration options. Inspiro Premium integrates with Elementor page builder and offers multiple starter site templates.
Explore the theme’s documentation and setup process. Many premium themes include demo content import features that help you recreate the demo site appearance quickly.
If you’re replacing an existing design, read how to change a WordPress theme without losing content.
How to Install WordPress Themes Manually Using FTP
FTP installation gives you complete control over the process and works when other methods fail. This approach requires basic technical knowledge but isn’t complicated once you understand the steps.
Step 1: Download and Extract Your Theme
Download your theme ZIP file and extract it on your computer. For Inspiro Premium, this creates a folder named “inspiro” containing all theme files.
Keep this folder easily accessible as you’ll upload it to your server shortly.
Step 2: Choose an FTP Client
Download and install an FTP client, such as FileZilla, which is free and user-friendly.
FileZilla offers a split-screen interface, displaying your local files on the left and server files on the right.
Step 3: Gather FTP Credentials
Contact your hosting provider or check your hosting control panel for FTP credentials. You need:
- Host/Server: Usually your domain name or server IP address
- Username: Your FTP username
- Password: Your FTP password
- Port: Typically 21 for FTP or 22 for SFTP
Use these credentials in your FTP client.
Step 4: Connect to Your Server
Open FileZilla and enter your credentials in the Quick Connect bar at the top. Click Quickconnect to establish the connection.
Once connected, navigate to your WordPress installation folder, usually named public_html or your domain name.
Step 5: Upload the WordPress Theme
In the server file browser (right side), navigate to wp-content/themes/. This folder contains all your WordPress themes.
Drag and drop your extracted theme folder (inspiro) from your computer to the themes folder on the server.

FileZilla displays upload progress at the bottom of the screen.
Step 6: Activate Through WordPress
Return to your WordPress dashboard and go to Appearance → Themes. Your uploaded theme now appears in the list of available themes.
Hover over the theme and click Activate to enable it on your website.
Not sure which theme to install? Here’s how to choose a WordPress theme that fits your needs and goals.
Essential Tips After Installing a WordPress Theme
WordPress theme installation is just the beginning. These post-installation steps ensure that your website performs optimally and looks professional.
Theme Customization Basics
Every theme includes customization options through Appearance → Customize. Common settings include:
- Site Identity: Upload your logo and set site title
- Colors: Modify background, text, and accent colors
- Typography: Choose fonts that match your brand
- Layout Options: Adjust sidebar positions and page layouts
- Header/Footer: Customize navigation and footer content
Take time to explore each customization panel. Many free and premium themes offer live preview functionality, letting you see changes before publishing.
Essential Plugin Recommendations
Themes handle design, but plugins add functionality. Consider these popular additions:
- WooCommerce: Transform your site into an online store
- Yoast SEO: Optimize content for search engines
- WPZOOM Forms: Create contact forms easily
- UpdraftPlus: Backup your website regularly
- Elementor: Advanced page building capabilities
Install plugins that align with your website goals. Avoid installing too many plugins, as they can slow down your site.
Discover more essential tools in our comprehensive guide to the best WordPress plugins for every website.
SEO and Speed Optimization
Search engine visibility depends on both the quality of content and technical performance. After theme installation:
- Check Mobile Responsiveness: Ensure your theme displays correctly on all devices.
- Test Loading Speed: Run your site through PageSpeed Insights. Many themes include speed optimization features, but additional tweaks may be necessary.
- Set Up SEO Basics: Configure meta titles, descriptions, and structured data if your theme doesn’t handle these automatically.
- Optimize Images: Compress images and use appropriate file formats.
Learn advanced techniques in our detailed guide: 23 WordPress SEO Tips: Best Practices Guide.
Browser Compatibility Testing
Test your new theme across different browsers and devices:
- Desktop Browsers: Chrome, Firefox, Safari, Edge
- Mobile Devices: iOS Safari, Android Chrome
- Tablet Views: iPad and Android tablets
Most professional themes undergo extensive browser testing, but custom modifications can introduce theme compatibility issues.
Content Migration Considerations
If switching from another theme, review your content carefully:
- Widget Areas: Your new theme may have different widget areas. Reconfigure widgets in Appearance → Widgets.
- Menu Locations: Check that your navigation menus appear in the correct locations through Appearance → Menus.
- Custom Post Types: Ensure any custom content (portfolios, testimonials, etc.) displays correctly with your new theme.
- Customizer Settings: Previous theme customizations won’t transfer. Recreate important styling choices in your new theme’s customizer.
Ready to Transform Your Website with Professional Themes?
Looking for a professionally designed, responsive WordPress theme that’s easy to install and fully customizable? Explore WPZOOM’s collection of premium WordPress themes crafted for freelancers, creatives, and small businesses. Whether you’re launching a portfolio, blog, or online store, our themes help you build a stunning site—without writing a single line of code.