A slow WordPress website can destroy your business faster than you think. Studies show that 53% of mobile users abandon sites that take longer than 3 seconds to load, and a devastating 1-second delay can reduce conversions by 7%. Even worse, Google now uses Core Web Vitals as a direct ranking factor, meaning slow sites get buried in search results where potential customers will never find them.

In this comprehensive guide, you’ll discover proven strategies to dramatically speed up WordPress, boost your Core Web Vitals scores, and create lightning-fast experiences that keep visitors engaged and converting. Whether you’re a complete beginner or an experienced developer, these actionable techniques will transform your site’s performance.
Table of Contents
- How to Test Your WordPress Website Speed
- What Slows Down a WordPress Site?
- Essential Ways to Speed Up Your WordPress Site
- Advanced Speed Optimization Tips
- Ongoing Performance Monitoring & Maintenance
- Boost Your Site’s Speed with WPZOOM Themes
How to Test Your WordPress Website Speed
Before optimizing your WordPress site, you need to establish a performance benchmark. Testing your website speed isn’t just about getting a number—it’s about understanding which specific issues are holding back your site’s performance and measuring the impact of your optimization efforts.
Essential Speed Testing Tools
These free and premium tools provide different perspectives on your WordPress site’s performance, from Google’s official metrics to detailed technical analysis:
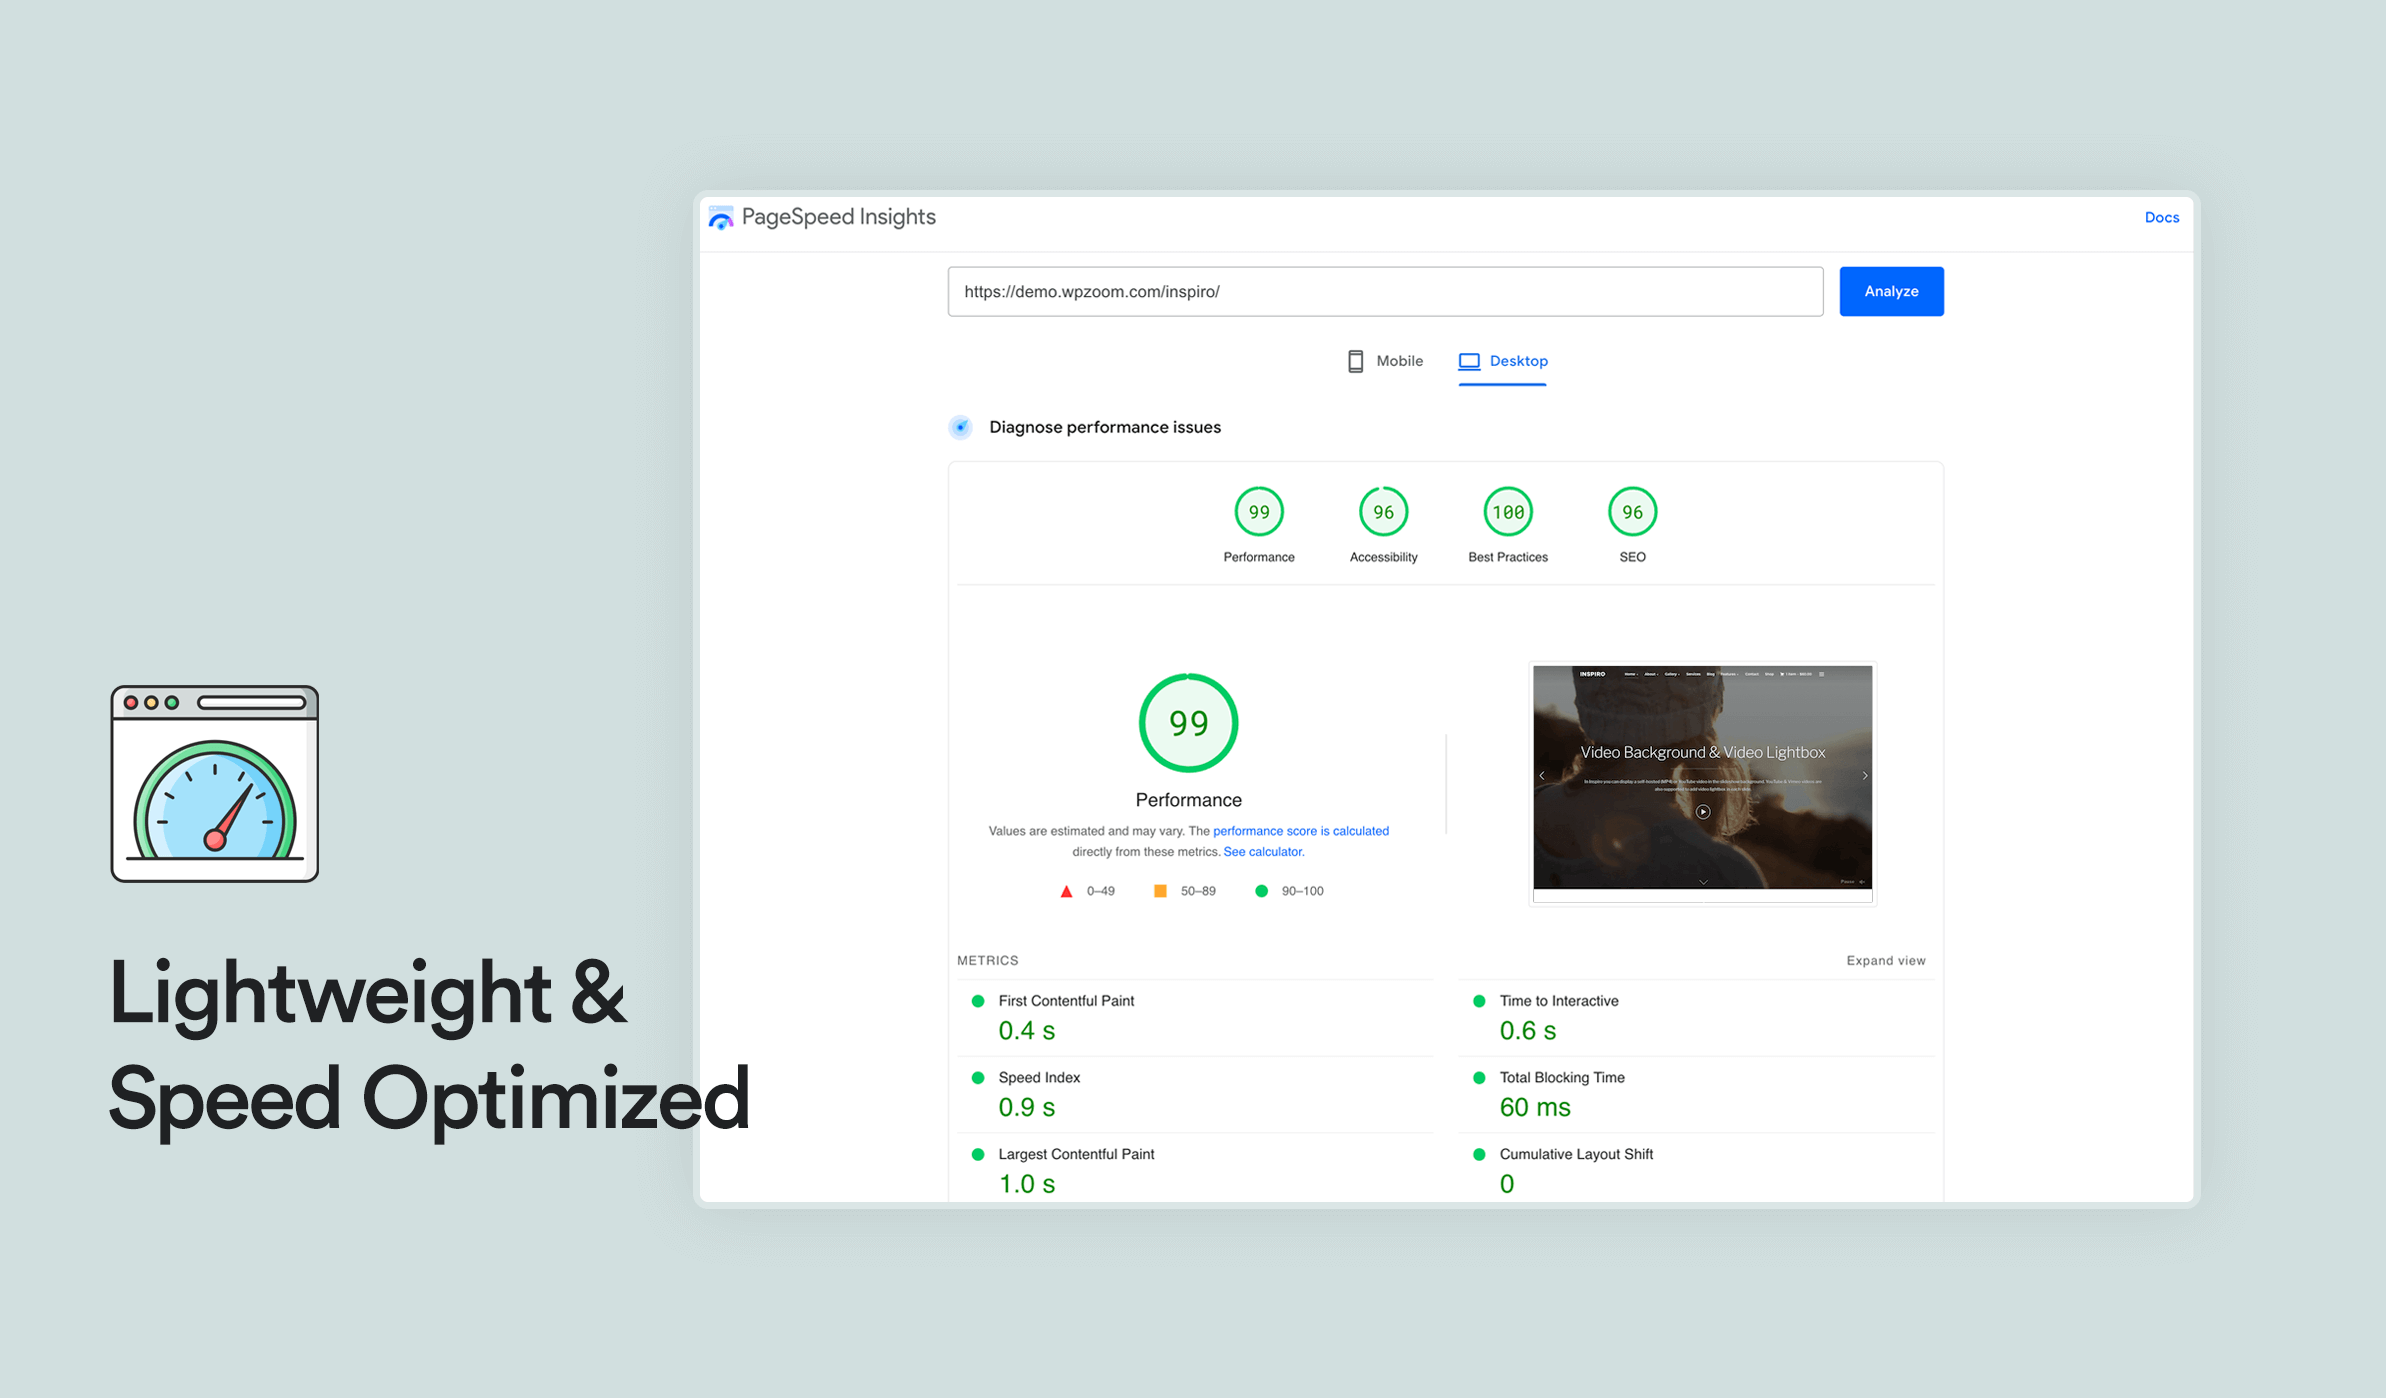
1. Google PageSpeed Insights is the gold standard for WordPress speed testing. It provides both lab data and real-world field data, showing exactly how your site performs for actual users. Most importantly, it measures Core Web Vitals—Google’s official metrics for page experience.

2. GTmetrix offers detailed waterfall charts and actionable recommendations. It shows you exactly which resources are slowing down your site and provides specific suggestions for improvement.
3. WebPageTest gives you advanced testing options, including testing from multiple locations and different devices. This is crucial for understanding how your WordPress speed varies globally.
4. Treo Core Web Vitals and Site Speed Test provides comprehensive Core Web Vitals analysis with detailed breakdowns and actionable insights for WordPress optimization.
Key Performance Metrics to Monitor
Understanding these metrics is crucial for effective WordPress speed optimization:
Largest Contentful Paint (LCP): Measures when the largest content element loads. A good LCP is under 2.5 seconds.
First Contentful Paint (FCP): Time until the first piece of content appears. Target under 1.8 seconds.
Cumulative Layout Shift (CLS): Measures visual stability. Good CLS is under 0.1.
Interaction to Next Paint (INP): Measures responsiveness to user interactions. Target under 200ms.
Time to First Byte (TTFB): Server response time. It should be under 600ms.

How to Run Accurate Speed Tests
- Clear all caches before testing to get accurate results
- Test multiple times and take the average—single tests can be misleading
- Test from different locations to understand global performance
- Test both mobile and desktop versions of your site
- Document your baseline before making any changes
Pro Tip: Don’t obsess over perfect scores. Focus on real-world load times and user experience. A site that loads in 2 seconds with an 85 PageSpeed score is better than a site with a 95 score that takes 4 seconds to load.
What Slows Down a WordPress Site?
WordPress sites typically slow down due to server limitations, inefficient code, or resource-heavy content. Here are the primary causes of poor performance:
| Performance Issue | Impact | Common Causes |
|---|---|---|
| Poor hosting | High TTFB, server crashes | Overcrowded shared servers, outdated hardware |
| Plugin bloat | Increased database queries, render-blocking | Too many plugins, poorly coded plugins |
| Heavy themes | Large page sizes, excessive HTTP requests | Bloated code, unnecessary features |
| Unoptimized images | Poor LCP, high bandwidth usage | Large file sizes, wrong formats |
| Excessive scripts | Render-blocking resources | External widgets, analytics, ads |
| Database bloat | Slow database queries | Post revisions, spam, transients |
| Outdated PHP | Slow server processing | Old PHP versions, legacy code |
| Lack of caching | Dynamic page generation | No caching plugins or server-side caching |
| Missing compression | Large file transfers | No GZIP or Brotli compression |
| External HTTP requests | Network latency | Third-party fonts, scripts, widgets |
Identifying which of these issues affects your specific WordPress site is the first step toward dramatic speed improvements. Use the testing tools mentioned above to pinpoint your biggest bottlenecks before implementing solutions.
Essential Ways to Speed Up Your WordPress Site
These fundamental optimizations will provide the biggest impact on your WordPress speed with the least technical complexity. Start here for immediate improvements.
1. Choose Reliable, Fast Hosting
Your hosting provider is the foundation of WordPress speed. No amount of optimization can overcome poor hosting—it’s like trying to race a Ferrari with a broken engine.
Here’s how each hosting type impacts your site speed:
- Shared Hosting places your site on servers with hundreds of other websites, sharing CPU, RAM, and bandwidth. While budget-friendly, performance suffers when neighboring sites experience traffic spikes. Expect slower TTFB and occasional downtime.
- VPS Hosting gives you dedicated server resources while sharing the physical hardware. This provides better performance consistency and more control over your server environment.
- Managed WordPress Hosting offers the best performance for WordPress sites. These providers optimize their servers specifically for WordPress, often including built-in caching, automatic updates, and WordPress-specific security features.
Recommended Hosting Providers
Based on performance testing, customer feedback, and technical capabilities, here are our top hosting recommendations organized by user needs and budget:
- For beginners: SiteGround, Bluehost (with built-in caching)
- For growing sites: WP Engine, Kinsta, Flywheel
- For developers: DigitalOcean, Vultr (with ServerPilot)
When evaluating hosting providers, certain technical features can make or break your site’s performance. These aren’t just marketing buzzwords—they’re proven technologies that directly impact your load times and user experience:
- SSD storage (3x faster than traditional hard drives)
- Data center location close to your audience
- PHP 8.1+ support
- Built-in caching (page, object, and database)
- CDN integration
- HTTP/2 and HTTP/3 support
2. Use a Lightweight, Speed-Optimized Theme
Your WordPress theme significantly impacts site speed. A well-coded, lightweight theme can load in under 1 second, while a bloated theme might take 5+ seconds with the same content.
Not all themes are created equal when it comes to performance. Understanding the key characteristics of speed-optimized themes will help you make the right choice for your site’s performance goals.
- Minimal design with only essential features
- Clean, optimized code following WordPress standards
- Responsive design that works perfectly on all devices
- SEO-friendly structure with proper heading hierarchy
- Regular updates and active developer support
- Compatibility with popular caching plugins
Top Speed-Optimized Themes
After extensive testing and performance analysis, these themes consistently deliver exceptional speed while maintaining design flexibility and functionality.
1. Inspiro Premium: Specifically optimized for multimedia-rich sites, providing swift loading without compromising visual quality.
2. Astra: Known for its lightweight build (less than 50KB) and extensive customization options. Includes built-in schema markup and works seamlessly with page builders.
3. GeneratePress: Praised for clean code and fast loading times. Offers a modular design where you only load features you actually use.
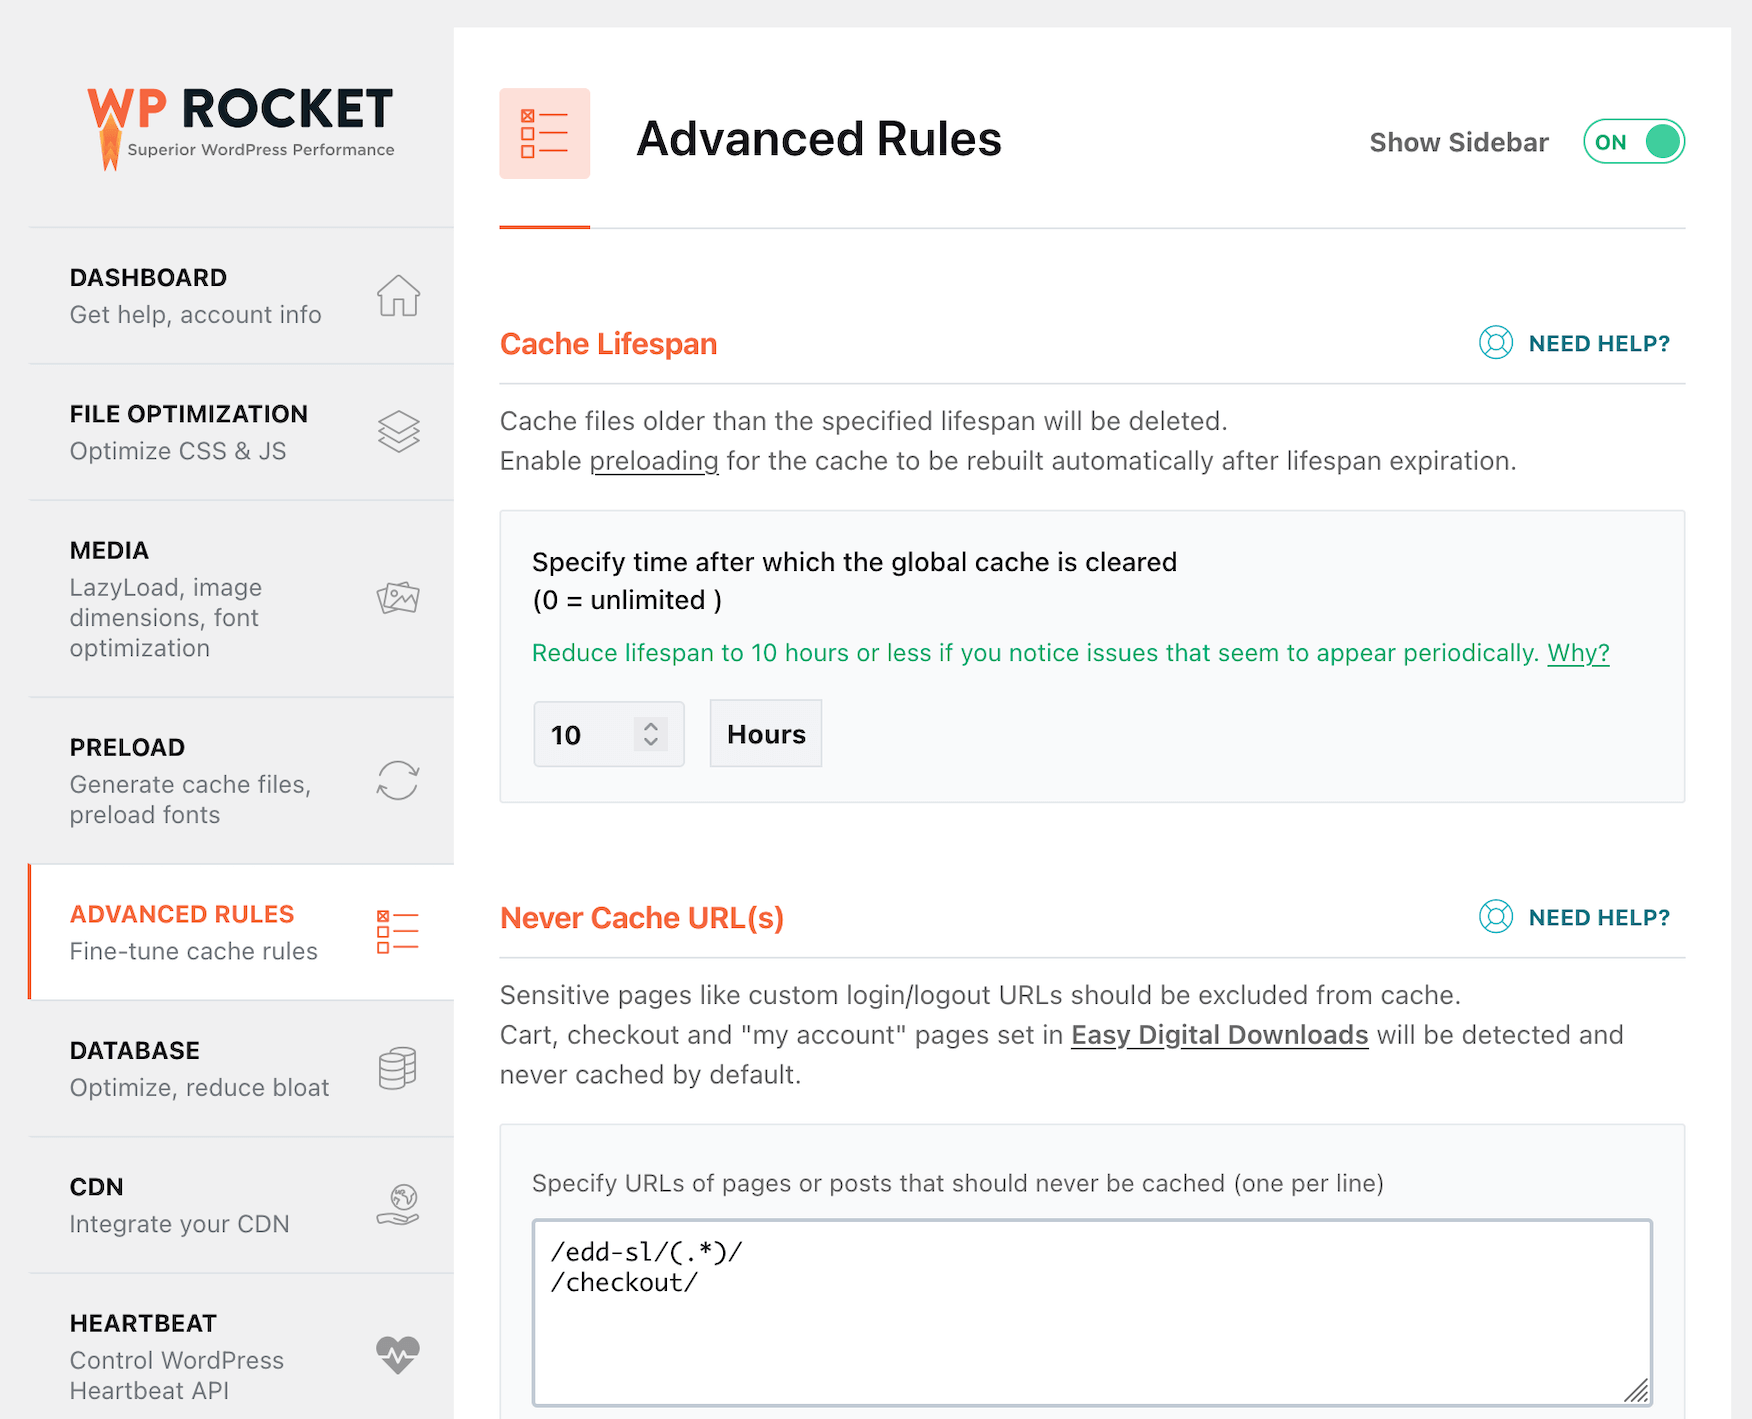
3. Install a Quality Caching Plugin
Caching is the single most effective way to speed up WordPress. Instead of generating pages dynamically for every visitor, caching serves stored HTML copies, reducing server load and dramatically improving load times.
Most WordPress hosts don’t enable comprehensive caching by default, making a caching plugin necessary for optimal performance.
Top Caching Plugins
Here are the most reliable and effective caching plugins for WordPress:
1. WP Rocket (Premium – $59/year) stands out for its beginner-friendly approach, offering one-click optimization that includes minification, lazy loading, and database optimization.
2. LiteSpeed Cache (Free) delivers outstanding performance, particularly on LiteSpeed-powered servers where it integrates deeply with the server architecture.
3. W3 Total Cache (Free) offers the most comprehensive caching options available, supporting multiple caching methods and providing granular control over every aspect of performance optimization.
4. WP Super Cache (Free) maintains its reputation as a simple, reliable solution maintained by Automattic.
Setup tip: After installing your caching plugin, test your site thoroughly to ensure everything works correctly. Some plugins may conflict with certain themes or other plugins.
4. Optimize Images for Maximum Speed
Unoptimized images are the #1 cause of slow WordPress sites. A single uncompressed photo can be larger than your entire website’s code, devastating your LCP and overall page load time.
Effective image optimization involves multiple techniques working together. Here’s how to systematically reduce image file sizes while maintaining visual quality:
Use Next-Generation Formats
- WebP: 25-50% smaller than JPEG with better quality
- AVIF: Even better compression than WebP (newer format)
- Fallback to JPEG/PNG for older browsers
Resize Images Properly
- Never upload images larger than they’ll be displayed
- Use responsive images with srcset attributes
- Consider different sizes for mobile vs. desktop
Compress Aggressively
- JPEG: Use 80-85% quality for photos with many colors
- PNG: Use for simple graphics, logos, or images needing transparency
- Aim for under 100KB per image when possible
Implement Lazy Loading
- Load images only when they’re about to enter the viewport
- Can reduce initial page load by 50%+ on image-heavy pages
- Now supported natively in WordPress 5.5+

Top Image Optimization Plugins
These WordPress plugins automate the image optimization process, handling compression, format conversion, and lazy loading without requiring manual intervention:
1. Smush (Free/Premium) handles automatic compression during upload and offers bulk optimization for existing images in your media library. The plugin includes WebP conversion capabilities and lazy loading features, making it a comprehensive solution for image optimization. In our testing, Smush consistently delivered impressive results, reducing a typical 2.3MB image collection to just 487KB—a 79% reduction in file size.
2. Imagify (Premium) uses excellent compression algorithms with three distinct compression levels: Normal, Aggressive, and Ultra, allowing you to balance file size with image quality based on your specific needs. The plugin supports WebP conversion and bulk optimization, making it particularly effective for sites with large existing image libraries.
3. ShortPixel (Premium) delivers outstanding compression with minimal quality loss and supports the cutting-edge AVIF format for maximum performance gains. Beyond standard image optimization, ShortPixel also handles PDF and document compression, making it valuable for sites that host various file types beyond images.
5. Limit and Optimize Your Plugins
The “too many plugins slow down WordPress” myth needs clarification. It’s not about quantity—it’s about quality. One poorly coded plugin can slow your site more than 20 well-built plugins combined.
Not all plugins are created equal—some run continuously in the background, while others only activate when needed. Effective plugin management starts with understanding which plugins actually impact performance.
- Audit existing plugins. Use Query Monitor to identify slow plugins. Remove plugins you don’t actually need. Replace multiple single-purpose plugins with one comprehensive plugin.
- Choose quality plugins. Check reviews and update frequency. Test new plugins on staging first. Monitor performance after installation.
- Optimize plugin loading. Use tools like Asset CleanUp to load plugins only where needed. Disable plugins on pages that don’t require them. Consider replacing heavy plugins with lighter alternatives.
Common plugin performance killers:
- Contact forms loading site-wide (should only load on contact pages)
- Social media plugins with excessive external requests
- Backup plugins running during peak hours
- Security plugins with aggressive scanning
- Page builders loading unnecessary CSS/JS on every page
6. Use a Content Delivery Network (CDN)
A CDN dramatically improves global WordPress speed by serving your static files (images, CSS, JavaScript) from servers closest to your visitors. This reduces network latency and can cut load times by 50%+ for international visitors.
When someone visits your WordPress site, the CDN automatically determines their geographic location and serves your static content from the nearest edge server rather than your primary hosting server. This dramatically reduces the physical distance data must travel, cutting load times significantly.
Meanwhile, your original hosting server only handles dynamic content generation, reducing its overall workload and improving performance for all visitors.

Top CDN Providers
Here are the most reliable and performance-focused CDN services for WordPress sites:
Cloudflare (Free tier available) operates a massive global network with 270+ data centers and includes built-in security features with DDoS protection alongside its CDN services. The platform offers easy WordPress integration through dedicated plugins and provides excellent performance for most WordPress sites, making it the go-to choice for users seeking reliable, feature-rich CDN services.
Amazon CloudFront functions as part of the comprehensive AWS ecosystem with pay-as-you-go pricing that scales with your usage. The service offers excellent integration with other AWS services like S3 storage and EC2 hosting, making it ideal for sites already utilizing AWS infrastructure or those planning to scale significantly.
KeyCDN focuses specifically on performance optimization with competitive pricing and provides real-time analytics alongside straightforward setup processes. The service appeals particularly to performance-conscious users who prioritize speed metrics and want detailed insights into their CDN performance without unnecessary complexity.
Selecting the right CDN depends on your budget, technical requirements, and global audience distribution.
7. Keep Everything Updated
Regular updates aren’t just about security—they often include significant performance improvements. WordPress core, themes, and plugins frequently release optimizations that can boost your site speed.
Not all updates are equally important for performance. Follow this prioritized approach to ensure you’re focusing on updates that provide the biggest speed and security benefits:
- WordPress core: Usually includes performance and security fixes
- Active theme: Theme updates often optimize code and fix conflicts
- Active plugins: Updated plugins run more efficiently
- PHP version: Newer PHP versions are dramatically faster
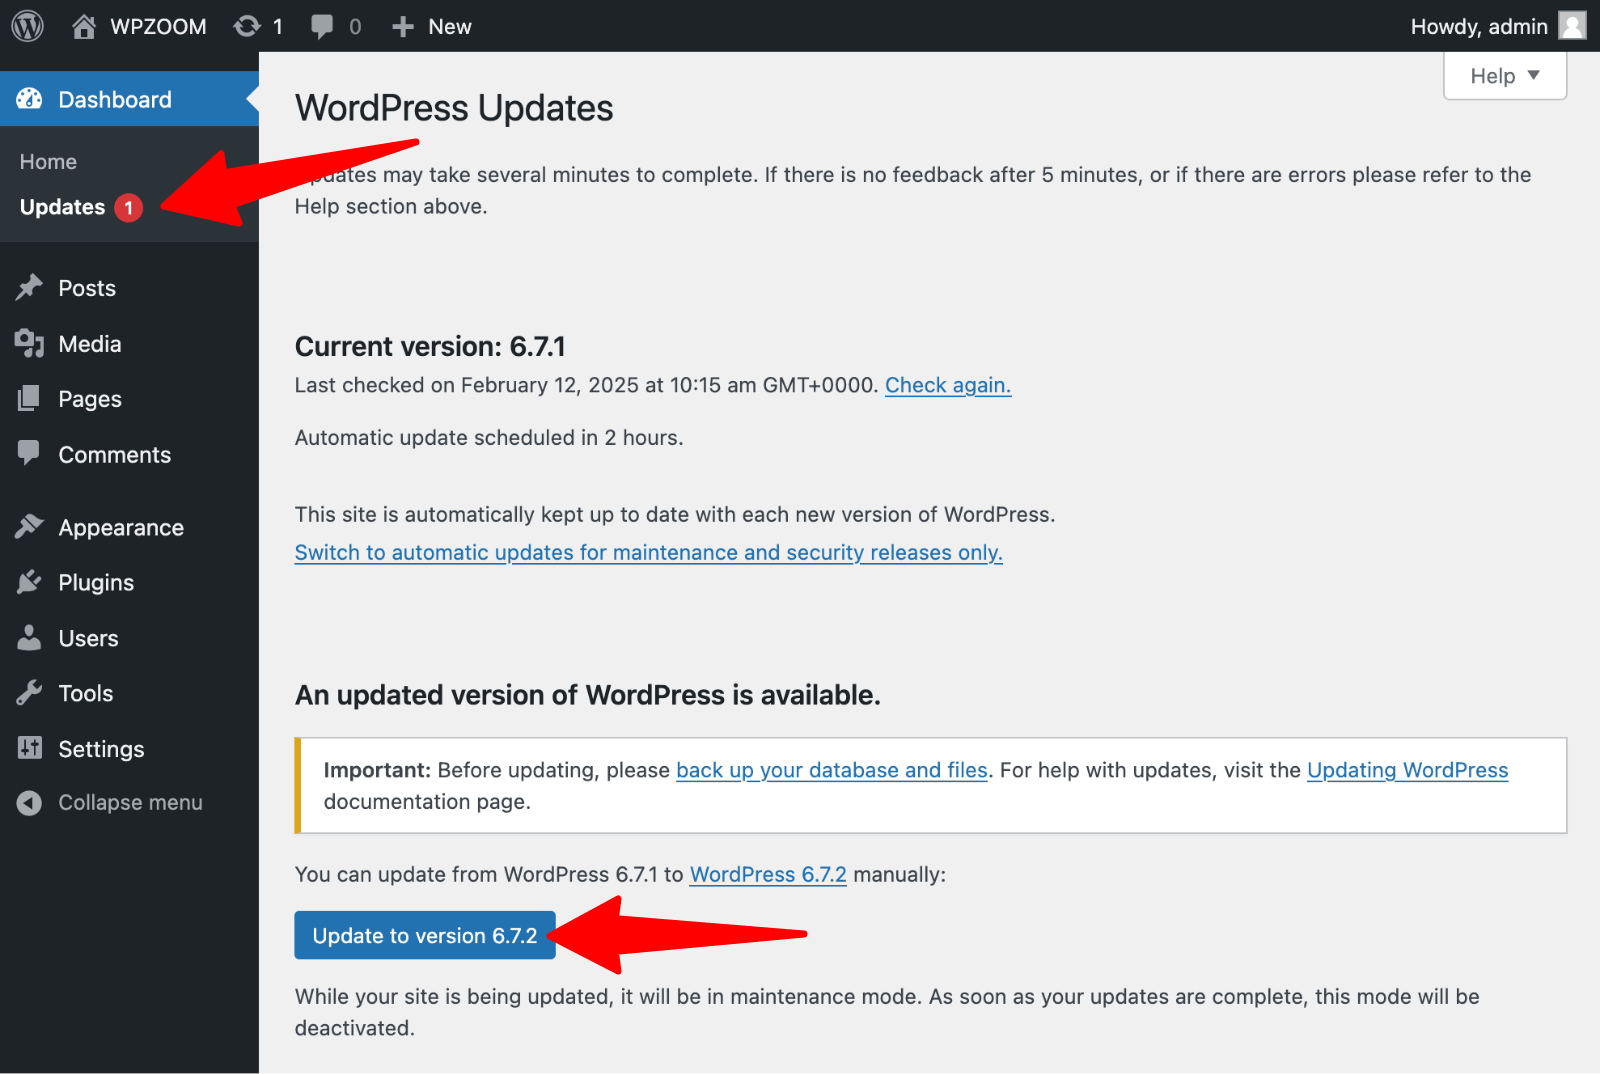
Updates can occasionally cause conflicts or break functionality. Following a systematic approach minimizes risks while ensuring you get the performance benefits of staying current:
- Back up your site before any updates
- Test updates on staging first when possible
- Update one item at a time to identify any conflicts
- Test your site after each major update
Upgrade Your Website with a Premium WordPress Theme
Find a theme that you love and get a 10% discount at checkout with the FLASH10 code
Choose your theme
Advanced Speed Optimization Tips
These advanced techniques can provide significant additional speed improvements for users ready to dive deeper into WordPress performance optimization.
1. Upgrade to the Latest PHP Version
PHP powers WordPress, and newer versions offer dramatic performance improvements.
- PHP 8.1 is 50% faster than PHP 7.4, improved memory usage and more efficient code execution
- PHP 8.0 offers a 25% performance boost over PHP 7.4
- PHP 7.4 is 30% faster than PHP 7.0
Several indicators suggest your WordPress site would benefit from a PHP upgrade:
- If your site runs on PHP 7.3 or older, you’re missing significant performance improvements available in newer versions.
- WordPress may display “deprecated function” warnings in your error logs, indicating that your current PHP version no longer supports certain code functions.
- Additionally, if your hosting provider still offers outdated PHP versions as their default or recommended option, it may be time to consider switching to a more current hosting environment.

Here is how to upgrade PHP safely:
- Check compatibility using a plugin like PHP Compatibility Checker
- Create a full backup of your site
- Test on a staging environment first
- Upgrade through your hosting control panel
- Monitor your site for any issues after the upgrade
2. Use Advanced Hosting Features
Modern hosting environments offer powerful features that can significantly boost WordPress speed. Understanding and utilizing these features can provide substantial performance gains.
Nginx vs. Apache Servers
- Nginx handles concurrent requests more efficiently and uses less memory. It’s particularly effective for high-traffic WordPress sites and static file serving.
- Apache offers more flexibility with .htaccess files, but can be slower under high load.
HTTP/2 and HTTP/3 Benefits
These modern web protocols offer significant performance improvements over older HTTP/1.1 standards:
- Multiplexing allows multiple requests for data to be sent in parallel over a single TCP connection, eliminating the bottlenecks that occurred when browsers had to wait for one request to complete before starting another.
- Header compression reduces the overhead associated with each request by compressing repetitive header information, while server push enables proactive resource delivery where servers can send critical files before the browser explicitly requests them.
- Combined, these features typically result in 20-40% faster page loads compared to older protocols.
Premium DNS Services
Standard DNS resolution can add 100-200ms to your TTFB, creating a noticeable bottleneck before your site even begins loading.
Premium DNS providers like Cloudflare or Amazon Route 53 operate superior server infrastructure with global networks of DNS servers, delivering faster DNS resolution typically under 20ms globally.
These services also provide better uptime with 99.99%+ availability guarantees and include DDoS protection at the DNS level, ensuring your site remains accessible even during attacks.
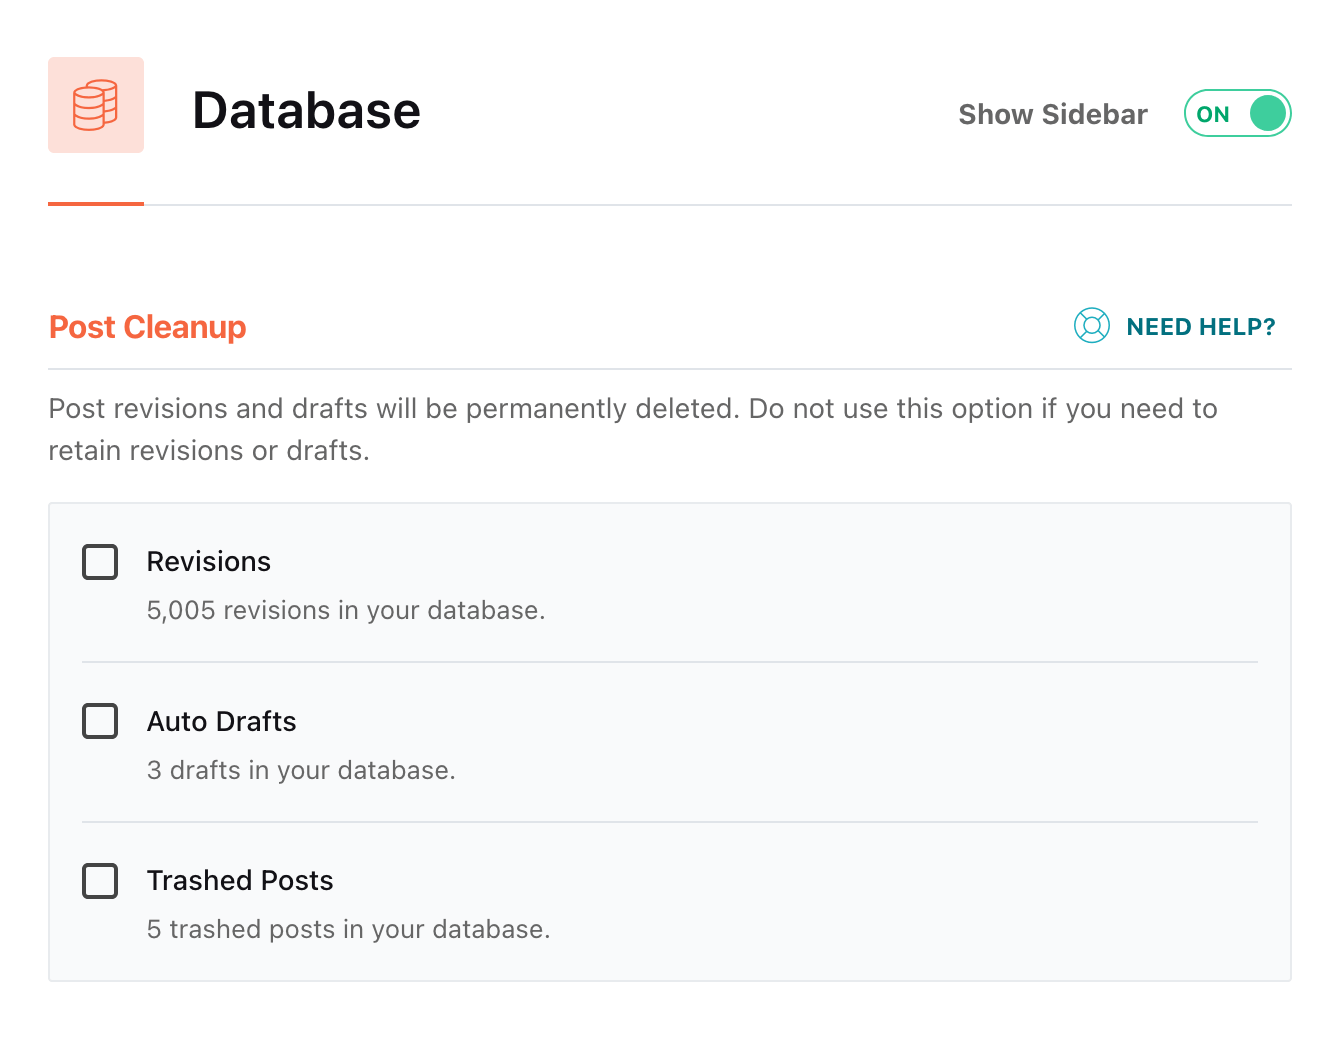
3. Optimize Your WordPress Database
Over time, your WordPress database accumulates unnecessary data that slows down queries and increases server load. Regular database optimization is essential for maintaining peak performance.
Here are the most common database bloat sources:
- Post revisions: Every save creates a revision
- Spam comments: Automated spam accumulation
- Transients: Expired temporary data
- Auto-drafts: Unfinished posts and pages
- Plugin data: Leftover data from deleted plugins
Manual Database Optimization
To manually optimize your database, just follow these steps:
1. Limit post revisions by adding this to wp-config.php:
define( 'WP_POST_REVISIONS', 3 );2. Clean spam and trash regularly. Empty trash every 30 days. Delete spam comments immediately. Remove unapproved comments older than 90 days.
3. Remove expired transients using specialized plugins.
You can automate the database cleanup process using WordPress plugins, making regular maintenance simple and safe for users at any technical level:
Recommended Database Optimization Plugins
1. WP-Optimize automatically removes spam comments, post revisions, and expired transients while offering advanced features like table optimization and scheduled cleanups. Its one-click optimization process can typically reduce database sizes by 30-60% while improving query speeds by 15-25%, making it an excellent choice for regular maintenance routines.
2. Advanced Database Cleaner excels at identifying and removing leftover data from deleted plugins and themes, something many other tools miss. Its comprehensive scanning capabilities help you understand your database structure better, making it particularly valuable for sites that have used many plugins over time or experienced significant growth.
4. Minify & Combine CSS/JavaScript Files
Minification removes unnecessary characters (spaces, comments, line breaks) from code files, resulting in smaller file sizes that typically see a 20-40% reduction in overall size. These smaller files require less bandwidth to download, leading to faster page loads, especially for users on slower internet connections.
The reduced file sizes also contribute to better Core Web Vitals scores, particularly improving First Contentful Paint (FCP) and Largest Contentful Paint (LCP) metrics that Google uses for search ranking evaluation.
Combining multiple CSS and JavaScript files into a single, larger file reduces the number of HTTP requests your browser needs to make when loading a page. This reduction in connection overhead becomes particularly beneficial for older HTTP/1.1 connections, where browsers could only handle a limited number of simultaneous requests.
Additionally, single combined files cache more efficiently than multiple smaller files, as browsers can store and retrieve one file instead of managing multiple cache entries for the same functionality.
Important: Test thoroughly after enabling modification. Some plugins may break if JavaScript execution order changes.
5. Eliminate Render-Blocking Resources
Render-blocking resources prevent your page from displaying until they’re fully loaded, directly impacting FCP and LCP scores.
The most common render-blocking resources:
- CSS files above the fold
- JavaScript files in the head section
- External fonts and scripts

Here is what solutions you have:
1. Critical CSS Optimization
It involves identifying the CSS needed to render above-the-fold content and inlining it directly in the HTML head, while deferring non-critical styles to load after the page renders. This technique ensures users see styled content immediately without waiting for entire stylesheets to download.
You can implement this by extracting critical CSS manually or using tools that automatically identify and inline essential styles:
<!-- Inline critical CSS -->
<style>
/* Above-the-fold CSS here */
body { font-family: Arial, sans-serif; }
.header { background: #333; color: white; }
</style>

<!-- Defer non-critical CSS -->
<link rel="preload" href="style.css" as="style" onload="this.onload=null;this.rel='stylesheet'">
2. JavaScript Deferring and Async Loading
It prevents scripts from blocking page rendering by changing how and when they execute. The defer attribute tells browsers to download the script immediately but wait to execute it until HTML parsing completes, maintaining script execution order.
This works well for scripts that depend on DOM elements or other scripts:
<script src="script.js" defer></script>3. Async Loading
It downloads and executes scripts as soon as they’re available, without waiting for HTML parsing to complete.
This approach works best for independent scripts like analytics that don’t require DOM interaction or specific execution timing:
<script src="analytics.js" async></script>Plugin Solutions
While manual implementation provides the most control, several WordPress plugins can automate render-blocking resource optimization for users who prefer simpler solutions.
1. Flying Pages preloads pages when users hover over links, reducing perceived load times for subsequent page visits.
2. WP Rocket offers comprehensive render-blocking optimization, including critical CSS generation, JavaScript deferring, and resource preloading.
6. Reduce External HTTP Requests
Every external request adds latency and potential failure points. Minimizing these requests can significantly improve WordPress speed and reliability.
The most common external requests:
- Google Fonts: Can add 200-500ms load time
- Analytics scripts: Google Analytics, Facebook Pixel
- Social media widgets: Twitter, Facebook embeds
- Advertising scripts: Ad networks and affiliate programs

Here are some optimization strategies:
Host Google Fonts Locally
Host Google Fonts locally instead of loading them from Google’s servers to eliminate external DNS lookups and reduce dependency on third-party services. While Google Fonts typically load quickly, hosting them locally gives you complete control over caching and eliminates the risk of Google’s servers being slow or unavailable.
You can download font files and implement them using plugins like OMGF (Optimize My Google Fonts) or manually:
// Remove Google Fonts
function remove_google_fonts() {
    wp_dequeue_style( 'google-fonts' );
}
add_action( 'wp_enqueue_scripts', 'remove_google_fonts', 100 );
Minimize Analytics Scripts
Optimize analytics implementation by choosing lightweight tracking solutions and loading them efficiently. Google Analytics 4’s latest gtag.js implementation offers better performance than older versions, but consider hosting the gtag.js file locally to reduce external requests.
For even better performance, privacy-focused alternatives like Plausible, Fathom, or Simple Analytics use significantly less code and don’t require complex tracking libraries:
Replace Heavy Widgets
Replace heavy social widgets with lightweight alternatives that don’t load external scripts until users interact with them. Official social media widgets from Facebook, X, and other platforms often load multiple external files and tracking scripts. Instead, use custom social sharing buttons that only make requests when clicked, or implement lazy-loading social widgets that activate only when users scroll near them.
7. Set Cache-Control and Expires Headers
Proper caching headers tell browsers how long to store your files, reducing repeat visits’ load times significantly and decreasing server load by serving cached versions instead of requesting fresh copies for every visit.
Here are the implementation methods:
Add Expires Headers via .htaccess for Apache Servers:
<IfModule mod_expires.c>
ExpiresActive On
ExpiresByType text/css "access plus 1 year"
ExpiresByType application/javascript "access plus 1 year"
ExpiresByType image/png "access plus 1 year"
ExpiresByType image/jpg "access plus 1 year"
ExpiresByType image/jpeg "access plus 1 year"
ExpiresByType image/gif "access plus 1 year"
ExpiresByType image/svg+xml "access plus 1 year"
ExpiresByType font/woff "access plus 1 year"
ExpiresByType font/woff2 "access plus 1 year"
ExpiresByType text/html "access plus 1 day"
</IfModule>
Cache-Control Headers via .htaccess:
<IfModule mod_headers.c>
<FilesMatch "\.(css|js|png|jpg|jpeg|gif|svg|woff|woff2)$">
Header set Cache-Control "max-age=31536000, public"
</FilesMatch>
</IfModule>
Plugin-based solutions offer easier implementation for users uncomfortable with server configuration. Caching plugins like WP Rocket, LiteSpeed Cache, and W3 Total Cache include options to set browser caching headers automatically.
8. Implement Prefetching, Preconnect, and Lazy Loading
These advanced techniques help browsers anticipate and optimize resource loading, creating smoother user experiences by reducing waiting times and loading content more intelligently.
DNS Prefetching
DNS prefetching allows browsers to resolve domain names in the background before users actually need the resources, eliminating DNS lookup delays when external resources are requested. This technique is particularly valuable for sites that load resources from multiple external domains like CDNs, analytics services, or advertising networks:
<link rel="dns-prefetch" href="//fonts.googleapis.com">
<link rel="dns-prefetch" href="//www.google-analytics.com">
<link rel="dns-prefetch" href="//cdn.example.com">
Preconnect for Critical External Resources
Preconnect establishes complete connections to external servers, including DNS resolution, TCP handshake, and TLS negotiation. This is ideal for resources needed immediately:
<link rel="preconnect" href="https://fonts.gstatic.com" crossorigin>
<link rel="preconnect" href="https://cdn.jsdelivr.net">
Resource Preloading Strategies
Resource preloading tells browsers to fetch specific files immediately, regardless of when they appear in HTML parsing:
<link rel="preload" href="hero-image.jpg" as="image">
<link rel="preload" href="critical-font.woff2" as="font" type="font/woff2" crossorigin>
<link rel="preload" href="critical.css" as="style">
Several WordPress plugins can automate these optimizations. WP Rocket provides comprehensive prefetching and preloading options, while Perfmatters includes DNS prefetching and preconnect configuration through an intuitive interface.
9. Disable Pingbacks, Trackbacks, and Limit Heartbeat API
Pingbacks and trackbacks are WordPress technologies that create automatic notifications when websites link to each other. When you link to another WordPress site in your content, WordPress can automatically notify that site about your link, and vice versa. While this was useful for building connections in WordPress’s early days, these features now often cause more problems than benefits.
Every pingback or trackback generates database queries, creates comment-like entries in your database, and consumes server resources to process incoming notifications. On busy sites, these can accumulate into thousands of database entries that serve no real purpose. Additionally, pingbacks and trackbacks are frequently exploited by spammers to create fake backlinks and overwhelm comment moderation systems with automated notifications.
Disabling Pingbacks and Trackbacks
The most straightforward approach is through WordPress admin settings:
- Navigate to Settings > Discussion in your WordPress dashboard
- Uncheck “Attempt to notify any blogs linked to from the article”
- Uncheck “Allow link notifications from other blogs (pingbacks and trackbacks) on new articles”
- Click Save Changes
For existing pingbacks and trackbacks, you can remove them from Comments > All Comments by filtering for “Pingback” and “Trackback” types and deleting them in bulk.
Several plugins provide user-friendly interfaces for controlling these features.
1. Dynamic Front-End Heartbeat Control plugin offers granular control over Heartbeat frequency and location settings.
2. WP Rocket includes Heartbeat optimization options in its database optimization section.
3. Perfmatters provides simple toggles for disabling pingbacks, trackbacks, and controlling Heartbeat API behavior without requiring code modifications.
Advanced Pingback Prevention via Code
For complete protection against pingback abuse, add this code to your theme’s functions.php file or use a code snippet plugin:
// Disable pingbacks completely
function disable_pingbacks( &$links ) {
foreach ( $links as $l => $link ) {
if ( 0 === strpos( $link, get_option( 'home' ) ) ) {
unset( $links[$l] );
}
}
}
add_action( 'pre_ping', 'disable_pingbacks' );

// Remove pingback header
function remove_pingback_header( $headers ) {
if ( isset( $headers['X-Pingback'] ) ) {
unset( $headers['X-Pingback'] );
}
return $headers;
}
add_filter( 'wp_headers', 'remove_pingback_header' );
Optimizing Heartbeat Frequency
Rather than completely disabling the Heartbeat API (which can break useful features), adjusting its frequency provides better balance between functionality and performance:
// Reduce heartbeat frequency to save server resources
add_filter( 'heartbeat_settings', 'optimize_heartbeat_settings' );
function optimize_heartbeat_settings( $settings ) {
    // Slow down admin area heartbeat to 60 seconds
    if ( is_admin() ) {
        $settings['interval'] = 60;
    }
    // Disable heartbeat on frontend for logged-in users
    if ( ! is_admin() ) {
        wp_deregister_script( 'heartbeat' );
    }
    return $settings;
}
10. Split Long Posts and Paginate Comments
Long content can significantly impact load times and user experience, especially on mobile devices where users face bandwidth limitations and slower processing power. Lengthy blog posts with multiple images, embedded videos, and extensive text create large page sizes that take longer to download and render.
WordPress includes built-in functionality to split long posts into multiple pages, allowing you to break content at logical points while maintaining SEO value and user engagement. To split a post into multiple pages, simply add the Page Break block where you want to create a new page:
- In the WordPress block editor, click the + button to add a new block
- Search for and select the Page Break block
- Insert it at the logical breaking point in your content
- Repeat for additional page breaks as needed
Alternatively, you can use the classic <!–nextpage–> HTML comment in the text editor:
This is the content of page 1.

<!--nextpage-->

This is the content of page 2.

<!--nextpage-->

This is the content of page 3.
Comment Pagination
Active blog posts can accumulate hundreds or thousands of comments over time, significantly increasing page size and database queries required to render the full comment section. Comment pagination reduces this load by displaying only a subset of comments initially, with links to view additional pages.
- Go to Settings > Discussion
- Check “Break comments into pages”
- Set to 20-50 comments per page
11. Protect Against Hotlinking
Hotlinking occurs when other websites display your images or files by linking directly to your server’s resources, essentially stealing your bandwidth and server resources while providing no traffic or attribution benefits to your site.
When someone hotlinks your content, their website loads images or files directly from your server while their visitors see the content on the hotlinker’s site. This creates several problems: your server bears the bandwidth cost and processing load, your hosting resources are consumed by traffic that doesn’t benefit your site, and in extreme cases, hotlinking can overwhelm your server and cause downtime for your actual visitors.
The most effective method for Apache servers involves adding specific rules to your .htaccess file that check the referring domain before serving images:
# Comprehensive hotlink protection
RewriteEngine on
RewriteCond %{HTTP_REFERER} !^$
RewriteCond %{HTTP_REFERER} !^http(s)?://(www\.)?yourdomain.com [NC]
RewriteCond %{HTTP_REFERER} !^http(s)?://(www\.)?google.com [NC]
RewriteCond %{HTTP_REFERER} !^http(s)?://(www\.)?bing.com [NC]
RewriteCond %{HTTP_REFERER} !^http(s)?://(www\.)?facebook.com [NC]
RewriteRule \.(jpg|jpeg|png|gif|bmp|webp|svg)$ - [NC,F,L]

# Alternative: Serve a replacement image instead of blocking
RewriteRule \.(jpg|jpeg|png|gif|bmp)$ /images/hotlink-blocked.png [NC,R,L]
Several plugins provide user-friendly hotlink protection without requiring server configuration file editing.
1. All In One WP Security includes hotlink protection features with easy toggle switches and customizable blocked referrer messages.
2. Wordfence Security offers hotlink protection as part of its comprehensive security suite.
Ongoing Performance Monitoring & Maintenance
WordPress speed optimization isn’t a one-time task. Regular monitoring and maintenance ensure your site stays fast as you add content, update plugins, and grow your audience.
Here is a monthly performance checklist:
Week 1: Speed Testing
- Run PageSpeed Insights tests on key pages
- Test from multiple geographic locations
- Monitor Core Web Vitals trends
- Document any performance regressions
Week 2: Plugin Audit
- Review Query Monitor for slow plugins
- Update all plugins and themes
- Remove any unused plugins
- Test new plugins on staging before live deployment
Week 3: Database Maintenance
- Run database optimization with WP-Optimize
- Clean up spam comments and revisions
- Check for database bloat and unnecessary data
- Verify backup systems are working
Week 4: Image and Content Optimization
- Optimize the new images added during the month
- Check for oversized images in recent posts
- Review and optimize any new external scripts
- Update CDN settings if needed
Quarterly Deep Optimization
Every three months, perform a comprehensive performance review:
- Full site audit using multiple speed testing tools
- Security and backup verification
- PHP version and hosting plan review
- CDN performance analysis
- Database deep cleaning and optimization
- Theme and plugin compatibility testing
Performance Monitoring Tools
Free monitoring options:
- Google Search Console: Core Web Vitals monitoring
- UptimeRobot: Free uptime monitoring
- GTmetrix: Monthly performance reports
Premium monitoring options:
- New Relic: Application performance monitoring
- Pingdom: Advanced uptime and speed monitoring
- Google Analytics: Site speed reporting
Boost Your Site’s Speed with WPZOOM Themes
Explore WPZOOM’s collection of speed-optimized WordPress themes designed for performance and user experience. Our themes follow all the optimization best practices covered in this guide, giving you a head start on creating a lightning-fast website.
Your faster WordPress site starts today. Pick one optimization from this guide and implement it right now—you’ll be amazed at the immediate improvement in your site’s performance.


May 17, 2020 4:34 pm
i followed and did everything step by step and my speed is still trash
how do you fix this?
June 10, 2020 11:49 pm
Steve, what hosting are you on? Try with a VPS or Dedicated Server. :)
July 2, 2020 7:58 am
I am using LiteSpeed Webserver With LsCache wp plugin in my website.This plugin just amaging.It increase my site speed.I will definitely suggest everyone try this plugin for at least one time.
December 3, 2020 12:51 am
I tried a free versió of NitroPack Plugin and while it works, my website scores above 90/100 unfortunately the proversion is too expensive for me.
March 3, 2021 8:17 pm
Lscache caching plugin best for wp caching solution.